8
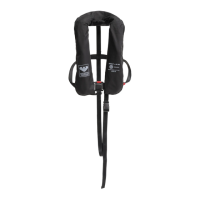
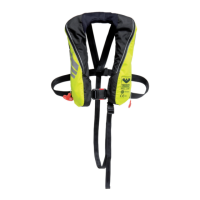
1. DESCRIPTION
VIKING YouSafe
TM
One is an automatically inflatable
lifejacket of high quality. The lifejacket is available in
a 180N (PV9342 A) and a 275N (PV9242 B) version, and
has been tested and approved according to EU Council
Directive (MED) 2014/90/EU on Marine Equipment.
VIKING YouSafe
TM
One has a buoyancy chamber with two
separate compartments, which fully inflated provides a
buoyancy of 180 or 275 Newton (see front cover for type).
The lifejacket is intended for persons weighing from 43
kg – 100+ kg, and with 60-175 chest measure.
2. TRAINING BEFORE USE
Make yourself familiar with the functioning of the
lifejacket and test it in a swimming pool or in
other safe conditions before starting to use it. Wear your
normal clothes during training.
3. INSTRUCTIONS FOR USE
1. Put on the lifejacket as a jacket
2. Close the front buckle
3. Adjust the waist strap
4. Fasten the crutch strap buckle and adjust the
crutch strap.
5. The lifejacket is automatically inflated when
immersed into water, but can also be manually
inflated by a strong pull of the release line.
6. Inflated lifejacket. The light is automatically
activated.
Inflation of VIKING PV9342 may be effected in three ways:
a: Automatic inflation:
The buoyancy chamber inflates within approx. 5
seconds after immersion into the water.
b: Manual inflation:
The lifejacket inflates on a strong pull of the
release line at the right side of the lifejacket.
In case this chamber does not work, the second
chamber may be activated by a strong pull of the
release line placed at the left side of the
lifejacket.
c: Oral inflation:
Open the protective cover and blow air into one
of the oral inflation tubes.
WARNING: Although it has been tested to stand excess
pressure, do not ever inflate the lifejacket by mouth
prior to automatic or manual inflation.
4. MAINTENANCE
Maintenance of your lifejacket is essential to your safety
in case of an accident. The lifejacket must be handed in
for annual service at an authorized servicing station. Find
your nearest servicing station on www.viking-life.com.
The lifejacket is equipped with a Halkey Roberts inflator.
The bobbin must be replaced every year after you have
started using the lifejacket. Do not use bobbins that are
more than four years old. The production date is printed
on the bobbin.
4.1 CHECKING THE LIFEJACKET BEFORE USE
1. Check that the lifejacket is undamaged.
You may inflate the lifejacket by mouth. Then
repack it as described in Packing (4.3).
(Note: Avoid activating the inflators).
2. Open the protective cover and check the
inflators (see sketch):
a: The indicator must be green and the lock
pin must be mounted on the inflator.
b: The 180 N lifejacket is to be equipped
with 38 g CO
2
-cylinders and the 275 N
lifejacket is to be equipped with 60 g
CO
2
-cylinders.
c: The opening of the CO
2
-cylinders must not
be pierced - check by unscrewing the
CO
2
-cylinders.
3. Check the oral inflation valve and tube.
4. Check the light and whistle.
5. Check straps and buckles.
6. Close the protective cover.
IMPORTANT: If the lifejacket is not intact, do not use it.
Ensure that the release line is free-hanging and visible
outside the protective cover.
4.2 CLEANING
Clean the lifejacket in mild soapy water only.
4.3 PACKING
1. Place the lifejacket on a table or similar.
2. Fold up the bottom section on the left side of
the buoyancy chamber.
3. Fold the inner section on the left hand side
towards the middle
4. Fold the outer section on the left hand side
towards the middle.. The release unit must be
visible.
5. Zip the cover – starting at the left side –
remember to pull the release line through the
hole in the cover. Zip up past the marking on the
cover. Close the hook/loop closure.
5.1 IMPORTANT: The release handle must be located
as in packing photo. Release line and handle
must hang out from the bottom edge of the
velcro.
6. Left corner is folded so that the welding is on
top. The cover is zipped up to the middle of the
neck.
7. Right corner of the neck is folded so that the
welding is on top. The cover is zipped a bit more
to cover the corner. Mount lifting strap.
8. Fold up the bottom section on the right side of
the buoyancy chamber. The release unit must be
visible.
9. Fold the inner section on the right hand side
towards the middle.
VIKING YouSafe
TM
OneEN
 Loading...