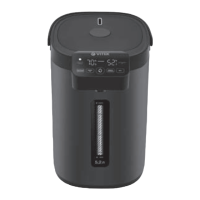
The VITEK VT-1191 Thermopot is an electric appliance designed for boiling water and maintaining the desired water temperature.
Important Technical Specifications:
- Power Supply: 220-240 V ~ 50 Hz
- Rated Power: 1600 W
- Maximum Water Volume: 5.2 L
Device Description:
The thermopot features a control panel with a digital display (5). Key components include:
- Minimum water level mark «MIN»
- Water level scale
- Maximum water level mark «MAX»
- Water spout
- Control panel and digital display
- Lid opening button
- Steam outlet openings
- Removable upper lid
- Lid lock
- Carrying handle
- Body
- Power cord connector
- Sealing gasket
- Power cord
Control Panel and Digital Display Indicators:
- «Select T°C / Timer» indicator
- «100 °C» («Boiling») indicator
- Water temperature maintenance mode indicator «))) T°C» («Maintain T°C»)
- «Current T°C» indicator
- Light sensor
- «REPEAT» («Re-boil») button
- Temperature selection button «Select T°C»
- Water dispense button «»
- Control panel unlock button «» («Unlock»)
- «ECO» power-saving function activation button
- «ECO» power-saving function indicator
Usage Features:
Before First Use:
After transportation or storage at low temperatures, allow the device to stand at room temperature for at least three hours. Traces of water inside the thermopot are normal, as the device undergoes quality control.
- Unpack the thermopot, remove any promotional stickers.
- Check the device for integrity; do not use if damaged.
- Ensure the operating voltage matches the mains voltage.
- Place the thermopot on a dry, flat surface, ensuring at least 20 cm clearance from walls/furniture and 50 cm above.
- Open the lid (8) by pressing button (6) and lifting it (Fig. 2, 3).
- Fill the thermopot with water using a suitable container, not exceeding the «MAX» (3) mark.
- Insert the power cord plug (14) into the connector (12) on the thermopot body, and plug the power cord (14) into a wall socket. The display (5) will turn on and then off. The screen will show «----», and button (23) will flash, indicating standby mode.
- Press button (23) to unlock the control panel (Fig. 4). By default, the thermopot will turn on in 40°C temperature maintenance mode (indicator (15) will show 40). The display (18) will show the current water temperature. If the current temperature is below 40°C, the thermopot will automatically start heating, and the «100°C» indicator (16) will light up. Once 40°C is reached, the thermopot will switch to heat preservation mode, and indicator (16) will turn off, while indicator (17) will light up.
Notes:
- Each button press is accompanied by a sound signal.
- The mode buttons on the control panel (5) are touch-sensitive; simply touch to activate the desired mode.
- To drain water, unlock the control panel (5) by pressing button (23) (Fig. 4), place a container under the spout (4), and press the «» button (22) (Fig. 6), holding it until the desired water level is reached.
- If no action is taken within 15 seconds after unlocking, the lock will automatically re-engage, and the lock indicator (20) will light up again.
- Caution! Be careful when draining hot water to avoid burns.
- To turn off the thermopot, unplug the power cord (14) from the socket.
- Open the lid (8) and wait for it to cool completely.
- Carefully tilt the thermopot to drain any remaining water.
- Replace the lid (8). Before use, ensure the lid (8) is securely fixed and button (6) is pressed.
- The thermopot is ready for use.
Using the Thermopot:
- Open the lid (8) by pressing button (6) and lifting it (Fig. 2, 3).
- Fill with water using a suitable container, not exceeding the «MAX» (3) mark. Do not overfill, as hot water may splash out when boiling.
- Insert the power cord plug (14) into the connector (12) on the thermopot body, and plug the power cord (14) into the mains. A sound signal will sound, and all display indicators will light up for a few seconds.
Temperature Selection:
To change the desired hot water maintenance temperature, repeatedly press the water temperature selection button (21) «Select T°C» (Fig. 5). The maintenance temperature can be varied in the range «CO/40/45/50/55/60/65/70/75/80/85/90/95/100°C», where «CO» is the self-cooling mode.
- The set maintenance temperature is shown on the display indicator (15).
- Depending on the current water temperature (indicator (18)), the thermopot will automatically heat the water to the set temperature (indicator (15)).
- Note: If the selected temperature is lower than the current temperature, the water will first cool to the set temperature, then maintain it. If the water temperature drops below the set temperature by more than 5 degrees, the thermopot will switch to heating mode.
Water Dispense and Dosing Function:
5-Second Water Dispense:
- First, press button (23) (Fig. 7). The five function buttons on the control panel (5) will light up, indicating the control panel is unlocked.
- Then, press button (22) (Fig. 6). The thermopot will continuously dispense water for 5 seconds. The «Timer» indicator (15) on the display will show a countdown in seconds (water output 200-250 ml). To stop dispensing, press the «» button again.
Continuous Water Dispense:
- First, press button (23). When the five function buttons light up, the control panel is unlocked.
- Then, press and hold the «» button (22) to start dispensing water (Fig. 6).
The «Timer» indicator (15) on the display will show a direct countdown in seconds. Water dispense will stop when you release button (22).
Boiling and Re-boiling:
Press button (23) to unlock the control panel (5) (Fig. 4).
- Press button (20) «REPEAT» to start the water boiling process. The «100°C» indicator (16) will start flashing on the display.
- Notes:
- The thermopot uses a long boiling technology to significantly reduce chlorine levels in water.
- Do not open the upper lid during boiling.
- Do not block the steam outlet opening (7).
- After boiling, 5 beeps will sound, and the thermopot will switch to temperature maintenance mode. Indicator (16) will turn off, and indicator (17) will light up.
- If the water temperature drops significantly (e.g., by adding cold water), boiling mode will reactivate. After boiling, the temperature will be maintained according to the set value (15).
- You can also initiate re-boiling by pressing button (20) «REPEAT».
- To disconnect, unplug the power cord (14).
- Open the lid (8) and wait for it to cool completely. Remove the lid (see "Before First Use"), drain water, replace the lid, and store the thermopot.
- Caution! Be careful when pouring water to avoid burns.
ECO Power-Saving Function:
With the light sensor (19): in unlocked state, after pressing the «ECO» button (24) (Fig. 8), the «ECO» indicator (25) will light up on the right side of the display. When the light sensor detects darkness (night) or low ambient light, the «power saving» indicator will blink, and the thermopot will automatically enter 40°C temperature saving mode for energy efficiency. Once ambient light is sufficient, power-saving mode will automatically deactivate, and the thermopot will return to the set temperature mode.
Automatic Switch-off Function:
If the thermopot is not used for 48 hours (no button pressed on the control panel), it will automatically switch off and enter standby mode.
Overheat Protection:
If the thermopot is accidentally turned on without water, automatic overheat protection will activate, displaying error code «E3», and the control panel will lock. In this case, unplug the power cord, fill the thermopot with water, and plug it back in; the thermopot will operate normally.
Error Codes on the Display and Their Meaning:
The thermopot may display errors due to incorrect use, malfunction, or system failure. The table below provides error codes, their brief decoding, and recommended solutions.
| Error Code |
Possible Cause |
Action Required |
| E1 |
Open circuit in overheat protection |
Contact authorized service center for diagnostics and repair |
| E2 |
Short circuit in overheat protection |
Contact authorized service center for diagnostics and repair |
| E3 |
Overheat protection system tripped |
See section «Overheat protection» |
Maintenance Features:
Cleaning and Care:
- Before cleaning, disconnect the thermopot from the mains, pour out water, and let it cool completely.
- Open the lid (8) and carefully tilt the thermopot to drain remaining water, then close the lid (8).
- Clean the outer surface with a slightly damp cloth, then wipe dry.
- Use neutral detergents for cleaning; do not use metal brushes, abrasive detergents, or solvents.
- Do not immerse the thermopot or the power cord in water or other liquids.
- Do not wash the thermopot in a dishwasher.
Stains on the Inner Surface of the Thermopot:
The inner surface of the metal flask may change color due to various water impurities.
- Stains can be removed with citric acid or vinegar.
- To remove the taste of citric acid or vinegar, boil water and pour it out.
- Repeat this procedure until the smell and taste completely disappear.
Descaling:
Scale forming on the inner surface of the metal flask leads to overheating and malfunction of the heating element. Heating element burnout due to scale in the thermopot is not a warranty case.
- To remove scale, fill the thermopot with a 2:1 mixture of vinegar and water up to the «MAX» (3) level.
- Insert the power cord plug (14) into the connector (12) on the thermopot body, and plug the power cord (14) into the mains.
- The thermopot will switch to boiling mode. After boiling, unplug the power cord (14) from the socket and leave the thermopot with the vinegar solution overnight.
- In the morning, pour out the vinegar solution, fill the thermopot with water up to the maximum level, boil, and pour out the water.
- Special descaling agents for electric kettles can be used, strictly following the instructions.
- Repeat the cleaning procedure several times if necessary.
Storage:
- Before long-term storage, disconnect the thermopot from the mains, let it cool, and drain the water.
- Clean the thermopot.
- Store the thermopot out of reach of children and persons with disabilities.
Kit Contents:
- Thermopot – 1 pc.
- Power cord – 1 pc.
- Instruction manual – 1 pc.
- Warranty card – 1 pc.