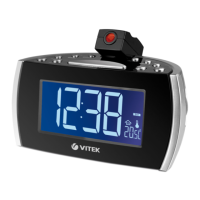
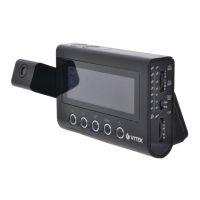
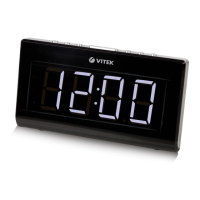
1. Function selector (On/Off/Auto)
2. LCD
. AUTO indicator
4. Snooze/Sleep button
5. Setting/turning off the alarm
6. Setting the time
7. Setting the off time
8. Hours/minutes indicators
9. Hours setting button
10. Minutes setting button
11. Volume level/signal control
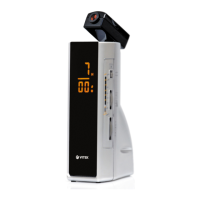
12. Radio band selector
1. Tuning control
14. Backup battery
15. FM band antenna
16. Power cable
17. Pointer
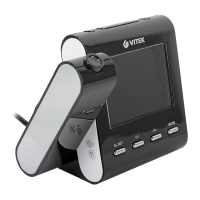
18. Projector On / off
19. Projector
20. Time set button for projector
21. Hours setting button for projector
22. Minutes setting button for projector
2. Focus adjustment for projector
Before connecting to electrical power,
make sure that the voltage and currency
of the electrical supply match those indi-
cated on the underside of the device.
If the device will not be used for a long
period of time, unplug it from the elec-
trical outlet. In order to avoid electrical
shock, do not remove the device hous-
ing. There are no user-serviceable parts
inside. In order to avoid electrical shock,
do not leave the device in the rain or in
high-moisture conditions (fog, damp
rooms, etc).
1. Set the ON/OFF/AUTO (1) switch to
‘OFF’ and connect the power cable to
the electrical outlet.
The time will blink on the display,
verifying that the power has been con-
nected and that the time has not been
set.
2. To set the current time, press and
hold the TIME SET (6) button and then
press the MINUTE SET(10) button or
HOUR SET (9) button, holding them
down until the correct time is shown
on the display.
. Open the battery compartment and
insert a 9 V battery. The battery is nec-
essary in order to save alarm settings
and for the clock to continue working
if electrical power is disconnected.
Close the compartment lid. The time
will continue to be kept although it will
not be displayed on the LCD.
The time on the LCD and the time on the
projector are set separately.
- Turn on the projector – move the
switch to the ‘ON’ position.
- To set the hour, press the HOUR (21)
and TIME (20) buttons together; when
the desired hour appears, release the
buttons.
- To set the minutes, press the MINUTE
(22) and TIME (20) buttons together;
when the desired minutes appear, re-
lease the buttons.
- Focus settings: To adjust the sharp-
ness of the projected time, turn the
4
 Loading...