4
•
During operation and breaks between opera-
tion cycles, the unit should be placed out of
reach of children.
•
For children safety reasons do not leave poly-
ethylene bags, used as packaging, unattended.
Attention! Do not allow children to play with poly-
ethylene bags or packaging film. Danger of suf-
focation!
•
Periodically check the power cord and power
plug integrity.
•
If the power cord is damaged, it should be
replaced by the manufacturer, a maintenance
service or similar qualified personnel to avoid
danger.
•
Do not attempt to repair the unit. Do not disas-
semble the unit, if any malfunction is detected
or after it was dropped, unplug the unit and
apply to any authorized service center from
the contact address list given in the warranty
certificate and on the website www.vitek.ru.
•
Transport the unit in the original packaging
only.
•
Keep the unit out of reach of children and dis-
abled persons.
THIS UNIT IS INTENDED FOR HOUSEHOLD USE
ONLY. ITS COMMERCIAL USAGE AND USAGE IN
PRODUCTION AREAS AND WORK SPACES IS
PROHIBITED.
BEFORE THE FIRST USE
After the unit transportation or storage at low
temperature keep it for at least three hours at
room temperature before switching on.
– Before switching the unit on for the first time,
make sure that the mains voltage corresponds
to the voltage specified on the unit body.
– The unit is intended for operation from an AC
power network with the frequency of 50 Hz.
The unit does not need any additional set-
tings for operating with the required rated fre-
quency.
– Unpack the press grill and remove all package
materials, wipe the grill body with a slightly
damp cloth and then wipe it dry.
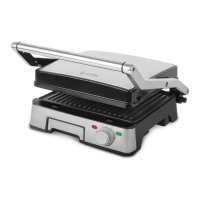
– Take the handle (5) and open the grill.
– Move the lock (2) to the right to the full extent
and remove the lower heating plate (3).
– Move the lock (7) to left to the full extent and
remove the upper heating plate (4).
– Wash the frying plates (3 and 4) with warm
water and neutral detergent and dry them
thoroughly.
– Install the frying plates back to theirs places;
to do this, match the ledges on the frying
plates (3 and 4) with the rear locks and press
alternately on the front part of the frying plates
(3 and 4) until the locks (2 and 7) click.
– Before using the grill apply some vegetable oil
on the non-stick coating of the frying plates (3
and 4), spread the oil over the whole surface
and wipe the surplus oil with a paper napkin.
– Close the grill, insert the power plug into the
socket, the power indicator (10) will light up.
– Set the temperature control knob (9) to the
maximal heating position «MAX».
– After 5-10 minutes switch the unit off by set-
ting the temperature control knob (9) to the
position «MIN» and unplug the unit.
– Wait until the frying plates (3 and 4) cool down
completely and remove the remaining vegeta-
ble oil with a paper napkin.
Note: While the first grill operation the heating
elements scorch, therefore occurrence of a small
amount of smoke or foreign smell is possible. It is
normal and is not a sign of malfunction.
FOOD COOKING WITH THE GRILL
– Place the grill on a flat, stable surface away
from sources of moisture, heat and open flame
and with free access to the mains socket.
– Place the grill keeping at least a 20 cm gap
between the grill base and the wall and 30 cm
of space above the grill.
– Do not place and do not use the grill near
highly inflammable materials or liquids and
objects subject to thermal deformation.
– Use the unit in places with proper ventilation.
•
Make sure that the frying plates (3 and 4) are
installed and fixed.
Attention! Do not switch the grill on without the
frying plates (3 and 4) installed.
•
Take the handle (5) and open the grill.
•
Oil the non-stick coating of frying plates (3 and
4) slightly and close the grill.
•
Make sure that the fat collector (1) is installed
to its place.
•
Set the temperature control knob (9) to the
«OFF» position.
•
Insert the power plug into the socket, the
power indicator (10) and the frying plates
heating indicator (8) will light up.
•
Use the temperature control knob (9) to set
the required heating temperature of the frying
plates (3 and 4). The frying plates heating indi-
cator (8) will go out.
 Loading...