5
•
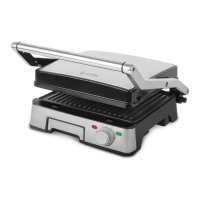
When the frying plates (3, 4) reach the set
temperature, the indicator (8) will light up and
you can start cooking.
•
Take the handle (5) and open the grill.
•
Carefully put the food on the lower frying
plate (3). Avoid getting scalded by eventual
splashes of liquids or fat.
•
You can use the unit as a griddle plate. To do
this take the upper frying plate (4) by the han-
dle (5) and lower on the foodstuffs.
ATTENTION! During the operation the frying
plates and the grill body heat up strongly; do not
touch hot surfaces to avoid burns. Do not touch
the unit body with bare hands.
•
After the food is ready, lift the upper frying
plate (4) by the handle (5) to the full extent.
•
Put the prepared food into an appropriate dish;
use wooden or heat-resistant plastic kitchen
tools to remove the foodstuffs.
•
When using the grill further on, lower the upper
frying plate (4) on the lower one (3), wait until
the plates reach the set temperature and the
indicator (8) lights up and continue cooking.
Using the grill as a cooking unit
– Take the handle (5) and lift the upper frying
plate (4) to the full extent.
– Make sure that the fat collector (1) is installed
to its place.
– Set the temperature control knob (9) to the
«OFF» position.
– Insert the power plug into the socket, the
power indicator (10) and the frying plates
heating indicator (8) will light up.
– Set the required temperature with the control
knob (9), the frying plates heating indicator (8)
will go out, wait until the frying plates (3 and 4)
heat up; when the indicator (8) lights up, you
can start cooking.
– Cook the products on the lower frying
plate (3).
Using the grill as an open cooking unit
ATTENTION! Open the grill before plugging it in.
– Take the handle (5) and lift the upper frying
plate (4) to the full extent.
– Holding the upper frying plate (4) by the han-
dle (5), press the detent (6) button (pic. 1) and
fully open the grill (pic. 2).
– Make sure that the fat collector (1) is installed
to its place.
– Set the temperature control knob (9) to the
«OFF» position.
– Insert the power plug into the socket, the
power indicator (10) and the frying plates
heating indicator (8) will light up.
– Set the required temperature with the control
knob (9), the frying plates heating indicator (8)
will go out, wait until the frying plates (3 and 4)
heat up; when the indicator (8) lights up, you
can start cooking.
– Cook the products on two frying plates
(3 and 4).
– After you finish cooking, set the temperature
control knob (9) to the position «MIN» and
unplug the unit.
– Before cleaning the unit wait until it cools down
completely.
ATTENTION!
•
Do not switch the grill on without the remov-
able frying plates (3 and 4) installed.
•
Always install the fat collector (1) during
cooking.
•
While the frying plates (3 and 4) are heat-
ing up, do not open the grill, the frying plates
(3 and 4) heat up quicker and more evenly in
closed position.
•
Be careful: - the grill body heats up strongly
during the operation. To avoid burns do not
touch hot surfaces, open the grill only by the
handle (5).
•
Be careful and beware of hot steam emission
from gaps between the frying plates (3 and 4).
Keep your hands and other open parts of your
body away from the frying plates (3 and 4).
•
Do not use the grill for defrosting and cooking
frozen food.
•
Do not cook meat with large bones.
•
Frying time depends on the products used.
•
Before eating make sure that the food is
cooked through.
•
Take the products out of the grill right
after cooking; keeping products in the oper-
ating grill for a long time can cause their
burning.
•
Never use sharp metal objects to take the
cooked food out, as they can damage the non-
stick coating of the frying plates (3 and 4).
Always use plastic or wooden kitchen tools
suitable for non-stick coatings.
CLEANING AND MAINTENANCE
– Clean the grill after every use.
– After you finish using the grill, set the tempera-
ture control knob (9) to the position «MIN» and
unplug the unit.
 Loading...