tallation Instructions
can securely install (mount) the keypad with the provided screws.
To mount with the provided screws
:
1. Slide the battery cover / mounting plate down and remove it.
2. Place the mounting plate in the desired location.
3.
Secure the mounting plate with the 2 screws, using the slotted hole to adjust the plate
up or down to ensure a precise level.
4. Reattach the keypad by placing it directly on the mounting plate, and sliding it down
until it locks into place.
System — Network Inclusion
Add the keypad device to the Vivint system using one of the following methods
below.
• Vivint app (SmartStart Inclusion): Scan the SmartStart QR code on the box with your
smartphone, and then follow the prompts in the app. (Note: The QR code can also be found
inside the battery cover under the batteries.)
SmartStart enabled products can be added into a
Z-Wave network by scanning the Z-Wave QR code present on the product with a controller
providing SmartStart inclusion. No further action is required and the SmartStart product will
be added automatically within 10 minutes of being switched on in the network vicinity.
• Vivint panel/hub via Z-Wave (Classic Inclusion): Use this standard method for adding Z-Wave
devices at the panel or hub. Use the "PAIR/RESET" button next to the battery tray. Follow the
onscreen prompts to add the keypad.
Removing the Keypad from the System — Network Exclusion
To remove
the keypad device from the Vivint system, follow the procedure below.
• Vivint panel/hub via Z-Wave: Use this standard method for excluding Z-Wave devices at the panel or hub. Use the "PAIR/RESET"
button next to the battery tray. Follow the onscreen prompts to remove the keypad.
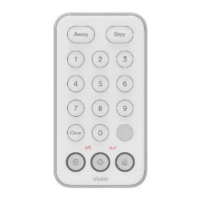
Vivint Keypad is a wireless Z-Wave™ control device that provides remote access to the security
features for a Vivint Smart Home
™ system, including enabling and disabling both the Arm Away and Arm
The keypad can also be used to transmit a signal to Vivint Monitoring for
fire, panic, and emergency
conditions such as a home intrusion.
-to-use interface with identified and illuminated buttons, as well as indicator icons
that show when the device is offline, or battery power is low. It also
displays security system status with a
indicator light.
This document includes a product description,
illustrations, installation instructions, basic system
/ user functionality, as well as technical specifications, standards listings, and regulatory
references. Note: For supplementary use only.
NOTE: The Vivint Keypad is for supplementary use only, and is not intended to be used as the primary
user interface. To access installation instructions, refer to
the Vivint Support site: support.vivint.com.)
Keypad
S-KPAD01-001)
Quick Reference (User Manual – Installation & Operation)
PRINT INSTRUCTIONS:
REFERENCE SHEET VS-KPAD01-001 P/N 77-600046-001 REV 1.0 |
INK: BLACK | MATERIAL: 20 LB MEAD BOND | SIZE: 8.50" X 11.00" SCALE 1:1 |
FOLDS: BI-FOLD VERTICAL, BI-FOLD HORIZONTAL (TO FIT IN BOX)
battery cover / mounting plate off) —
4931 N 300 W Provo, UT 84604
Basic Operation / User Functionality
Once the keypad is up and running, the user can perform the following functions. For more details,
refer to online Help at the
Vivint Support site: support.vivint.com.
—
Arm to STAY mode (press & hold the button for at least 5 seconds or until the system is armed)
Arm to AWAY mode (press & hold the button for at least 5 seconds or until the system is armed)
Disarm the system (enter a valid user's 4-digit PIN code)
NOTE: The keypad will beep 3 times when arming (Stay or Away), and 2 times when disarming.
Additionally, the keypad will beep every 3 seconds (speeding up for the final 10 seconds) during
the Exit Delay countdown.
Send an emergency signal to Vivint Monitoring (press & hold the PANIC, FIRE, or EMERGENCY
button for 2 seconds)
Verify system status by viewing the LED downcast light (see colors below). By default the keypad
wakes-on-motion via its proximity sensor – this setting can be disabled, requiring a button press
to wake – whereupon the downcast light, and any buttons applicable to the current security
status, will illuminate for 5 seconds.
Green: System disarmed (ready to arm)
Orange: System armed
Red: Alarm in progress