Do you have a question about the Vivo DESK-V100EBY and is the answer not in the manual?
Details on customer support hours and availability, Monday-Friday.
Procedure for reporting missing or defective parts within 30 days of delivery.
Covers choking hazard, electrical safety, and weight capacity limits for safe operation.
Details on product warranty, return policy, and contact information for issues.
List of tools needed for assembly, including Phillips screwdriver and Allen wrench.
Inventory of all included parts for the desk frame assembly.
Attaching the crossbar to the desk legs using M8x50mm screws.
Securing the feet to the desk legs using M6x35mm screws.
Mounting the side brackets onto the legs with M8x16mm screws.
Adjusting the crossbar to set the desired width for the desktop.
Securing the assembled desk frame to the desktop using ST4.2x15mm screws.
Connecting the sync rod between the legs for synchronized movement.
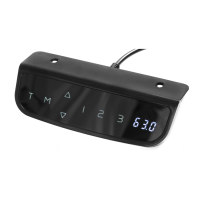
Mounting the main controller unit to the desktop.
Connecting the motorized leg cable and power cord to the controller.
Using cable clips and hooks to organize and attach wires to the desktop.
Plugging in the power cord and performing the initial desk reset process.
Overview of the controller's display panel, memory settings, and arrow buttons.
Instructions for raising and lowering the desk using the controller's up and down arrows.
How to store and retrieve preferred desk heights using the memory function.
Procedure to switch the height display between Centimeters (cm) and Inches (in).
Steps to reset the desk and resolve error messages like ER1.
Adjusting the sensitivity levels for the collision avoidance feature.
Configuring the minimum and maximum adjustable height limits for the desk.
Solutions for common desk problems, including overheating and error codes.
Contact information and support hours for getting help with the product.
This document outlines the assembly and operation of the VIVO Black Electric Single Motor Desk Frame, SKU: DESK-V100EBY. This desk frame is designed to provide an ergonomic workspace, allowing users to easily adjust the desk height for sitting or standing positions. The manual emphasizes safety precautions, assembly steps, and controller functions to ensure proper and safe usage.
The VIVO Black Electric Single Motor Desk Frame is a height-adjustable desk base that supports a desktop (not included) to create a dynamic workstation. Its primary function is to allow users to seamlessly transition between sitting and standing throughout their workday, promoting better posture, reducing sedentary behavior, and potentially improving overall well-being. The desk frame utilizes a single motor system to power the height adjustment, controlled by an intuitive display panel.
The core components of the desk frame include two legs (one motorized, one non-motorized), two feet for stability, a crossbar to connect the legs and provide width adjustment, and side brackets for attaching the desktop. A sync rod ensures synchronized movement of both legs during height adjustments. The system is powered by electricity and includes a controller for user interaction and a power cord for connection to an outlet.
The desk frame is designed for indoor use and is not intended for outdoor environments or contact with liquids. It has a specified weight capacity that must not be exceeded to prevent damage or injury. The electrical components are integrated for safe operation, provided the assembly instructions are followed carefully and no unauthorized alterations are made.
The VIVO Black Electric Single Motor Desk Frame offers several user-friendly features for convenient and personalized operation:
The VIVO Black Electric Single Motor Desk Frame is designed for straightforward maintenance, primarily focusing on safe operation and troubleshooting:
Overall, the VIVO Black Electric Single Motor Desk Frame is a robust and user-friendly solution for creating an adjustable ergonomic workspace, with clear instructions for assembly, operation, and basic maintenance to ensure a safe and satisfying user experience.
| Model | DESK-V100EBY |
|---|---|
| Category | Controller |
| Manufacturer | Vivo |
| Material | Steel |
| Color | Black |
| Type | Desk Controller |