Do you have a question about the VKAR Bison and is the answer not in the manual?
Thank you for purchasing VKAR product. This manual contains instructions on operating and maintaining the Bison.
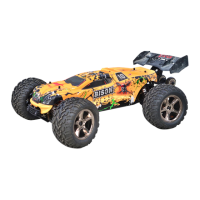
Highlights of the RC car, including LED lights, wheelie bar, bearings, adjustable wing, sealed differentials, all-terrain tires, and oil-filled shocks.
Details on the scale, drive system, and included components like the transmitter, power battery, and charger.
Product is not a toy; children under 14 need adult supervision for operation and maintenance.
Ensure batteries are charged and operate in a spacious, safe venue, avoiding highways and water bodies.
Handle battery correctly, follow transmitter/car power sequence, remove battery when idle, check wires, and mind heat.
Remove battery before charging, cool down before charging, and store batteries in a cool, dry place.
Procedure to replace used batteries with new AA size batteries when the power indicator blinks or buzzer beeps.
Explanation of the transmitter's controls, including throttle trigger, steering wheel, and trim adjustments.
Warning that the pin header on the receiver must not be connected directly to the power source.
Details on operating the throttle trigger for acceleration/braking and the steering wheel for directional control.
Correct sequence for powering on and off the transmitter and receiver to avoid signal loss.
Step-by-step guide to successfully bind the transmitter and receiver for reliable communication.
Wiring diagrams illustrating how to connect the ESC, receiver, and servos in the electric model.
Guide for connecting the ESC, motor, receiver, and battery, and programming the ESC.
Step-by-step procedure to calibrate the ESC's throttle range for optimal forward, neutral, and brake response.
Understanding the meaning of LED light patterns on the ESC during normal operation and different states.
Interpretation of audible alert tones emitted by the ESC for input voltage or throttle signal anomalies.
Details on safety features including low voltage cut-off, over-heat protection, and throttle signal loss protection.
Instructions for wing assembly, charging the battery, and loading the battery into the RC car.
How to adjust the steering trim on the transmitter for straight front wheel alignment.
How to adjust the steering D/R on the transmitter to control the steering angle.
Guide on how to adjust the slipper clutch to prevent gear damage during racing.
Detailed steps for filling shock bodies with silicone fluid and assembling shocks.
Important notes regarding the correct hole selection when installing suspension arms.
This document serves as an instruction manual for the VKAR 1:10 Scale Electric 4WD Off-Road Race Truggy, named "Bison." It provides comprehensive guidance on operating, maintaining, and understanding the various components of this remote-controlled vehicle. The manual emphasizes the importance of reading through the instructions carefully to ensure proper use and to prevent damage or injury.
The Bison is a powerful 1:10 scale electric 4WD off-road race truggy designed for enthusiasts seeking an enjoyable and high-performance RC experience. Its 4-wheel drive system ensures excellent traction and control across various terrains, making it suitable for off-road racing and recreational driving. The truggy is equipped with an electronic speed control (ESC) that manages the motor's power output, allowing for precise throttle control. The included transmitter (controller) provides intuitive command over the truggy's steering and throttle, enabling users to navigate and maneuver the vehicle effectively. The model is fully assembled and "Ready-To-Run" (RTR), meaning it comes pre-built and largely prepared for immediate use after basic setup.
The Bison boasts a range of features designed to enhance its performance and user experience:
The manual provides detailed instructions for installing the batteries in the transmitter, noting that AAA batteries are required. It also outlines the functions of the transmitter's various controls, including throttle trim, throttle dual-rate (D/R), steering trim, steering D/R, and the throttle trigger. The binding process for connecting the transmitter and receiver is clearly explained, ensuring a secure communication link between the controller and the truggy.
For electronic setup, the manual details how to connect the ESC, motor, receiver, battery, and servo. It emphasizes the importance of calibrating the throttle range to ensure proper functionality of the ESC with the transmitter. This calibration involves setting the neutral point, end point of forward direction, and end point of backward direction. The LED status indicators on the ESC are also explained, providing visual feedback on the truggy's operational state (e.g., neutral, forward, braking, reversing).
Safety warnings are prominently featured, advising users that the product is not a toy and that children under 14 should be supervised. It stresses the importance of checking battery charge levels, operating in spacious venues, and following the correct power-on/off sequence (transmitter first, then car; car off first, then transmitter). Users are also warned about the high heat generated by the ESC and motor during operation, advising against physical contact until the components have cooled.
The manual includes several instructions and tips related to maintenance and care:
Overall, the manual provides essential information for both novice and experienced RC enthusiasts to safely and effectively operate and maintain their VKAR Bison truggy.
| Drive | 4WD |
|---|---|
| Batteries Required | Yes |
| Remote Control Included | Yes |
| Recommended Age Range | 14 years and up |
| Manufacturer Recommended Age | 14 years and up |
| Manufacturer | VKAR |
| Vehicle Type | Truck |