2 Assembly and Operations Manual EXTRA - 330L SEMI SCALE SPORT MODEL
INDEX
Stage No. Page No.
Liability Disclaimer and Caution 2
Introduction 3
Review Packing List, gather your tools & shop materials 4
Installing the wing 1 5
Fitting aileron servo 2-3 6-7
Installing the horizontal & vertical stabilizer 4-11 7-10
Installing the main landing gear 12 10
Installing the tail wheel 13 11
Installing the fuel tank 14 11
Installing the engine 15 11-12
Fitting rudder and elelvator control horns 16 12
Installing the servos 17 13
Connecting the pushrods 18-20 13-14
Connecting the throttle control 21 14
Adjust control surface throw limits 22 14
Final RC setup 23-24 14
Installing radio equipment 25-27 15
Balancing the aircraft 28 15
Confirm mechanical integrity 29 15
CG and throw specifications 29 16
Model airplanes, model engines, model engine fuel,
propellers and products such as the EXTRA-330L semi
scale sport model can be hazardous if improperly used.
Be cautious and follow all safety recommendations when
using your Model . Keep hands, tools, clothing and all
foreign objects well clear of engines when they are
operating. Take particular care to safeguard and protect
your eyes and fingers and the eyes and fingers of other
persons who may be nearby. Use only a good quality
propeller that has no cracks or flaws . Stay clear of the
propeller and stay clear of the plane of rotation defined by
the propeller.
The Manufacturer, Distributor, Retailer and/or other
suppliers of this product expressly disclaim any
warranties or representations, either expressed or
implied, including but not limited to implied warranties of
fitness for the purposes of achieving and sustaining
remotely controlled flight.
In no event will the Manufacturer, Distributor, Retailer
and/or other suppliers of this product have any obligation
arising from contract or tort, or for loss of revenue or
profit, or for indirect, special, incidental, consequential or
other damages arising from the use of this product.
In purchasing and/or using this product, the user accepts
all responsibility for its use and accepts all liability
associated with such use.
Liability Disclaimer
It is important that the following liability disclaimer be
READ BEFORE ASSEMBLING OR USING THIS PRODUCT.
A Remote Control Model Aircraft is not a toy. It is a
flying model that functions much like a full size airplane.
If you do not assemble and operate this product
properly you can cause injury to yourself and others
and damageproperty. DO NOT FLY this model if you
are not qualified.
You are ultimately responsible for the mechanical, aero-
nautical and electrical integrity of this model and it’s struc-
ture, control surfaces, hinges, linkages, covering, engine,
radio, wiring, battery and all other components check all
components before and after each flight. Do not fly until
it’s right!
Proceeding with assembly and use of this product Indicates
Agreement With and Acceptance of the Liability Disclaimer .
CAUTION.
Assembly and Operations Manual EXTRA - 330L SEMI SCALE SPORT MODEL 15
25.1 Consult your radio manual for instructions
about hooking up your receiver battery, receiver and switch
harness.
25.2 Wrap the battery pack securely in foam suitable for RC
equipment and wrap the foam insulated pack in a plastic
bag or cling wrap.
25.3 Thread the battery pack connector back through from
beneath the fuel tank to the radio compartment by passing
the battery connector through an opening beside the fuel
tank.
25.4 Connect the battery connector to your radio system
according to the radio manual.
INSTALLING THE RECEIVER BATTERY
Stage 25
26.1 Consult your radio manual for instructions about hook-
ing up your receiver.
26.2 Plan where you are going to put the receiver with con-
sideration for routing the antenna safely.
26.3 Wrap the receiver securely in foam suitable for RC
equipment and wrap the foam insulated receiver in a plas-
tic bag or cling wrap.
26.4 Generally in the absence of specific instructions from
the radio manufacturer, it is recommended that the receiv-
er should be placed where it is least likely to have impact
during a crash. Keep the battery pack and other heavy
loose items ahead of the receiver.
INSTALLING THE RECEIVER
Stage 26
27.1 Consult your radio manual for instructions about test-
ing and operating your radio system.
27.2 Pay particular attention to charging your radio system
batteries and range testing the system before and after
each flight.
27.3 Check that all controls are working correctly before
and after each flight.
COMFIRM RADIO OPERATION
Stage 27
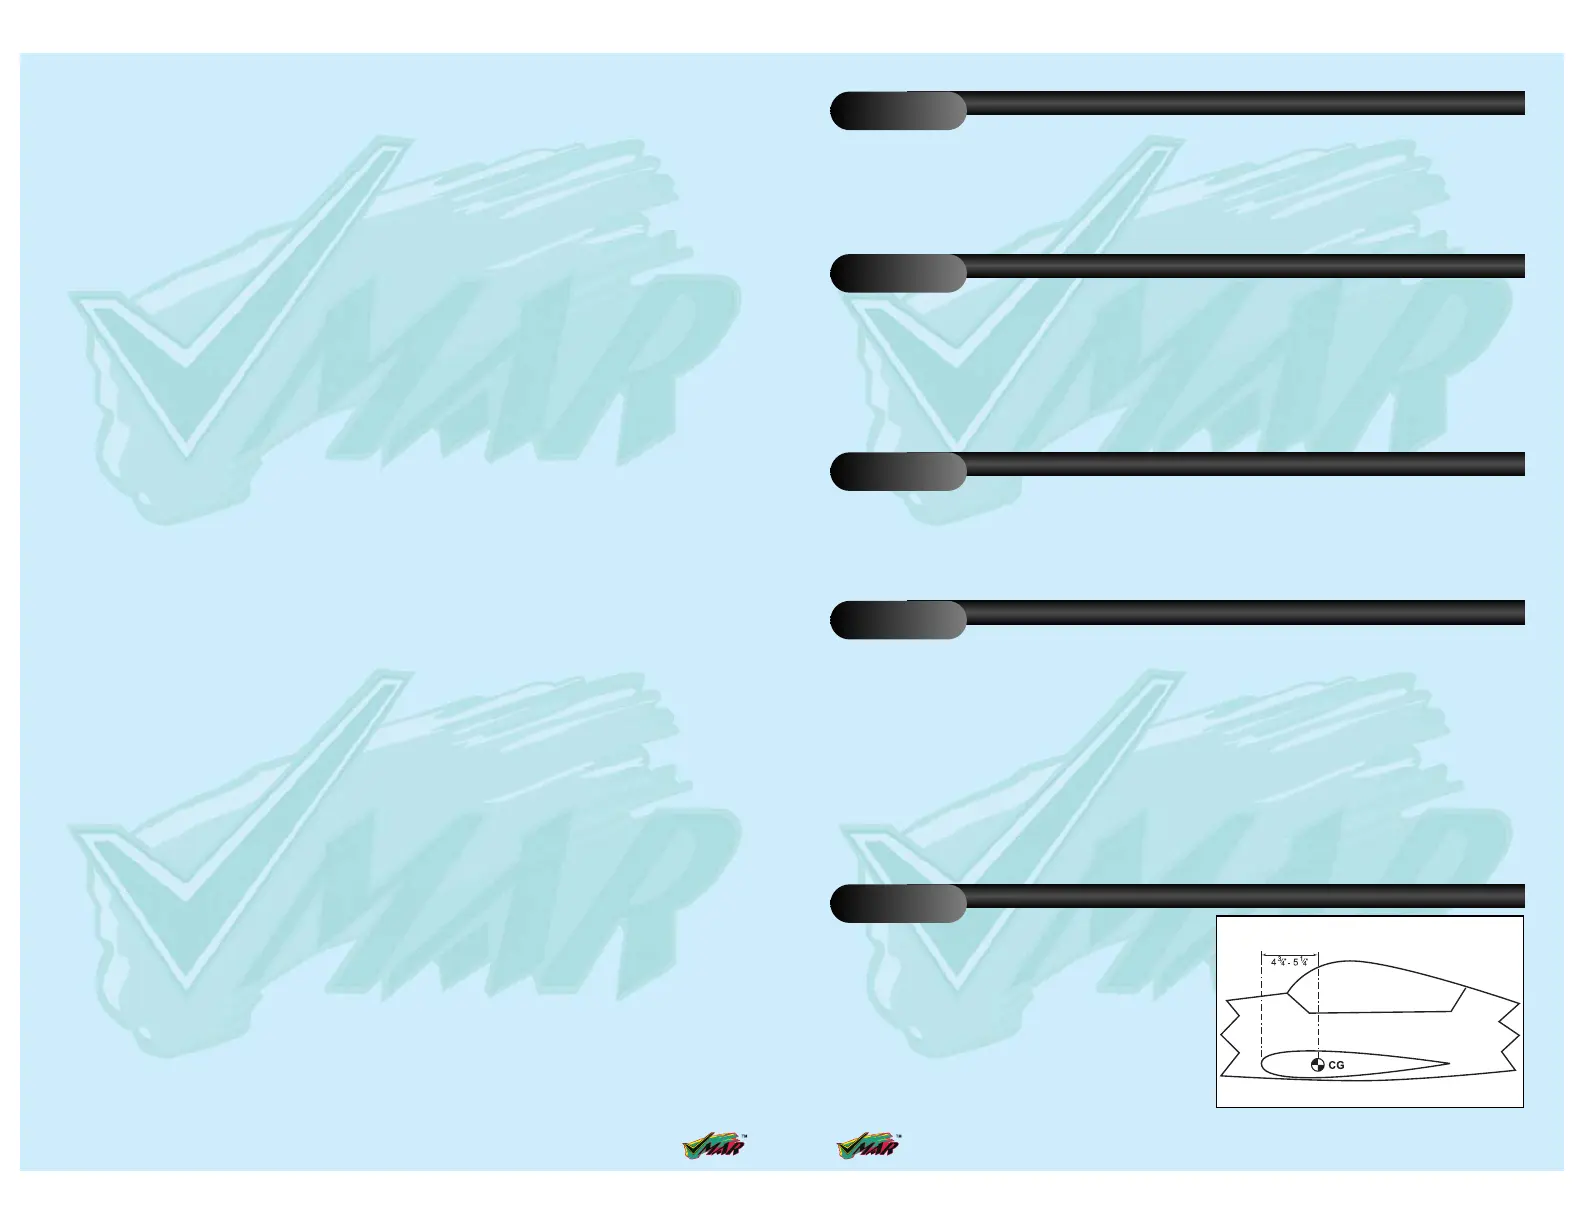
The CG for your EXTRA - 330L is located at 120 - 130 mm
(4 3/4” to 5 1/4”) back from the leading edge of the wing
when the wing has been attached to the fuselage.
For the initial flight, the CG should be located at 4 3/4”
(120mm) back from the leading edge of the wing when
the wing has been attached to the fuselage.
The CG is measured with the engine, radio gear and all
other components installed but WITH NO FUEL IN THE
TANK.
Set up the CG as it will be when you fly it BUT WITH NO
FUEL IN THE TANK.
It is very important to have the CG correct. Flying your model
with the CG too far will likely lead to loss control and a crash.
If you discover that after you have assembled your model
and installed your radio and engine that the CG is incorrect
you must bring the CG to the correct location by doing the
following BEFORE FLYING :
- Move the battery pack fore or aft.
- Move other components fore or aft.
- Change engine to a lighter or heavier model.
- Add weight to the nose or tail. If adding it to the nose,
try to make it useful by going to a heavier duty engine
or adding a spinner with a heavy metal backing plate.
As a last resort, add stick on “dead” weight where
appropriate.
BALANCING THE AIRCRAFT.
Stage 28
29.1 Once you have confirmed that the CG is correct, you
should do a thorough review of the entire model before your
first flight. Check everything twice! Every hook up, every
coupling, everything! Do it twice!!
29.2 Before your first flight , have an experienced flyer
review your work. Do not fly your model until it has been
checked out by a third party who knows how to fly and how
to set up a model aircraft
29.3 Once you have completed your first flight, get in the
habit of checking your model over before and after each
flight! Don’t fly if you find something that is not right!
CONFIRM MECHANICAL INTEGRITY
Stage 29
 Loading...