Do you have a question about the Vogue 310152 and is the answer not in the manual?
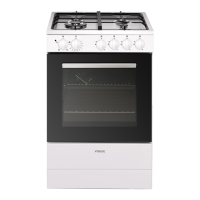
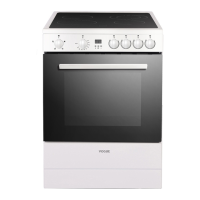
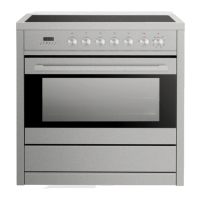
This document is an installation instructions and user guide for the Vogue Freestanding Oven 600mm with Ceramic Cooktop, models 310152, 310153, and 310154. It emphasizes the importance of reading the manual before installation and first use to prevent accidents or damage. The cooker is designed for household use and is noted for its ease of use and efficiency.
The appliance becomes hot during operation, so care must be taken not to touch hot parts. Children should always be kept away from the cooker to prevent burns. Small household equipment and connection leads should not touch the hot oven or hob due to potential heat damage. The cooker should not be left unattended when frying, as oils and fats can catch fire. The hob surface should be kept clean, and spills should be cleaned immediately. Pans with wet bottoms should not be placed on warmed heating zones to avoid irreversible stains. The hob should only be switched on after a pan has been placed on it. Pans weighing over 15kg should not be placed on the opened oven door, and pans over 25kg on the hob. Harsh cleaning agents or sharp metal objects should not be used on the doors to avoid scratching the surface and potential glass cracking. In case of a technical fault, the cooker should not be used, and the fault should be reported to a service centre. The appliance should not be cleaned with steam equipment. Discoloration of the hotplate during operation is normal. A stabilizing means must be installed to prevent accidental tipping, especially by a child climbing onto the open door. The oven must be switched off before removing and replacing the guard for cleaning. The appliance should be switched off before replacing the lamp to avoid electric shock. Accessible parts become hot when the grill is in use, and children should be kept away. The appliance is not intended for operation by external timers or remote-control systems. It is not intended for use by persons with reduced physical, sensory, or mental capabilities, or lack of experience and knowledge, unless supervised or instructed by a responsible person. Children should be supervised to ensure they do not play with the appliance. If the supply cord is damaged, it must be replaced by the manufacturer, its service agent, or a similarly qualified person.
To save energy and help the environment, use proper pans with thick, flat bases, which can save up to 1/3 on electric energy. Cover pans whenever possible to avoid using four times as much energy. Match the saucepan size to the heating plate; a saucepan should never be smaller than the heating plate. Ensure heating plates and pan bases are clean, as soils prevent heat transfer. Avoid uncovering pans too often. Switch off the oven in good time and utilize residual heat; for long cooking times, switch off heating zones 5 to 10 minutes before finishing cooking to save up to 20% on energy. Use the oven only for larger dishes; meat up to 1 kg can be prepared more economically in a pan on the cooker burner. If cooking time is greater than 40 minutes, switch off the oven 10 minutes before the end. When using the timer, set appropriately shorter cooking times. Only grill with the ultrafan after closing the oven door. Ensure the oven door is properly closed to prevent heat leakage through door seal spillages, which should be cleaned immediately. Do not install the cooker near refrigerators/freezers to avoid unnecessary energy consumption.
During transportation, protective packaging was used. All packaging materials are environmentally friendly, 100% recyclable, and marked with appropriate symbols. Packaging materials (polythene bags, polystyrene pieces) should be kept out of reach of children. Old appliances should not be disposed of with normal household waste but delivered to a collection and recycling centre for electric and electronic equipment. Materials used in the appliance are recyclable and labelled accordingly. Information on disposal centers can be provided by local authorities.
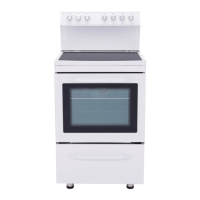
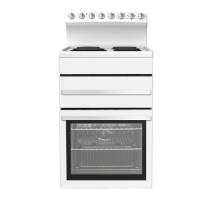
The appliance features an oven temperature control knob, oven function selection knob, cooktop control knobs, and a mechanical timer control knob, all located on the control panel. It includes a ceramic cooktop, a handle, a door, and a drawer panel.
The kitchen should be dry, airy, and have effective ventilation, such as a ventilation grid or hood. The cooker should be placed to ensure free access to all control elements. Coating or veneer on fitted furniture must be heat-resistant (100°C) to prevent deformation. If unsure, leave approximately 2 cm of free space around the cooker. The wall behind the cooker should be resistant to high temperatures. The cooker should stand on a hard, even floor and be leveled using the adjustable feet (range +20 mm) after removing the drawer. To fix the cooker to the back wall, overturn the rear control board, lie it on the cooker-top, fix two wall rubber mats with screws, and then fix the control top from the bottom side with screws and washers.
All electrical work must be carried out by a suitably qualified and authorized electrician. The cooker is manufactured for three-phase alternating current (400V 3N~50Hz), with heating elements rated at 230V. Adaptation to one-phase current is possible by bridging in the connection box according to the provided diagram. The connection wire must match the connection type and power rating. The safety wire must be connected to the E terminal. For 220-240V earthed one-phase connection, bridges connect 1-2-3 terminals and 4-5 terminals (H05VV-F3G4 lead). For 380-415/220-240V earthed three-phase connection, bridges connect 4-5 terminals, phases in succession 1, 2, and 3, earth to 4-5 (H05VV-F5G1,5 lead). The connection cable must be secured in a strain-relief clamp. The electricity supply must have a safety switch enabling power cut-off in an emergency, with a distance of at least 3 mm between working contacts.
Before First Use: Remove packaging and empty the drawer. Clean the oven interior with warm soapy water and wipe clean. Wash oven fittings with warm water and washing-up liquid. Ensure room ventilation. Heat the oven to 250°C for approximately 30 minutes, then clean any stains. Heat hotplates for about 4 minutes without a pan. It is normal for the stove to emit smoke and manufacturing odors during initial heating, which will dissipate after about 30 minutes.
Controlling Ceramic Hob Heating Zones: Choose pans with a diameter at least as large as the heating zone. Avoid pans with concave or convex bases. Always use a proper cover. Use pans with thick, even bases. Clean heating zones and pans for optimal heat utilization. The heating zones have different heat levels, adjusted by turning the knob. Push the knob gently, turn it to the desired position. Marks on the knob indicate heat levels (0-9).
Zone Heating Indicator: An indicator lights up if a heating zone's temperature exceeds 65°C, warning against touching a hot zone. Residual heat can be used for 5-10 minutes after switching off.
Mechanical Timer: To use the oven, set the food cooking time. Turn the mechanical timer to the desired time position. Turn the function knob to the desired function position. Turn the temperature knob to the desired temperature position. The oven knob will run normally. When cooking is finished, the timer will sound. To bypass the mechanical timer, turn it to the position.
Oven Operation and Functions: The oven is controlled by the function knob, mechanical timer, and temperature selection knob. The oven only switches on after the temperature has been set.
Proper cleaning ensures fault-free operation. Before cleaning, switch off the oven, ensure all knobs are at "0" position, and let the oven cool completely. Do not use pressurized hot steam cleaners.
Replacement of Oven Light Bulb: Disconnect the appliance from power supply. Let the oven cavity and heating elements cool down. Unscrew the protective cover (wash and dry it). Carefully remove the old bulb and insert a new bulb suitable for high temperatures (300°C): 220-240V, 50Hz, 25W, G9 fitting. Refit the protective cover. Never use screwdrivers or other utensils to remove the light cover; remove only by hand. Never replace the bulb with bare hands; use a clean cloth or gloves. Bulb replacement is not covered by guarantee.
Door Removal: To clean the oven chamber, the door can be removed. Tilt the safety catch part of the hinge upwards. Close the door lightly, lift and pull it out. To refit, reverse the process, ensuring the hinge notch is correctly placed on the hinge holder. Lower the safety catch carefully.
Removal of Internal Glass Panel: Unscrew and unfasten the plastic latch at the top corner of the door. Take out the glass from the second blocking mechanism and remove. After cleaning, insert and block the glass panel, and screw in the blocking mechanism.
Regular Inspections: Besides cleaning, carry out periodic inspections of control elements and cooking units. After guarantee expiry, have a technical inspection every two years. Fix any operational faults. Carry out periodical maintenance. All repairs and regulatory activities should be carried out by an appropriate service centre or authorized fitter.
Baking Pastry: Most appropriate position is with both upper and lower heater, or hot air. Baking parameters in tables are approximate and can be corrected based on experience. If a cake type is not found, use information for the most similar type.
Best results with both upper and lower heaters. Roasting tables indicate suggested temperatures, guide levels, and roasting times, which may vary.
Take extra precautions; intensive heat makes oven and accessories extremely hot. Use protective gloves and barbecue accessories. Perforated roast may produce spurting hot grease; use long grill tongs. Supervise grill at all times to prevent burning or fire. Do not let children near the grill. Grill heater is suitable for low-fat sausages, meat and fish fillets, steaks, and browning/crisping roast skin.