w
{/l=t sTS
l
-l
tL
Ld.
,
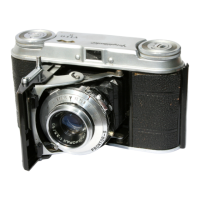
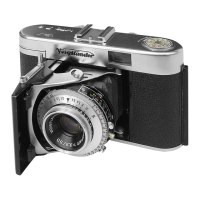
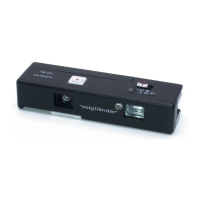
Pocketkamera
mit elekttonischer
Ver-
schluSzeitbildung
und automatischer
Abtastung
der
Emplindlichkeil
fÜr
Xassettenlilm 110 mit 10-21
Dl1tl64-100
ISA
odet
24-27 Dlli/200-400
ASA: 0blektiv
Lanthar
I
5,6/24
mm;
ßelaisauslöser mit
Meßtasle; Symbolvorwahl
und Zeil-
automatik
l/300
-
4 sec, CdS-lichtmessung
mit LE0-Anzeige
im
Sucher:
Mitlenkontakl
schuh,
Taschenclip,
Tragschlaule, Stativ-
gewinde
114";
Maße 122 x 25
x
35
mm,
Gewicht ohne
Eatterien 125
g.
(2)
Eatterie
einselzen.
Drtr;kel
rnit lVliinzo
Irjsen
Zwei Batterten
1,5
V
(l\,4allory
10 L 14
0der
Varta
V 76 PXS)
mit Pluspol
nach oben
einsetzen. 0eckel
wieder
f estschrauben.
Hinweis:
Beide
Batterien
auswech-
seln,
wenn
das Rotsignal
beim
Auslösen
verzögert
0der
gar
nicht mehr
aufleuchtet
(spätestens
Jedoch
nach 12
Mlonaten)
8el
längerem
Nichtoebrauch
Eatterien
aus
der
Kiililrir
;r htf ;IrittrlltllItt
r:l)
lilill etnlcfl0il
llrrkw;ullrrtllr'tltll'ttt
rlrl
rrllrrr:rr
(l
?
l1)
I rlrrrki|;r;rllr:
ilnll)llilr lilr{l
rrach
unlen
riruckerr Suckwarrd schlielJen
und sichern
(4-5).
@
Film
transportieren.
Schieber solange
hin
und
her führen, bis im Fenster die 1
1
erscheint.
@
Symbolschieher
einslellen bei
t{ormal-
Film.
Wettersymbole für Filme bis 21 DIN/
100 ASA erscheinen aut0matisch.
Schieber
bei Sonne auf r bei
bedecktem
Himmel auf
o
stellen lnnenaufnahmen
blitzen.
@
Symbolschieber
einstellen
bei tow-
light-Film.
Wettersymb0le
tÜt Filme
bts
27 DIN/400
ASA
erscheinen
automatisch
Schieber
bei
bedecktem
Himmel
auf
o
bei trübem
Wetter
bzw.
lnnenauf-
nahmen
auf
E
stellen.
(i)
Mntiv
anvisieren.
Die Sucherlinien
hr)(tr0n/r:n
tlas
Bild Bei
Nahaulnahmcn
mit
1,5 2,5
nr Intl0rt]unl;
t;tlllt:n
tlttt inntlrett
Lrnien
Xamera
richtig
hallen. lileßzelle
an
der
Vorderseite
(neben
dem Sucher)
nicht
ver0ec Ke
n.
@
Belichtung
messen.
Meßtaste
leicht
eindrücken.
Kein
R0tsignal:
Auf
nahmelicht
erlaubt
Kurzzeitbelichtung.
Rotsignal: Auf
nahmelicht
ertordert
Langzeit
belichtung;
Kamera
fest aufstÜtzen
0der
(nach
Lösen der
Handschlaufe)
aut Slalrv
bef estiqen.
Innenauf nahmen
hlil/r)rr
Itlt
Ausliisen! Mt:lilaslt:
tttttl Attrrltt:rt't
vttll
rlilt:llrlilr:kilr ll0lr;rtlrr;rl
zrtr;l
;t
lrl VIr
:,r.lrIrll;rlrIrttl ilt
^ll,lo
,r'r
rllrlt
tlr ll
@
(e
oD,,;*,,:,'r]:,,n,,n,,n,,",
Y@il];l;l]l],l]j;ttrlrll1a|lrlt;lt;tll]Sll]l;ks()hUh
@)
@)
(-ßl
\:_,/
24-n nN
2m-4m ASA
10-21
Dü{
M-IM
ASA
P0cket camera
with electr0nic lormation
ol
shutter speeds
and automatic
feeler
lor lilm
speeds for 110 cartridge
film with
64-100
ASA/19-21 01il or 200-4110
lSAi24-27 Dlt;
24 mm lens lanthar I 5,6;
relay release
with
measuring
button; symbol
pIe-selector
and aut0matic speed control
1/300
-
4 sec,
CdS light
measurement with LE0 indication
in viewlinder; hot shoe,
holding
clip,
wrisl
strap,
l/4
'
trip0d s0cket: dimensions
122x25x35 mm
/ 4.0 x I x 1.4 in, weight
without bafleries
125
g/4.4
oz.
Daylight
photography
t)
For
canera carrying:
Screw
in wrist
slrap and slip
holdrng
clrp
rnto socket.
(2.)
lnserting the batleries. Loosen cover
scr0w
with a
c0in
Insert 2 fresh 1.5 V
battenes
(lvlallory
10 L
14
or
Varta V 76 PXS)
with
positive poles
showinn up.
Replace
cover and screw on
tiqhtly
lmportanl: ExchanqP
t]ot\
balter rPc
when, releasing
the
shutter.
red siqnal
lioht is delayed
0r d0es nOt light
up at all
(t]fter
12 m0nths at
the
latest).
Rem0ve
batteries
hefore
lnnq
lttttitttls
l)l lllil(;llvlly
1
I
r
lilsr:rlnll
lht ltlnt carlrrtllu
Iilllt]lrk and
oplr lrrr:k
r.rrvrt
(
I ?
li) lllsrlll llllll
r:rrrlrrrlrlr: irnrl
l)ri)ss
rlr)wn {ilttsr: anrl
lock
back covr;r
(4
5)
(+)
tilrn
lransporl. MOve
slide t0 and
fro
until
1 1 appears
in the window.
@
Symbol
selting
lor normal
lilms.
Weather
symbols
f0r lilms up to 21 DIN/
100 ASA appear
automatically Set
the slide
to sun
*
or overcasl sky
o
use
fiash
for indoor
shooting.
C0
Symbol
setling
tor lowlight lilms.
Weather
symbols
for films up to 27
DIN/
400 ASA appear
automatically. Set
the slide
to overcast
sky
o
or dull
weather
B
also for indoor shootinq
Q)
Viewing the subiect.
View linder
lines
frame the
picture
to be
taken use
inner lines f0r close-ups
taken
within the
focusing
range 0f 1,5-2,5
m / 5 t0 I ft.
Correcl
holding ol the camera.
Insure
that fr0nt metering celi
(beside
vnw lirrrlcr)
is not t;overed.
(s)
Measuring
the exposure. Press
measuring
buttOn lightly
N0 red
signal
light
linht.onditinn<
ellnw chnrt-fimo
ovnnsrrro
Bed
srgnal
light:
lignt condrtr0ns
Iequirts
l0ng{ime
exp0sure support camera
firmly,
or
remove wrist strap and
fix
camera
t0
trip0d, use flash f0r
ind00r
sh00ting.
(ti)
ffeleasing! Press
measuring butt0n anrl
r{rlcase butl0n tirmly
Red
signal
light now
ililttr,;rlr'5shutlr'r..lrrsrilr;
krep ptessrntl
r
rIr;rsr
hullrrrt
urlrl lll
sr{lnal
st0ps
rlI
Allet sh0olrr{l
I rlrrr rrrlv;rrtr;t:
iltttvI
r,lr(l| 10 ll)r'ttt;ltl,ttttl
lr,tr
k lr lllI l{rll