B
u
c
k
e
t
s
B
u
c
k
e
t
,
c
h
a
n
g
i
n
g
B
u
c
k
e
t
,
r
e
m
o
v
a
l
W
A
R
N
I
N
G
Risk of splinter injury.
Striking the bucket pin with a hammer could cause
metal chips to fly around and cause serious splinter
injury.
A
l
w
a
y
s
w
e
a
r
f
a
c
e
a
n
d
e
y
e
p
r
o
t
e
c
t
i
o
n
,
h
a
r
d
h
a
t
a
n
d
g
l
o
v
e
s
w
h
i
l
e
r
e
m
o
v
i
n
g
a
n
d
i
n
s
t
a
l
l
i
n
g
t
h
e
b
u
c
k
e
t
p
i
n
s
.
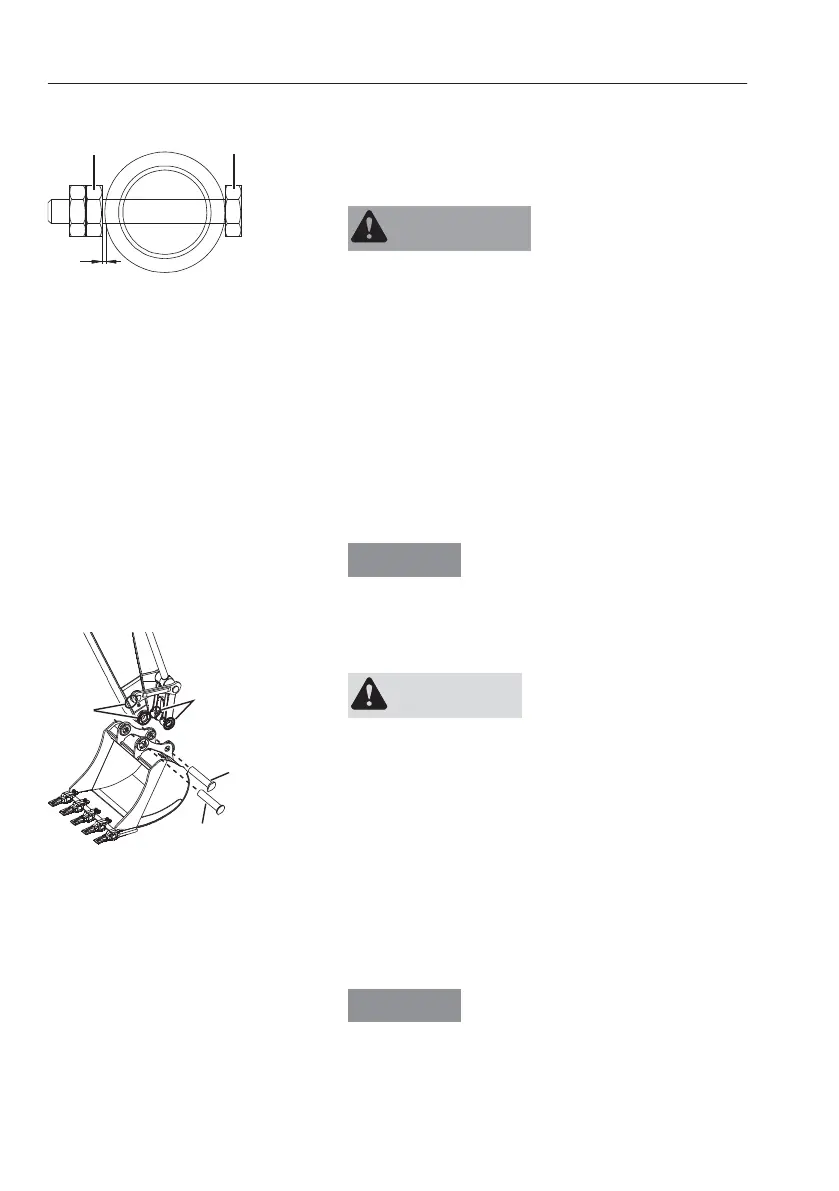
1 Lower the bucket lightly on the ground.
2 Remove the lock screw (A) and nut (B) of each
pins.
3 Remove pins (C and D) and O-rings (E), then
remove the bucket.
B
l
o
c
k
t
h
e
r
e
m
o
v
e
d
b
u
c
k
e
t
t
o
s
t
a
b
i
l
i
s
e
i
t
.
K
e
e
p
t
h
e
p
i
n
s
c
l
e
a
n
a
n
d
d
o
n
o
t
d
a
m
a
g
e
t
h
e
O
-
r
i
n
g
.
B
u
c
k
e
t
,
I
n
s
t
a
l
l
a
t
i
o
n
C
A
U
T
I
O
N
Risk of cutting and crushing.
Loose parts could cause crushing and cutting injury.
N
e
v
e
r
u
s
e
y
o
u
r
f
i
n
g
e
r
s
f
o
r
c
h
e
c
k
i
n
g
a
l
i
g
n
m
e
n
t
b
e
t
w
e
e
n
l
o
o
s
e
p
a
r
t
s
.
A
l
w
a
y
s
u
s
e
a
t
o
o
l
.
1 Align the dipper arm and links to the bucket.
2 Put O-rings (E) at the holes for the dipper arm
and link. Align the holes between bucket and
dipper arm and links.
3 Apply grease to the holes.
4 Insert pins (C and D).
5 Install lock screw (A) and nut (B) of each pins.
M
a
k
e
s
u
r
e
t
h
a
t
t
h
e
r
e
i
s
a
c
l
e
a
r
a
n
c
e
o
f
a
t
l
e
a
s
t
2
m
m
(
0
.
0
8
i
n
)
b
e
t
w
e
e
n
n
u
t
a
n
d
p
i
n
b
o
s
s
.
L
u
b
r
i
c
a
t
e
t
h
e
p
i
n
.
C
E
E
D
V1065824
1
2
2
O
p
e
r
a
t
i
n
g
t
e
c
h
n
i
q
u
e
s
B
u
c
k
e
t
s
 Loading...