S
t
a
r
t
i
n
g
e
n
g
i
n
e
N
O
T
E
!
Make sure the control lockout lever is in downward
(lockout) position, otherwise the engine can not be
started.
W
A
R
N
I
N
G
Risk of fatal accidents.
Unauthorised persons within the work area around
the machine could lead to serious crushing injury.
•
C
l
e
a
r
a
l
l
u
n
a
u
t
h
o
r
i
s
e
d
p
e
r
s
o
n
n
e
l
f
r
o
m
t
h
e
w
o
r
k
i
n
g
a
r
e
a
.
•
K
e
e
p
a
l
o
o
k
o
u
t
i
n
a
l
l
d
i
r
e
c
t
i
o
n
s
.
•
D
o
n
o
t
t
o
u
c
h
c
o
n
t
r
o
l
l
e
v
e
r
s
o
r
s
w
i
t
c
h
e
s
d
u
r
i
n
g
s
t
a
r
t
.
•
S
o
u
n
d
t
h
e
h
o
r
n
b
e
f
o
r
e
b
e
g
i
n
n
i
n
g
o
p
e
r
a
t
i
o
n
.
D
o
n
o
t
k
e
e
p
t
h
e
i
g
n
i
t
i
o
n
s
w
i
t
c
h
i
n
s
t
a
r
t
i
n
g
p
o
s
i
t
i
o
n
f
o
r
m
o
r
e
t
h
a
n
2
0
s
e
c
o
n
d
s
,
a
s
t
h
i
s
m
a
y
s
e
r
i
o
u
s
l
y
d
a
m
a
g
e
t
h
e
s
t
a
r
t
i
n
g
s
y
s
t
e
m
.
I
f
t
h
e
e
n
g
i
n
e
d
o
e
s
n
o
t
s
t
a
r
t
,
t
u
r
n
t
h
e
s
w
i
t
c
h
b
a
c
k
t
o
s
t
o
p
p
o
s
i
t
i
o
n
a
n
d
w
a
i
t
a
c
o
u
p
l
e
o
f
m
i
n
u
t
e
s
b
e
f
o
r
e
t
h
e
n
e
x
t
s
t
a
r
t
i
n
g
a
t
t
e
m
p
t
.
I
f
t
h
e
e
n
g
i
n
e
s
o
u
n
d
s
o
r
r
u
n
s
s
t
r
a
n
g
e
l
y
o
r
i
f
s
t
r
o
n
g
v
i
b
r
a
t
i
o
n
s
a
r
i
s
e
,
t
h
e
i
g
n
i
t
i
o
n
s
w
i
t
c
h
m
u
s
t
b
e
t
u
r
n
e
d
t
o
s
t
o
p
p
o
s
i
t
i
o
n
i
m
m
e
d
i
a
t
e
l
y
.
W
a
i
t
u
n
t
i
l
t
h
e
e
l
e
c
t
r
o
n
i
c
s
y
s
t
e
m
i
s
c
o
m
p
l
e
t
e
l
y
s
h
u
t
d
o
w
n
b
e
f
o
r
e
r
e
s
t
a
r
t
i
n
g
.
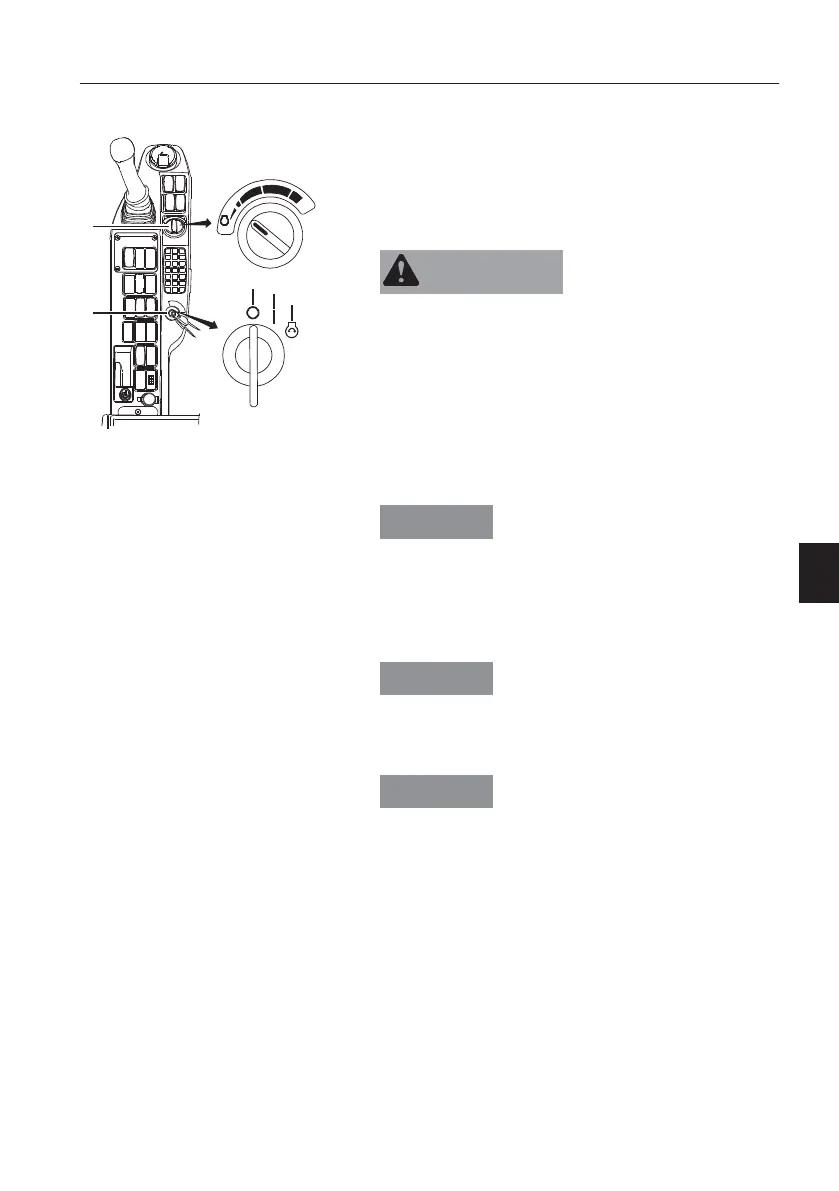
1 Turn the engine speed control switch (A) to the
low speed position and turn the key to running
position.
2 Sound the horn and let other workers and
bystanders know you are starting the machine.
For the startup sequence, see page
34
.
3 Turn the key to the starting position.
4 Release the key when the engine has started.
5 Warm up the machine.
V1129242
A
B
H
G
F
rpm
0
1
2
A Engine speed control switch
B Ignition switch
Off position (
0
)
Running (preheating) position (
1
)
Starting position (
2
)
O
p
e
r
a
t
i
n
g
i
n
s
t
r
u
c
t
i
o
n
s
S
t
a
r
t
i
n
g
e
n
g
i
n
e
8
9