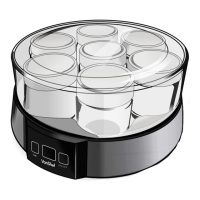
The VonShef Yoghurt Maker with 7 Jars (model 2000019) is an appliance designed for home-made yoghurt production. It allows users to create plain or Greek-style yoghurt using various types of milk and fresh, unflavoured, natural live yoghurt as a starter.
Technical Specifications:
- Voltage: 220-240V
- Rated Power: 20W
- Rated Frequency: 50Hz
Product Components:
The yoghurt maker consists of the following parts:
- Cover: The top lid that encloses the fermentation pot and jars.
- Lids (x7): Individual lids for each of the seven jars.
- Jars (x7): Seven glass jars for holding the yoghurt mixture during fermentation.
- Fermentation Pot: The main container where the jars are placed for fermentation.
- Main Unit: The base of the appliance, housing the heating element and control panel.
- Control Panel/Display: Located on the main unit, it features a digital display and control buttons for operation.
Function Description:
The VonShef Yoghurt Maker facilitates the fermentation process required to transform milk into yoghurt. Users prepare a mixture of milk and fresh yoghurt, which is then divided into the seven jars. These jars are placed in the fermentation pot, and the appliance maintains an optimal temperature for a set period, allowing the bacterial cultures to convert lactose into lactic acid, resulting in yoghurt. The device is not intended for commercial use or for operation by children or individuals with reduced physical, sensory, or mental capabilities without supervision.
Usage Features:
- Mixture Preparation:
- Any type of milk can be used, but consistency may vary (e.g., semi-skimmed/skimmed milk yields thinner yoghurt).
- Pasteurised milk should be heated to boiling point and cooled to below 50°C.
- Untreated goat's/ewe's milk requires boiling and simmering for 7 minutes, then cooling.
- Other milk types (UHT, sterilised, evaporated, reconstructed) do not require boiling but should be at room temperature.
- Only fresh, unflavoured, natural live yoghurt should be used as a starter, ensuring it is within its sell-by date.
- The mixture should not be whisked too vigorously.
- Flavourings (honey, fruit, jams) should always be added after the fermenting process to avoid altering the overall taste.
- Control Panel:
- POWER BUTTON: Press once to switch on the Yoghurt Maker. After selecting a time, press again to activate the yoghurt making process. To cancel, press and hold for 2 seconds.
- TIME BUTTON: Increases the fermentation time by 1-hour increments, up to a maximum of 14 hours. Time must be selected within 5 seconds of switching on; otherwise, the default time of 10 hours will activate.
- DISPLAY: Shows the selected fermentation time (e.g., "10h").
- Operation Steps:
- Spoon the prepared yoghurt mixture equally into the 7 jars.
- Securely screw the lids onto the jars.
- Place the jars inside the fermentation pot and cover with the main lid.
- Plug the appliance into a mains socket.
- Switch on using the POWER BUTTON.
- Use the TIME BUTTON to select the desired fermentation duration.
- Press the POWER BUTTON again to activate the appliance.
- The recommended ferment time is 8-10 hours for optimal consistency and acidity.
- Ferment time can be affected by ambient temperature and milk temperature; up to 14 hours may be needed in cooler conditions or with refrigerated milk.
- Adding some boiled water to the fermentation pot can shorten the ferment time and improve heat transmission for a smoother consistency.
- After fermentation, the yoghurt is edible, but refrigeration for several days is recommended before consumption.
- Refrigerated yoghurt can be flavoured with fruit juices or honey.
Maintenance Features:
- Before First Use:
- Remove all packaging and labels.
- Inspect for damage and ensure all parts are included.
- Disinfect jars and lids by soaking in warm water with detergent. Avoid boiling water for lids to prevent deformation.
- Wipe the main unit and cover with a clean damp cloth. Do not immerse the main unit in water.
- Position the appliance on a stable, dry, heat-resistant surface.
- General Cleaning:
- Always disconnect from mains and allow to cool completely before cleaning.
- Clean thoroughly after each use to minimise odours.
- Wipe the cover with a slightly damp cloth and mild detergent.
- To clean the fermentation pot, pour warm water and mild detergent inside, let soak, then gently scrub with a soft sponge. Discard water and dry with a towel. Avoid abrasive cleaning utensils.
- Soak jars and lids in warm water with detergent for disinfection, then rinse with cold water and dry thoroughly. Again, avoid boiling water for lids.
- Troubleshooting:
- Yoghurt lacks custard-like body: May be due to low indoor temperature (prolong working time) or over-mixing the mixture before fermentation.
- Heavy smell after fermenting: Could be due to expired produce (use fresh produce) or exceeding the 14-hour fermentation limit.
Safety Instructions:
- Always read instructions carefully and keep for future reference.
- Locate the appliance on a firm, flat, heat-resistant surface away from the edge of the worktop.
- Do not operate with an external timer or remote-control system.
- Do not insert objects into openings or cover the appliance.
- A "new" smell or vapour may occur during first use, which will dissipate.
- Do not lift or move the Yoghurt Maker while in use.
- Do not operate continuously for longer than specified.
- Do not lubricate parts or perform maintenance other than as instructed.
- Use only as described in the manual and do not exceed maximum capacity.
- Ensure electricity supply matches rating plate.
- Preferably, the socket outlet should be protected by a Residual Current Device (RCD).
- Do not use with a damaged cable or plug; replace by a qualified engineer if damaged.
- Extension cables are not recommended.
- Do not handle plug or appliance with wet hands.
- Keep the cable away from heated surfaces and out of reach of children or pets.
- Do not leave unattended when plugged in. Unplug when not in use.
- Turn off all controls before unplugging.
- Unplug by grasping the plug, not the cable.
- Always unplug before maintenance, connecting/disconnecting attachments, or changing accessories.
- Store the cable safely.