This document provides a user manual for a VSTARCAM device, likely a portable camera, with both IP Camera (4G) and Recorder (DV) modes.
Function Description
The device functions as a versatile camera with two primary modes:
- IP Camera (4G) Mode: This mode allows for real-time video monitoring, visual intercom, and cloud video recording. It supports a SIM card for 4G network connectivity, enabling remote access and monitoring.
- Recorder (DV) Mode: In this mode, the device acts as a standalone video recorder, continuously recording to a TF card for up to 24 hours.
The device is designed for ease of use, with a focus on portability and connectivity. It supports adding devices to a mobile application (Eye4) via QR code scanning or manual input, and allows for device sharing with other users.
Important Technical Specifications
- Modes: IP Camera (4G) mode and Recorder (DV) mode.
- Battery: Built-in 2600mAh battery.
- Power Supply: Supports DC5V/2A power supply.
- Connectivity: 4G Card Slot (for SIM card with internet access), TF Card Slot (for memory card), USB interface.
- Indicators:
- Yellow light: Always bright during charging.
- Blue light: Slow flash (waiting for connection), fast flash (during connection), always bright (connection success).
- Green light: Slow flash (during recording), fast flash (does not insert a TF card).
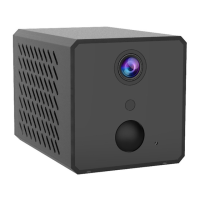
- Physical Components: HD Lens, IR Light, Light sensor, PIR (Passive Infrared sensor), Microphone, Power Switch, Reset Button, Mode Switch Button, Power Interface.
Usage Features
Pre-Setup (for 4G Mode):
- Insert a SIM card with internet access.
- Turn the power switch to "On".
- Turn the mode switch button to "4G" mode. (Important: Insert SIM card before switching to "on" mode).
APP Download and Registration:
- Download the "Eye4" app from App Store or Google Play by searching or scanning the provided QR code.
- Register an account by clicking "Register," entering a username and password. Third-party login (e.g., Facebook) is also supported.
Adding Devices to the APP (for 4G Mode):
- Open the Eye4 app, click "+" in the upper right corner.
- Scan the QR code located on the body of the camera.
- Follow the app prompts to complete the adding process. (For Android phones, grant system permissions by selecting "Allow").
- If the QR code is not found, click "+" in the upper right corner, select "Others," then "4G Camera," and finally "Next-Manually add" to follow prompts for manual adding.
- After about 30 seconds, the app should prompt "binding successfully." If it fails, perform a hard reset and reconfigure.
DV Mode Usage:
- Turn the power switch to "ON".
- Turn the mode switch button to "DV".
- Insert a TF card for continuous recording.
Viewing Recording Videos (DV Mode):
- Via APP: Turn the mode switch button to 4G mode, enter the Eye4 app, and go to "TF card" to view.
- Via Computer: Place the TF card in a card reader, plug the card reader into a computer, and view the video files directly.
Device Share:
- In the Eye4 app, click "Settings" (upper right corner).
- Select "Device Share" and then "QR Code Sharing."
- Other users can open the app, click "+" on the home page, and scan this QR code to add the device.
Maintenance Features
- Resetting the Camera: To reset the camera, turn the power switch to "On," then hold the reset button for 5 seconds. The blue and green lights will turn on together, and then the blue light will flash slowly, indicating a successful reset. This is useful for troubleshooting connection issues or reconfiguring the device.
- Restore Factory Settings: The indicator status for "Restore factory" is when the green and blue lights are on, and then the blue light flashes slowly. This implies a hard reset to default settings.
- Charging Indicator: The yellow light always being bright indicates that the device is charging.
- Customer Support: VSTARCAM offers after-sales service through the Eye4 app ("Me" -> "Online Customer Service"), official mall (https://shop.vstarcam.com/), FAQ (www.vstarcam.com/support), and email (support@vstarcam.com). Online customer service hours are provided for weekdays.