EasyManua.ls Logo

WAGNER DeckMate User Manual

WAGNER DeckMate
4 pages
To Next Page IconTo Next Page
Page #1 background imageLoading...
Page #1 background image
IMPORTANT! - This product is intended
for exterior use of stains and sealers
only! ALWAYS make sure you have drop
cloths covering anything you do not want
spattered with material.
IMPORTANT! - Ce produit est conçu
uniquement pour l’application de teintures
et de scellants à l’extérieur! Assurez-vous
toujours de couvrir de toiles tout article
devant être protégé des éclaboussures.
¡IMPORTANTE! ¡Este producto está
diseñado sólo para el uso exterior de tintes
y selladores! Asegúrese siempre de colocar
protectores de tela para cubrir todo lo que
no quiere que se salpique con el material.
1
104
• Form No. 0284765C
Read this manual for complete instructions • Ce manuel contient les
instructions directives • Lea este manual para obtener instrucciones completas
Printed in
Taiwan
Setup • Préparation • Preparación:
Valve MUST be set in the fully OPEN position before assembling the DeckMate
®
or it will not function properly (refer to CAUTION label on the flow control
knob).
Le clapet doit être réglé à la position de pleine
OUVRE avant d’assembler l’appareil
DeckMate
®
sinon il pourrait ne pas fonctionner correctement (référez-vous à
l’étiquette D’AVERTISSEMENT sur le commande de débit de liquide).
La válvula debe estar completamente ABIERTA antes de armar el DeckMate
®
o, de lo
contrario, no funcionará adecuadamente (refiera a la etiqueta de la PRECAUCIÓN en
la perilla de control de líquido).
1
Insert the tube ends of the unit together, and press into position and twist until
the two sections snap together.
Insérez les extrémités du tube de l’appareil l’une dans l’autre, appuyez pour bien les
mettre en place, puis vissez-les jusqu’à ce que les deux sections s’enclenchent.
Inserte los extremos del tubo de la unidad juntos, presiónelos hasta colocarlos en su
posición y gire hasta que encajen las dos secciones.
2
Press quick-release tabs and attach the pad to the handle.
Appuyez sur les languettes à dégagement rapide et fixez le tampon à la poignée.
Presione las lengüetas de liberación rápida y fije la almohadilla al mango.
3
FULLY CLOSE fluid control knob. Remove fill cap and fill
container with the material you plan to apply.
Fermez
COMPLÈTEMENT la commande de débit de liquide.
Retirez le bouchon de remplissage et remplissez le récipient du
produit que vous souhaitez appliquer.
Cierre
COMPLETAMENTE la perilla de control de líquido. Quite la
tapa de llenado y llene el recipiente con el material que piensa
aplicar.
4
1770 Fernbrook Lane, Plymouth, MN 55447
Customer Service: 1-800-760-3844
Patent pending
CLOSE
FERMER
CERRAR
Tab
Lenguette
Lengüeta
Tab slot
Fente de languette
Ranura de la lengüeta
Label
Étiquette
Etiqueta
OPEN
OUVRE
ABRIR
Question and Answer IconNeed help?

Do you have a question about the WAGNER DeckMate and is the answer not in the manual?

WAGNER DeckMate Specifications

General IconGeneral
BrandWAGNER
ModelDeckMate
CategoryTools
LanguageEnglish

Summary

Setup and Preparation

Valve Position

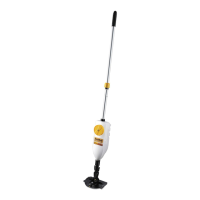
Ensure the fluid control valve is fully OPEN before assembly for proper operation.

Tube Section Connection

Join the tube ends by pressing and twisting until they securely snap together.

Pad Attachment to Handle

Secure the pad to the handle by pressing the quick-release tabs until they engage.

Container Filling

Close the fluid control knob, remove the fill cap, and fill the container with the desired material.

Usage and Application

Material Flow Control

Open the fluid control knob to allow material to flow to the pad; adjust as needed.

Staining Technique

Apply material with a back-and-forth motion, finishing toward the rounded end for an even coat.

Groove Staining Method

Align indicator dot with deck gaps to stain the sides of boards in grooves.

Overnight Storage Procedure

Close fluid control knob, bag pad assembly, and store unit horizontally away from elements.

Cleaning and Maintenance

Initial Cleanup Steps

Close knob, empty material, fill with cleaning solution, and shake unit to flush.

Pad Assembly Removal

Use quick-release tabs to detach the pad assembly from the main unit.

Cleaning Solution Preparation

Prepare cleaning solution (soapy water or mineral spirits) in the container as per material type.

Flushing and Rinsing

Flush cleaning solution and rinse water through the unit to remove all residue.

Component Surface Cleaning

Wipe down fill cap interior, canister exterior, and connector area with a rag and solution.

Troubleshooting Guide

Low Material Flow Issues

Address insufficient flow by checking knob, valve cleanliness, or material viscosity.

High Material Flow Issues

Resolve excessive flow by closing the fluid control knob until desired coverage is achieved.

Streaky Application Fixes

Correct streaky patterns by ensuring correct pad connection and consistent application strokes.

Gaps and Uneven Coverage

Ensure full coverage by increasing material flow to the pad and checking groove brushes.

Container Leak Resolution

Fix leaks by ensuring the container nut is properly tightened to prevent fluid escape.

Replacement Parts

Related product manuals