6 7
Niclas Walser
Inhaber
Wir sind für Sie da!
Sollten Sie Hilfe oder eine kostenfreie, individuelle Beratung durch unser
geschultes Fachpersonal benötigen, dann freuen wir uns, wenn Sie mit
unserem Serviceteam Kontakt aufnehmen.
Wir helfen Ihnen gerne!
Ihr Team von WALSER
E-Mail / Homepage
info@walser.de
www.walser.de
Unsere Postanschrift:
WALSER GmbH & Co. KG
Senefelderstraße 23
86368 Gersthofen
Deutschland
Unser Garantieversprechen
WALSER ist bekannt für seine hochwertige Verarbeitung, beste Funktio-
nalität und einen kundennahen Service. Um unserem außergewöhnlichen
Serviceniveau zusätzlichen Ausdruck zu verleihen, geben wir für dieses
Walimex pro Produkt eine Garantie von 2 Jahren. Diese Garantie ist nur
in Verbindung mit Ihrem Kaufbeleg gültig.
Wenn Sie unsere Garantie in Anspruch nehmen wollen, kontaktieren Sie
uns bitte per Mail unter info@foto-walser.de.
Unser umfassendes Garantieversprechen und den Garantieumfang nden
Sie unter www.foto-walser.de/garantie
EN
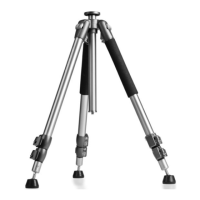
We are pleased that you have decided to buy a Walimex pro Tripod
from WALSER.
With the purchase of this product you have acquired an extremely variab-
le, high-quality and extremely stable photo tripod. Generously dimensio-
ned tripod legs made of aluminium guarantee an excellent stability. The
working height is variably adjustable and gives you the necessary exibility
for your work. The centre column is reversible, for example for macro
photography. The tripod offers quality and comfort for demanding and
advanced amateur and professional photographers for medium and heavy
camera and video equipment up to 12 kg.
We wish you much pleasure with our product.
Your team from WALSER
Leg angle adjustment
The tripod legs can be adjusted to 3 different angles. This can be used to
adjust the working height, but this also has an inuence on the stability
of the tripod. To set the desired angle of the tripod legs, lift the leg angle
lock (5), hold it rmly and set the desired angle, then press the lock down
again. Then fold the leg out so far that the lock reaches the stop. Only
then the tripod will stand securely.
TIP: Always press the tripod legs slightly inwards to easily unlock the
locking clips.
CAUTION!
Note that there is a risk of squeezing if the tripod is operated improper-
ly. Exercise due caution when assembling and disassembling the tripod.
Collapsing the tripod
To collapse the tripod, push the centre column (9) in the tripod shoulder
(4) down all the way. To do this, loosen the screw of the centre column
lock (6) and then retighten it. Fold the tripod legs to the centre column.
This way you can achieve the minimum packing size and the usual trans-
port position of the tripod.
Height adjustment of the tripod legs and centre column, setting up
the tripod
Set the desired leg angle. Loosen the tripod leg locks (7). Extend the
tripod legs to the desired length. Lock the clamps. The maximum working
height can also be changed by pulling out the centre column (9). For this
purpose loosen the screw (6). Set the desired height. Tighten the screw
again. Make sure that the tripod is standing securely and upright. Adjust
the length of the individual tripod legs by opening and closing the leg
locks until the desired alignment of the tripod is achieved.
A bubble level and a compass are embedded in the tripod shoulder. The
bubble level allows you to read off the upright position of the tripod,
which is particularly important for panning shots, e.g. panoramas.
Reverse function of the centre column
For use close to the ground (e.g. macro photography) the centre column
can be used in reverse. For this purpose unscrew the load hook (10). Then
release the centre column by loosening the screw (6). Remove the centre
column, turn it over and put it back into the stand from below. Screw the
load hook back on and tighten the center column screw. The tripod is now
prepared for the so-called reverse use of the centre column.
Use and mounting of tripod heads
The tripod is delivered without a tripod head This gives you the choice of
using a ball head or a video head, for example, or mounting your camera
 Loading...