10 11
EN
Instructions for use
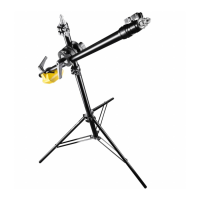
With the Walimex pro WT-501 boom stand, you get a stable, top-class boom
stand. Use equipment for your photo or lm work in three dimensions. The
high-quality workmanship and product quality will convince you and give you
many years of satisfaction.
Intended use
This boom stand, consisting of a lamp stand and an extension arm with
clamp attachment, is used to bring light or other light equipment (e.g.
microphones) in front of, above, below or behind the subject for photo and
lm work. Designed for use in photo and lm shoots in private studios and
homes as well as in industrial or commercial photo and lm studios. For in-
door and dry outdoor use. Specially designed for the requirements of photo
and video shooting.
Not suitable for mounting or moving cameras.
CAUTION
Centre column segments with pre-tension!
When opening the stand lock (4), take enormous care to maintain suf-
cient distance from the top of the stand and do not lean over the stand.
When delivered, the springs in the segments of the centre columns are
under tension. When opening the locking clamps, the centre column ele-
ments can pop out by up to 20 cm. This could lead to injuries.
Assembling the stand
Open the stand locks (4) on the centre column. Caution, the centre column
segments are under pre-tension and can pop out! Close the stand locks
again. Then loosen the locking screw of the stand leg lock of the angle
adjustment (5). Pull the stand legs (8) outwards and push the stand star (6)
downwards. This spreads the stand legs. Set the desired angle of the stand
legs. For optimal stability, we recommend a wide spread of the stand legs.
Be careful when working with the stand legs, there is a risk of them squee-
zing your hand. Secure the stand legs by tightening the stand leg locking
screw (5). Note that the lower rubber buffer of the telescopic centre column
must not touch the ground, as this would affect the stability of the stand.
When folding the stand, proceed in reverse order.
Height adjustment
The stand is equipped with a two-part telescopic centre column. Use the
stand locks (4) to lock the clamps of the centre column (3). To adjust the
height of the stand, loosen the stand locks (4) by turning them anticlockwise.
Caution, the centre column segments are under tension and may pop out!
Adjust to the desired height and tighten the locks again. Finally, check that
all the locks are correctly secured by pushing the centre column elements
downwards. The stand is now ready for use.
Mounting equipment on the stand
At the top of the centre column there is a mounting adapter (1). It is
equipped with a connection known as a 16 mm spigot or 5/8 inch spigot.
With the help of this adapter, equipment such as studio ashes, lights, soft-
boxes, booms, etc. can be attached using standardised brackets. To attach
your equipment, unscrew the locking screw of the equipment holder of the
accessory to be attached and insert the equipment holder of your equipment
from above into the stand adapter (1). Then tighten the screw again. Make
sure that the holder is positioned correctly. The screw must be tightened
onto the slimmer part of the mounting adapter (1). This reliably prevents the
bracket and your equipment from coming loose. On the upper end of the
mounting adapter (1) there is an additional 1/4 inch connection thread. You
can also attach suitable equipment to this.
Mounting the boom on the stand
The boom is attached to the stand with the help of a clamping adapter (2).
Note: The clamping adapter consists of four elements that are held together
by an axle. Two of the elements each embrace the centre column of the
stand or the boom. These elements are pressed together by the clamping
lever (7). In addition, the toothing of the rosette in the middle allows the
angle of the boom to be set absolutely twist-proof. Call in a second person
for the assembly.
In preparation, extend the centre column of the stand to the necessary
height. To mount the clamping adapter on the stand, rst loosen the clam-
ping lever (7) so far that you can slip the rst two elements over the centre
column of the stand. Turn the two elements so that the centre column rests
in a recess of the appropriate size. Make sure that the recess is the same size
on both sides so that the load is distributed equally.
Now hold the elements that enclose the centre column of the stand closed
with one hand. This gives you the space to insert the extension arm between
the other two elements in the same way.
 Loading...