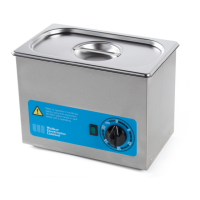
The QC Ultrasonic Cleaner is a device designed for ultrasonic cleaning, utilizing high-frequency sound waves to clean various items. The cleaning process, known as 'Cavitation,' involves the creation and implosion of microscopic bubbles in a cleaning solution, which effectively scrubs surfaces clean. The device operates at an ultrasonic frequency of 44-52 kHz, which is beyond the range of human hearing.
Function Description:
The ultrasonic cleaner functions by generating sound waves that are transmitted into a tank containing a cleaning solution. These waves create millions of microscopic bubbles that collapse or "implode," releasing energy to clean surfaces. This process is effective for a wide range of applications, including cleaning dental instruments, dentures, endoscopes, veterinary instruments, chiropody instruments, clocks, watches, jewelry, and printed circuit boards. The unit is equipped with a 'generator' that develops high-frequency power, which is then supplied to a 'transducer' to create the sound waves in the tank. The effectiveness of the cleaning process is also highly dependent on the type of cleaning solution used; an incorrect solution can lead to slower cleaning and poor results.
Important Technical Specifications:
- Model Type: QC
- Rated Voltage: 220-240 Volts AC, 50-60 Hz
- Tank Dimensions: 240 x 130 x 100mm (internal, approximate, taken at the top of the tank)
- External Dimensions: 265 x 161 x 195mm (approximate)
- Working Capacity: 2.0 litres
- Maximum Capacity: 2.75 litres
- Weight: 2.5kg (excluding accessories and mains lead, approximate)
- Typical Generator Peak Output: 320 watts
- Typical Power Consumption: 150 watts (dependent on tank loading, fluids used, and mains voltage)
- Operating Frequency: 50 kHz +/- 2 kHz
- Construction Materials: Stainless steel case (BS1449), aluminium chassis (BS1470), stainless-steel tank (BS304).
- Compliance: All units comply with BSEN 61010-1.
- EMC Compliance: Emissions to EN50081-1:1992, Immunity to EN50082-1:1997.
- Power Lead: Supplied with a 1m IEC mains lead fitted with an ASTA approved UK moulded plug and a 5 amp fuse (BS1362).
Usage Features:
- Installation: The unit should be mounted on a level surface, away from extreme temperatures, moisture, strong vibrations, and dusty or corrosive environments.
- Fluid Level: The tank must always be filled with the appropriate fluid up to the filling ridge. Water alone is not sufficient; a wetting agent is required for proper ultrasonic energy transference.
- Operation:
- Plug the IEC cable into a suitable socket and the unit.
- Safety Precaution: Ensure hands are dry when switching the mains power on and off.
- Timer: The timer knob can be set clockwise for ultrasonic agitation from 0 to 30 minutes. For continuous operation, turn the knob anti-clockwise to the 'OO' symbol. To stop agitation, turn the knob to 'O'. A green neon light illuminates when the unit is in operation.
- Cleaning Cycle Duration: The required time depends on the type, size, and number of components, contamination type, and cleaning solution. For medical/dental applications, a 3-minute cycle is suggested, with a maximum of 6 minutes if needed.
- Loading: Only one layer of components/instruments should be cleaned at a time, as ultrasonic energy is generated from the bottom of the tank. Pre-soaking can assist the cleaning process.
- Cavitation Heating System: The unit is designed to create strong cavitation, which generates heat in the cleaning fluid. It will 'pulse' when the fluid reaches approximately 50°C to prevent excessive temperatures. This pulsing is not harmful to the unit. If high temperatures are a concern, the unit should be turned off, and the fluid replaced or allowed to cool. Prolonged pulsing can lead to temperatures well above 50°C and may trigger a self-resetting thermal cut-out, which will stop ultrasonic agitation but keep the green neon illuminated. If this occurs, unplug the unit and allow it to cool for 5 minutes to self-reset.
- Degassing: Fresh water/solution should always be 'de-gassed' by operating the ultrasonic unit with the fresh water, basket, and cleaning solution for 6 minutes. Avoid unnecessary agitation after degassing to prevent air reintroduction.
- Cleaning Methods:
- Using a Basket (Fig. 2): Items are placed in the basket, which is then gently lowered into the tank, ensuring the fluid level is at the filling ridge. Care must be taken to avoid fluid overflow.
- Using a Beaker (Fig. 1): For small components, a 600ml beaker can be used. The tank should be half-filled with water and detergent or another cleaning fluid (not water alone). A beaker stand is placed on top of the unit, and the beaker is positioned so its base is 2.5cm (1") to 5cm (2") below the fluid surface but not touching the tank base. A rubber ring on the beaker helps adjust its depth. Care must be taken to prevent fluid overflow from the tank.
- Simultaneous Use: A single beaker stand and the basket can be used simultaneously. However, a double beaker stand must be used without the basket.
- Safety Guidelines (Do's and Don'ts):
- DO use the correct fluid and ensure the tank is filled to the ridge.
- DO NOT operate without fluid.
- DO keep the tank free of sediment.
- DO NOT drop the unit or expose it to shock.
- DO NOT immerse the unit in water or other liquids.
- DO NOT use acid, bleach, or corrosive substances in the tank.
- DO NOT use highly flammable substances.
- DO NOT place hands in the fluid during operation. Read cleaning fluid directions and Material Safety Data Sheets.
- DO NOT pour hot or boiling water into the tank to prevent thermal shock damage.
- DO keep the lid on during use to prevent splashes and reduce evaporation.
- DO NOT drop items into the tank; place them gently using the basket.
- DO disconnect mains supply when unattended.
- DO disconnect mains plug before emptying/filling fluid, moving the unit, or removing base screws (no user-serviceable parts).
- DO keep the front panel dry; prevent fluid from running down the case or around the IEC socket.
- DO NOT operate switches with wet hands.
- DO use correct accessories; DO NOT use unrecognised glass or other containers in place of the beaker.
- Operating Environment: Temperature: 5°C to 40°C; Humidity: 10% to 80% (non-condensing).
- Safety Distance: Maintain a minimum distance of 1 meter between any person and the equipment during operation.
- DO NOT Flash test this equipment.
- For Dentistry use, refer to HTM0105 or www.walkerelectronics.co.uk for testing instructions.
- Failure to use the equipment as specified may impair its protection and invalidate the guarantee.
Maintenance Features:
- Cleaning: Wipe the case and tank with a lightly oiled cloth.
- Fluid Replacement: Always replace the fluid when contaminated.
- Transducer Overload Device: The unit is protected by a transducer overload device, which may occasionally cause an 'occasional pulse' during normal use. This indicates an incorrect solution, incorrect fluid level, or the transducer self-protecting.
- Guarantee: The unit is guaranteed against faulty workmanship and materials for 3 years from the purchase date. The Transducer Bonding is guaranteed for an additional 2 years. The guarantee does not cover damage from misuse, transit damage, or failure to comply with the Do's and Don'ts list. For service, return the unit postage paid to Walker Electronics Limited, Service Department, Collingham, Newark, Nottinghamshire, NG23 7LA, U.K. Include a covering letter with purchase details and problem description, and proof of purchase if within the guarantee period. Repair or replacement is at the manufacturer's discretion.
Walker Electronics Limited reserves the right to change product specifications without prior notice in accordance with its policy of progressive product design.