EasyManua.ls Logo

Waring Ice Cream Parlor User Manual

Waring Ice Cream Parlor
3 pages
To Next Page IconTo Next Page
Page #1 background imageLoading...
Page #1 background image
PickYourOwn.org
Where you can find a pick-your-own farm near you!
Click on the printer icon that looks like this: (at the top left, to the right of
save a copy
) to print!
See www.pickyourown.org/alllaboutcanning.htm for many other canning directions and recipes
All images and text Copyright © Benivia, LLC 2006 All rights reserved. Page 1 of 3
Waring Ice Cream Parlor Instructions
If you have lost your original manual and instructions for the 1970s era Waring Ice Cream
Parlor ice cream maker, these instructions should help you!
Ingredients:
6 to 10 lbs of ice 4 or 5 trays of ordinary ice cubes works
One 26-oz box of ordinary table salt
Two cups of cold water
Ice cream mix of your choice; either homemade (see our recipes at
http://www.pickyourown.org/allaboutcanning.htm#icecream )or prepackaged
Step-by-step directions
Setup preparation
1. Prepare the ice cream mix. If you make fresh custard (homemade ice cream mix), be sure
to let it chill overnight in the fridge.
2. Place the ice bucket onto the motor and base assembly and rotate the bucket until it
drops down over the raised stop lugs on the base and sits firmly.
3. Pour ice cream mix into the cream can. For most desserts, the liquid level will be well
below the "fill line" stamped into the can wall. This is so the mixture will have room to
expand. Some desserts, like sherbets, expand less so the liquid mix can be above the fill
line when you start.
4. Stir mixture, then insert the dasher (mixer blade) into the cream can so that the rounded
ball end of the dasher's shaft sits in the matching indentation in the cream can.
5. Place the transparent plastic can lid over the top end of the dasher and snap it into place
over the rim of the cream can.
6. Place the loaded cream can into the ice bucket, making sure that the drive socket
indentation in the bottom of the can engages with the drive shaft protruding from the
bottom of the ice bucket.
Question and Answer IconNeed help?

Do you have a question about the Waring Ice Cream Parlor and is the answer not in the manual?

Waring Ice Cream Parlor Specifications

General IconGeneral
BrandWaring
ModelIce Cream Parlor
CategoryIce Cream Maker
LanguageEnglish

Summary

Setup Preparation

Prepare Ice Cream Mix

Chill homemade custard mix overnight. Ensure prepackaged mix is ready for use.

Assemble Ice Bucket

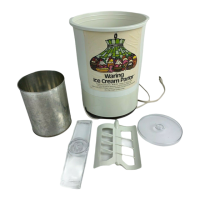
Place ice bucket onto motor base, rotating until it securely drops over raised stop lugs.

Add Ice Cream Mix to Can

Pour mix into cream can, ensuring liquid level allows for expansion.

Insert Dasher and Lid

Insert dasher, then place transparent lid, snapping it over the cream can rim.

Place Can in Ice Bucket

Seat cream can into ice bucket, engaging drive socket with the drive shaft.

Freezing and Processing

Assemble Support Arm

Attach support arm to dasher shaft, rotating to lock ends into ice bucket cutouts.

Add Ice and Salt Layers

Layer ice cubes and salt around the cream can, adding water to fill the bucket.

Process Ice Cream

Start motor; it rotates can while dasher stays stationary. Processing takes 20-50 minutes.

Unplug and Disassemble

Unplug unit when done. Remove bucket, support arm, and lift out the cream can.

Serving and Storage

Serve or Harden Ice Cream

Serve immediately for soft-serve, or freeze to harden. Stir for even texture.

Storage Instructions

Store in freezer containers for 1-2 hours, allowing space for expansion.

Tips for Processing

More salt means faster, coarser texture; less salt means slower, finer texture.

Cleaning Notes

Wash parts in hot, soapy water; they are not dishwasher safe.

Related product manuals