Do you have a question about the Waterford 101 and is the answer not in the manual?
Place the base upside down, insert legs into corner sockets, and secure each leg.
Position side panels in the base groove and secure with set screws, leaving final tightening until later.
Place the back panel into the base groove, ensuring a sealed fit and supporting it.
Position the front panel into the base groove and secure, ensuring a sealed fit.
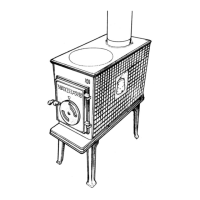
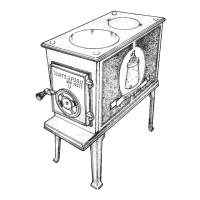
Place the main top onto the body assembly and secure with hexagon-head set screws.
Hang the inner side baffle plates on the lugs and slide the top baffle plate into place.
Screw the flue outlet collar into the main top and place the hotplate in its opening.
Assemble and attach the door latch and knob to the fire door.
Allow 24 hours for the furnace cement to set before lighting the stove.
Ensure chimney soundness, clear creosote, and maintain clearances for safe venting.
Maintain 30-inch clearance around the stove and protect combustible floors.
Details on using single-wall, fireplace, or factory-built connectors for chimney attachment.
Adherence to local codes and NFPA standards for installation and clearances.
Maintain a two-inch layer of sand or wood ash in the fire chamber at all times.
Start with small fires and gradually increase, controlling draft for desired burning rate.
| Fuel Type | Wood |
|---|---|
| Efficiency | 75% |
| EPA Certified | Yes |
| Maximum Log Length | 18 inches |
| Flue Outlet Diameter | 6 inches |