1
INSTRUCTION GUIDE: COLOR TOUCHSCREEN COMMUNICATING THERMOSTAT
IG1601EW 06/16
*IG1601EW*
997-012330-14-R
Instruction Guide:
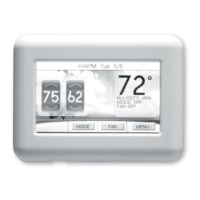
Color Touchscreen Communicating with Humidity Control Thermostat
TPCC32U01
Heat Pump Thermostat User Information
This communicating thermostat communicates via a 4-wire
Modbus protocol and will only operate as a stand-alone
thermostat with the Aurora Control System, or as a zone
thermostat (not the MasterStat) in the IntelliZone2 or IntelliZone2
● 24V zoning system. The thermostat will auto recognize
whether it is connected as a stand-alone thermostat or a zone
thermostat and display the proper set up screens.
Zone Configuration
The thermostat will auto detect that it is attached to the
IntelliZone2 relay panel and will display the screen below. Use
the up/down arrows ▲▼ to select the zone.
If more than one zone is assigned the same zone number an
error will be displayed on the thermostat and MasterStat. After
the initial configuration to change the zone numbers enter the
configuration mode by holding a finger over the Zone number
in the upper left hand corner for 5 sec. Select zone number and
use the up/down arrow to adjust.
Thermostat Operation
Adjusting Temperature
(Temporary Override in Programmable models)
* Displayed if configured as a Zone Thermostat
**Comp SPD and Room Humidity only displayed if configured as a
stand-alone thermostat
Heating Set
Point
Time Date
Outside
Temperature
(If installed)
Room Humidity**
Mode &
Comp SPD**
Fan Operation
Error Code (If present)
Cooling
Set Point
Room
Temperature
Zone*
NOTE: Outdoor temperature is only displayed if an outdoor
sensor is installed.
1. To select a MODE, press the screen button MODE, and
then press the desired operating mode.
2. Press the blue up or down arrow to increase or decrease the
cooling temperature set point. Press the red up or down arrow
to increase or decrease the heating temperature set point.
Non-Critical Faults
Non-critical faults (error codes) are displayed below the
temperature on the main screen. These faults will clear
themselves if the fault condition corrects itself. Your dealer
should be informed when either a critical or non-critical fault
occurs.
Lockout/Critical Faults
Critical faults will change the top and bottom bars of the screen
red to indicate service needed. The system can be reset by
pressing reset lockout. Some of the faults will clear themselves
if the fault condition corrects itself. Your dealer should be
informed when either a critical or non-critical fault occurs.
Menu
(Screens shown below are for stand-alone thermostat configuration)
Press the Menu button.
Color Touchscreen Communicating with Humidity Control
TPCC32U01 (Firmware Version 3.01 and later)