Do you have a question about the Watt Stopper DT-305 and is the answer not in the manual?
Opaque tape masks PIR lens sections to restrict view and eliminate unwanted coverage.
Position sensor for maximum coverage in classrooms, avoiding pointing out the door.
Details low voltage connections from power pack to sensor terminals for basic operation.
Explains wiring for manual ON function using a momentary switch and sensor terminals.
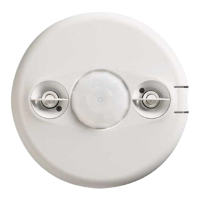
Instructions for mounting the sensor in a ceiling tile by cutting a hole and securing spring clips.
Steps for mounting the sensor into a standard 4" octagonal J-box using mounting screws and keyhole slots.
Procedure to test sensor operation, including warm-up, initial stillness, and movement testing.
Configures the time delay for lights to turn off after no motion is detected.
Enables or disables the walk-through mode for specific light-off behavior.
Adjusts the sensitivity of the Passive Infrared (PIR) detection range.
Selects the logic for initial occupancy detection, maintenance, and re-triggering.
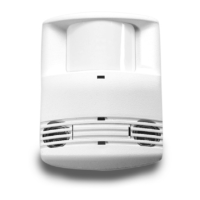
The WattStopper DT-305 is a 360° Dual Technology occupancy sensor designed for low voltage applications, featuring a manual on capability. This device integrates both passive infrared (PIR) and ultrasonic technologies into a single unit, a combination that significantly reduces the likelihood of false triggering, even in challenging environments. The primary function of the DT-305 is to automatically control lighting systems by turning them on and off based on the presence or absence of occupants in a space.
The sensor offers a variety of operating modes that can be customized to suit specific control needs. Users can configure the sensor to turn lights on and maintain them as long as either or both of the integrated technologies detect occupancy. Once no movement is detected for a user-defined period, which can range from 30 seconds to 30 minutes, the lights will automatically switch off. A "walk-through" mode is also available, which can turn lights off after a mere 3 minutes if no activity is detected within 30 seconds of an initial occupancy detection. The DT-305 operates on a 24V power supply, typically provided by WattStopper Power Packs.
For optimal performance, the DT-305 provides a 360° coverage pattern, designed for walking motion at a mounting height of 10 feet. It's important to note that in spaces with lower activity levels, or those containing obstacles and barriers, the effective coverage area may be reduced. The PIR-only trigger mode's coverage varies with mounting height, while the ultrasonic coverage remains relatively consistent for mounting heights between 8 and 12 feet.
When installing the sensor, it's recommended to mount it to the ceiling at heights between 8 and 12 feet, as mounting outside this range can significantly impact coverage patterns. For best results, each occupant should have a clear line of sight to the sensor. To prevent false detections in unwanted areas, such as hallways outside the intended coverage zone, opaque adhesive tape is provided to mask sections of the PIR lens. This masking restricts the sensor's view by removing bands of coverage. While ultrasonic coverage cannot be masked, its sensitivity can be adjusted to reduce the coverage area. It is also advisable to place the sensor at least 4 to 6 feet away from air supply vents to avoid interference.
The DT-305 comes factory preset for basic operation, allowing for quick installation in most applications. However, its settings can be customized through DIP switches and a trimpot. Before making adjustments, ensure that office furniture is installed, lighting circuits are on, and HVAC systems are in the overridden/on position with the highest airflow. A 30-second warm-up period is required when power is first applied.
The sensor's time delay, adjustable via DIP switches, determines how long the lights remain on after the last detected motion. Options range from 30 seconds to 30 minutes, with a "Test Mode" setting for quick verification. The walk-through mode, enabled by a DIP switch, allows lights to turn off after 3 minutes if no activity is detected within 30 seconds of initial occupancy. PIR sensitivity can be set to "Minimum" for a reduced detection range or "Maximum" for automatic adjustment to provide reliable operation without false detections.
The DT-305 features eight logic configurations for occupancy triggers, controlled by DIP switches. These configurations define how initial occupancy is detected (e.g., by both PIR and ultrasonic, either technology, PIR only, or manual switch activation), how occupancy is maintained, and how quickly the lights re-trigger after turning off.
A manual on function can be implemented by installing a momentary switch, such as the WattStopper LVS-1 or RS2-3. This switch connects to the sensor's manual switch and +24V terminals. Each press of the switch changes the load state. In "Manual Mode" (Trigger Option 6 or 7), the switch is required to turn on the load, with the sensor then maintaining the load based on occupant activity. If no movement is detected within the re-trigger period after the time delay ends, the manual switch must be used to turn the load back on. In "Automatic Mode" (any other Trigger Option), occupancy triggers and switch activation can turn the load on. The manual switch can also turn the load off; if turned off manually, the load remains off as long as occupancy is detected, and the sensor reverts to automatic-on mode after the time delay.
The DT-305 includes built-in overload protection. If the load current exceeds 200mA, the control output automatically turns off, and the sensor's LED blinks rapidly (approximately 10Hz) to indicate an overload condition. Normal operation resumes once the load current is corrected.
Troubleshooting common issues involves checking DIP switch settings, wire connections, and 24VDC input. If lights don't turn on, verify power, connections, and sensor functionality. If LEDs don't flash, check warm-up time, PIR sensitivity, and ultrasonic sensitivity. If lights don't turn off, inspect connections, disconnect the power pack blue wire to isolate the problem, and adjust sensitivity and time delay settings. For complete sensor override, the ultrasonic sensitivity trimpot can be set to the fully counterclockwise "Service" position, allowing manual control of lights with a wall switch.
| Category | Accessories |
|---|---|
| Voltage | 24V DC |
| Mounting | Ceiling |
| Ambient Temperature Range | 32°F to 104°F (0°C to 40°C) |
| Housing | High-impact, injection-molded plastic |
| Mounting Height | 8-10 ft |
| Time Delay | 30 seconds to 30 minutes |
| Dimensions | 4.5" |
| Certifications | UL, cUL |