7
STEP 6
Blue ¼" Tube Connection - Faucet
Connection
Step A - Locate the ¼" blue tube
connected to the RO Faucet.
Connect the open end to the
¼" elbow fitting on the back
of the RO Module behind the
Post-Carbon Filter. Make sure
the tube is pushed in all the way
to the tube stop.
STEP 7
Black ¼" Tube Connection - Inlet Water
Step A - Locate the ¼" black tube from
the parts bag and insert one
end into the plastic Adapt-A-
Valve. Make sure the tube is
pushed in all the way to the
tube stop.
Step B - Insert the other end of the
¼" black tube into the elbow
behind the sediment filter next
to the “IN” label.
STEP 8 - Option 1
Tank Valve Installation - Metal Tank Option
Step 1.A - Teflon tape must be applied in
a clockwise direction. Wrap
5 to 7 turns around the male
pipe threads (MPT) on the
stainless steel fitting on top of
the tank.
Step 1.B - Thread the plastic valve onto
the tank fitting
NOTICE
DO NOT over-tighten or the valve
could crack
STEP 8 - Option 2
Tank Valve Installation - Plastic Tank Option
Step 2.A - Make sure the O-ring is locat-
ed at the bottom of the recess
for the tank connection
Step 2.B - Thread the plastic valve onto
the tank fitting
NOTICE
DO NOT use teflon tape on plastic tank
DO NOT over-tighten or the valve could crack
STEP 9
White ¼" Tube Connection - Storage Tank
Step A- Locate the ¼" white tube from
the parts bag. Plug one end
into the RO Module at the open
port of the ASO Valve marked
“Tank”
Step B - Plug the other end of the ¼"
white tube into the valve at the
Storage Tank.
STEP 10
Reverse Osmosis Module Mounting
Step A - Determine the best location
for the RO Module to be
mounted to allow for future
system maintenance. The
parts bag has 2 self-tapping
screws. Using an electric drill
with a phillips-driver bit, screw
them into the cabinet wall
approximately 10
5
/8" apart and
16" from the bottom of the
cabinet.
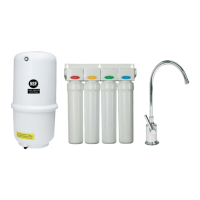
STEP 11
Install the Filter Cartridges
Step A - Identify each cartridge and the
proper location on the system
by matching teh colors and
descriptions.
Step B - Insert each cartridge with a
¼-turn in a counter-clockwise
direction. The cartridge is
installed properly when the label
is facing toward the front of
the unit.
FEED / COLD
1/4” BLACK
O-RING
TO INSTALL
POST-CARBON
POST-CARBON
RO MEMBRANE
PRE-CARBON

 Loading...