EasyManua.ls Logo

Wavlink I-WL2-AC12 - User Manual

Wavlink I-WL2-AC12
8 pages
Print Icon
To Next Page IconTo Next Page
Loading...
FEATURE
- Dual band with maximum speed up to 5G 867Mbps and 2.4G 300Mbps.
- Weatherproof and build in lightning arrested withstand harsh outdoor conditions.
- Four 7dBi omnidirectional antennas eliminate Wi-Fi dead zones.
- High power amplifier for stronger signal transmission.
- Gigabit port provides faster connection.
- Passive PoE support for flexible deployment.
- Support AP/Router/Repeater/EasyMesh agent mode.
- MU-MIMO function lets the router talk to several devices simultaneously over the same
Wi-Fi band.
HARDWARE OVERVIEW
Top view
Bottom view
DEFAULT PARAMETERS
Web: http://wifi.wavlink.com 2.4G SSID: WAVLINK-N XXXX
Default IP: 192.168.10.1 5G/AC SSID: WAVLINK-AC XXXX
Login Password: admin Wireless Password: open
LED INDICATORS
1
2.4G RP-SMA Antenna Connectors
2
S5G RP-SMA Antenna Connectors
3
3 x Wi-Fi Signal LEDs
4
Status LED
5
WAN/LAN LED
6
LAN Backhaul LED
7
POWER LED
8
Reset/PAIR Button
9
LAN Backhaul Port
10
WAN (PoE IN)/LAN Port
11
Grounding Terminal
WI-FI SIGNAL
Mode Description
AP ON ON ON Wi-Fi signal output power 100%.
Repeater
ON ON ON Better reception: signal 81%-100%.
ON ON OFF Good reception: signal 60%-80%.
ON OFF OFF Weak reception: signal below 0-59%.
INSTALLATION
1. Please follow the installation steps when assembling the device.
1
Pass RJ45 cable through the spiral
cover
2
Pass RJ45 cable through the rubber
seal
3
Pass RJ45 cable through the holder
4
Connect the RJ45 cable to PoE IN/
WAN port
5
Spin 2.4G antenna into the 2.4G
external RP-SMA connector
6
Spin 5G antenna into the 5G external
RP-SMA connector
7
Screw the holder
8
Plug the rubber seal to the holder
9
Screw the spiral cover
2. Install the device.
2.1 Firstly, fasten the device to somewhere firm, then install the device in the holder.
Remark
If you happen to live in the zone where lightning happens a lot, we suggest that you install
the device through grounding connection in order to strengthen the lightning-resistant
function.
Power
On The device is powered on.
Off The device is not receiving electrical power.
LAN/Backhaul
On The Ethernet port is connected.
Off The Ethernet port is disconnected.
WAN/LAN
On The Ethernet port is connected.
Off The Ethernet port is disconnected.
Status
Fast flash
Another router has not been connected when the
device is the repeater mode.
SHOW flash
The another router has been connected but
the device has no access to the network in the
repeater mode.
On
The device keeps on in the AP mode;
The device can access the network normally.
12
3
4
5
67
12
8
11
10
9
1
9
2
8
3
7
5
4
6
TV LED/LCD
FLOOR STAND
AC1200 DUAL BAND HIGH-POWER
OUTDOOR ROUTER/AP/EXTENDER
USER'S
MANUAL
- 1 -
Question and Answer IconNeed help?

Do you have a question about the Wavlink I-WL2-AC12 and is the answer not in the manual?

Overview

This document describes the AC1200 Dual Band High-Power Outdoor Router/AP/Extender, detailing its features, installation, configuration, and maintenance.

Function Description

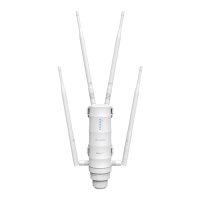
The device serves as a versatile outdoor networking solution, functioning as an AP, Router, Repeater, or EasyMesh agent. It is designed to provide robust and extended Wi-Fi coverage, particularly in outdoor environments, thanks to its weatherproof and lightning-arrested construction. The device supports dual-band operation, offering high speeds on both 5G (up to 867Mbps) and 2.4G (up to 300Mbps) bands. Its primary goal is to eliminate Wi-Fi dead zones and deliver stronger signal transmission over a wider area.

Important Technical Specifications

Wireless Performance:

  • Dual Band: Supports both 5G and 2.4G Wi-Fi bands.
  • 5G Speed: Up to 867Mbps.
  • 2.4G Speed: Up to 300Mbps.
  • Antennas: Four 7dBi omnidirectional antennas for extended coverage.
  • Signal Output Power: 100% in AP mode.
  • Reception Quality (Repeater Mode):
    • Better reception: 81%-100% signal.
    • Good reception: 60%-80% signal.
    • Weak reception: below 0-59% signal.
  • Amplification: High power amplifier for stronger signal transmission.
  • MU-MIMO Function: Allows the router to communicate with multiple devices simultaneously on the same Wi-Fi band, improving efficiency.

Hardware:

  • Ports:
    • 2.4G RP-SMA Antenna Connectors (x2)
    • 5G RP-SMA Antenna Connectors (x2)
    • LAN Backhaul Port (x2)
    • WAN (PoE IN)/LAN Port (x1)
  • LED Indicators:
    • Wi-Fi Signal LEDs (x3)
    • Status LED (x1)
    • WAN/LAN LED (x1)
    • Power LED (x1)
  • Buttons: Reset/PAIR Button.
  • Power: Passive PoE support for flexible deployment.
  • Environmental: Weatherproof and built-in lightning arrestor to withstand harsh outdoor conditions.
  • Grounding Terminal: For enhanced lightning protection.

Default Parameters:

  • Web Address: http://wifi.wavlink.com
  • Default IP: 192.168.10.1
  • Login Password: admin
  • 2.4G SSID: WAVLINK-N XXXX
  • 5G/AC SSID: WAVLINK-AC XXXX
  • Wireless Password: open

PoE Converter Specifications:

  • PoE Port: Connects to the device's PoE IN/WAN port.
  • LAN DATA IN Port: Connects to the LAN of the main router.
  • Ethernet Cable Length (PoE to device): Less than 60 meters (196 ft).
  • Ethernet Cable Type: Certified CAT5e/CAT6 with RJ45 connectors.

Usage Features

Installation: The installation process involves assembling the device by connecting RJ45 cables and antennas, then securely fastening it to a firm location using the provided holder. A grounding connection is recommended in lightning-prone areas to strengthen lightning resistance.

Connection:

  • Via Cable (PoE): The device can be powered and connected to the main router using a PoE converter. The "PoE" port of the converter connects to the device's PoE IN(WAN) port, and the "LAN DATA IN" port connects to the main router's LAN.
  • Via Cable (Direct): For configuration, an Ethernet cable can be connected from a PC/laptop to the device's LAN Backhaul port.
  • Via Wireless: Users can connect to the device's default Wi-Fi SSIDs (WAVLINK-N XXXX or WAVLINK-AC XXXX) from their smart devices (smartphones, tablets, laptops) to initiate configuration.

Configuration (Web UI): Access to the web UI is typically automatic upon first connection. If not, users can manually enter 192.168.10.1 or wifi.wavlink.com in a browser. The default login password is admin.

Initial Setup:

  1. Country/Region and Time Zone Selection: Users must select the correct country/region due to bandwidth restrictions and set the time zone.
  2. Login Password: It is highly recommended to set a new, strong login password for network security. The web UI provides visual feedback on password strength.

Mode Selection: The device supports four operational modes:

  1. Repeater Mode (WISP):
    • Recommended for extending existing Wi-Fi coverage.
    • Users select "WISP" mode and either manually enter the SSID of the network to connect to or choose from a list.
    • The password for the repeater must match the password of the connected Wi-Fi network.
  2. EasyMesh Agent Mode:
    • Allows the device to join an existing EasyMesh system, creating a mesh network.
    • Users select "EasyMesh Agent Mode" and click "Start Pairing."
    • Pairing is then initiated on the EasyMesh controller.
  3. LAN Bridge (AP Mode):
    • Connects the device's LAN DATA IN port (via PoE converter) or LAN Backhaul port directly to the upper router.
    • Users can change the SSID and are recommended to use WPA3/WPA2-MIX encryption for enhanced security, if supported by their devices.
    • A new password should be created.
    • "Self Management" is enabled by default, allowing management via the assigned IP or domain name.
  4. Router Mode:
    • Requires the upper router to be connected to the LAN DATA IN port of the PoE converter.
    • Users select the WAN Type (PPPoE, DHCP, or Static IP) based on their ISP's connection type.
    • WPA2-PSK is the default encryption, but WPA3/WPA2-MIX is recommended if supported.
    • A strong password should be created for network security.

Wi-Fi Password Management: Users can change their Wi-Fi password by navigating to the "Wireless" section in the web UI.

LED Indicators:

  • Power LED:
    • On: Device is powered on.
    • Off: Device is not receiving electrical power.
  • LAN/Backhaul LED:
    • On: Ethernet port is connected.
    • Off: Ethernet port is disconnected.
  • WAN/LAN LED:
    • On: Ethernet port is connected.
    • Off: Ethernet port is disconnected.
  • Status LED:
    • Fast flash: Another router has not been connected (repeater mode).
    • SHOW flash: Another router is connected but has no network access (repeater mode).
    • On: Device is in AP mode and has normal network access.

Bandwidth Usage Limitations (ETSI): In Europe, there are restrictions on 5G band frequencies for indoor and outdoor use. Users must select the correct bands based on their installation type (indoor/outdoor) to comply with regulations. Specific channels are designated for "INDOOR USE ONLY," "INDOOR USE ONLY DFS ON," and "OUTDOOR USE ONLY DFS ON."

Maintenance Features

Firmware Upgrade: Firmware updates are crucial for bug fixes, new features, and improved product performance. There are two options for upgrading:

Option I (Manual Download):

  1. Download the latest firmware file from the Wavlink website.
  2. Extract the firmware file.
  3. Log in to the web UI (wifi.wavlink.com or 192.168.10.1), navigate to "Advanced," then "Firmware Update."
  4. Click to locate and select the firmware file.
  5. Click "Upload" and then "Apply" to complete the upgrade.

Option II (Automatic Check and Download):

  1. Log in to the web UI (192.168.10.1 or wifi.wavlink.com), navigate to "Advanced," then "Firmware Update."
  2. Click "Check New Version" to find the latest version.
  3. Click "Download and Upgrade" to initiate the update process.

Important Notes for Firmware Upgrade:

  • Ensure the device is connected to the Wavlink Wi-Fi during the process.
  • Clear the browser cache after updating.
  • Using incorrect firmware can damage the device and void the warranty.

Troubleshooting (FAQ):

  • Cannot Access Internet:
    • Verify ISP service is working.
    • Follow the quick start guide via the web UI.
    • Reboot the device.
  • Cannot Access Web UI:
    • In AP mode, check the IP address assigned by the upstream router.
    • Ensure connection to the Wavlink Wi-Fi.
    • Clear browser cache.
    • Try different browsers or devices.
  • Forgot Administration Password:
    • Reset the device (default password is admin).
  • Best Location for Mesh Devices:
    • Place in open spaces, avoiding metal objects or reinforced concrete walls.

Product Disposal (WEEE Directive): At the end of its life, the product should not be treated as general waste. It must be handed over to an applicable collection point for recycling electrical and electronic equipment or returned to the supplier.

Wavlink I-WL2-AC12 Specifications

General IconGeneral
BrandWavlink
ModelI-WL2-AC12
CategoryNetwork Router
LanguageEnglish

Related product manuals