WindshieldFone
Installation Video
Step 1: Choosing the Length
Rubber Bumper
Knob A
Knob B
Knob C
Knob D
Knob E
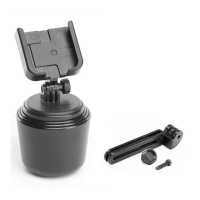
Base
Base Lever
Holder
3” Short Arm
5” Medium Arm
Telescopic Arm
Determine a safe, convenient location to mount on
your windshield. We recommend keeping it as low
on the windshield as possible.
Contents: WindshieldFone, 3” Short Arm, 5” Medium Arm, Rubber Bumper
Note: We recommend reading all instructions prior to beginning.
Note the length between your windshield and the
front of your dashboard.
Start with the installed telescopic arm, and extend
or retract as necessary to see if it fits your dash. If
so, you’re ready to mount. If the telescopic arm is
too long, you can easily swap it out with either the
included 3” Short or 5” Medium Arm.
The suction cup Base can be flipped to allow for
easier mounting.
© 2022 MacNeil IP LLC
A B
67WF1