Do you have a question about the WeatherTech WindshieldFone and is the answer not in the manual?
Choose the best-fitting arm length (Short, Medium, or Telescopic) based on dashboard and windshield distance.
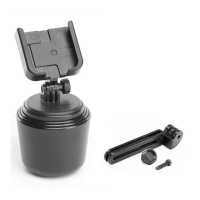
Position the suction cup base, extend the arm by loosening knobs, and tighten for stability.
Adjust phone holder width using Knob A and learn how to safely remove your phone.
Ensure all knobs are secured and check state/local laws before using the device.
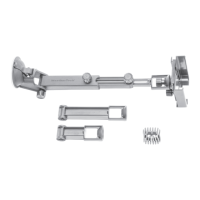
This document outlines the assembly, installation, and usage instructions for the WeatherTech WindshieldFone, a device designed to securely hold a smartphone within a vehicle. The system is comprised of several modular components, including a telescopic arm, a short arm, a medium arm, a bumper, a suction cup base, a phone holder, and various adjustment knobs.
The WeatherTech WindshieldFone serves as a robust and adjustable mounting solution for smartphones within a vehicle's interior, specifically designed to attach to the windshield. Its primary function is to provide a stable and accessible platform for a mobile device, allowing for hands-free operation and viewing while driving. The modular design enables users to customize the arm length and orientation to achieve an optimal viewing angle and position relative to the dashboard and windshield, ensuring the device does not obstruct the driver's view or interfere with vehicle controls. The system features a secure suction cup base for attachment to the windshield and a phone holder with adjustable width to accommodate various smartphone sizes.
The manual begins by identifying all the included components: the telescopic arm (which comes pre-attached), a short arm, a medium arm, a bumper, a suction cup base, a phone holder, and several adjustment knobs labeled A, B, C, D, and E. A crucial first step for the user is to assess the distance between their vehicle's windshield and the front of the dashboard. Based on this measurement, the user should select the most appropriate arm length—short, medium, or telescopic—to ensure a proper fit and optimal positioning. The manual includes a QR code that links to how-to videos, which are particularly useful for understanding how to swap in shorter arms or flip the base if needed.
The phone holder features an adjustable width mechanism to accommodate various smartphone models. To adjust the width of the phone holder, the user simply needs to manipulate Knob A. This allows the holder to securely grip the phone without excessive pressure or looseness, preventing the device from falling out during vehicle movement.
Removing the phone from the holder is designed to be quick and easy. The phone holder incorporates "Quick Lock & Release tabs" on either side. To release the phone, the user places their thumb and forefinger on these tabs and presses them simultaneously. This action disengages the locking mechanism, allowing the phone to be easily lifted out of the holder.
The manual emphasizes the importance of ensuring all knobs are securely tightened prior to use. This is a critical safety measure to prevent the phone mount from shifting or detaching while the vehicle is in motion. Furthermore, the manual includes a "Note" reminding users to check state and local laws regarding the placement of devices on windshields, as regulations can vary and may impact where the WindshieldFone can be legally installed.
While the manual does not explicitly detail "maintenance features" in the traditional sense (e.g., cleaning schedules for the device itself), it implicitly includes maintenance-related instructions that contribute to the longevity and proper functioning of the device:
In summary, the WeatherTech WindshieldFone is a user-friendly, customizable, and secure smartphone mounting system for vehicles, designed with ease of installation and adjustment in mind, while also highlighting important safety and legal considerations for its operation.
| Mounting Location | Windshield |
|---|---|
| Compatibility | Most smartphones |
| Color | Black |
| Function | Holds and secures phone for hands-free use |
| Installation | Suction cup |