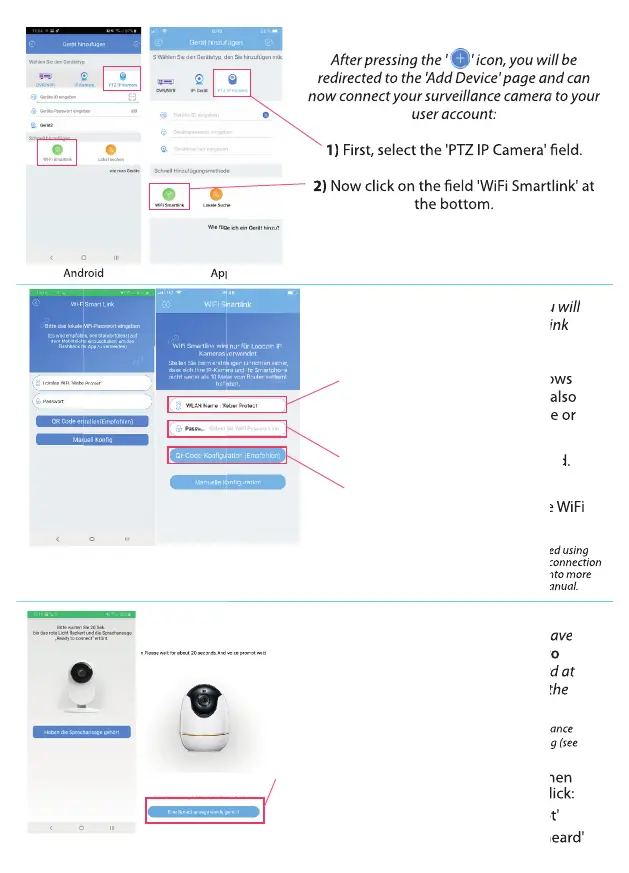
After pressing the ' ' icon, you will be
redirected to the 'Add Device' page and can
now connect your surveillance camera to your
user account:
1) First, select the 'PTZ IP Camera' eld.
2) Now click on the eld 'WiFi Smartlink' at
the bottom.
After pressing the ' ' icon, you will be
redirected to the 'Add Device' page and can
now connect your surveillance camera to your
First, select the 'PTZ IP Camera' eld.
Now click on the eld 'WiFi Smartlink' at
Android Apple
After pressing 'WiFi Smartlink', you will
be redirected to the WiFi Smartlink
settings.
1) The rst eld (Local WiFi) shows
your home WiFi, where you are also
logged in with your smartphone or
tablet.
2) Now enter your WiFi password.
3) Press 'Create QR Code
(Recommended)' to continue the WiFi
Smartlink process.
After pressing the ' ' icon, you will be
redirected to the 'Add Device' page and can
now connect your surveillance camera to your
First, select the 'PTZ IP Camera' eld.
Now click on the eld 'WiFi Smartlink' at
After pressing 'WiFi Smartlink', you will
be redirected to the WiFi Smartlink
The rst eld (Local WiFi) shows
your home WiFi, where you are also
logged in with your smartphone or
Now enter your WiFi password.
After pressing 'WiFi Smartlink', you will
be redirected to the WiFi Smartlink
The rst eld (Local WiFi) shows
your home WiFi, where you are also
logged in with your smartphone or
Android Apple
Note: The surveillance camera can also be connected using
'Manual Conguration'. However, we recommend the connection
method explained above and will therefore not go into more
detail about manual conguration in this user manual.
Android
After clicking on 'Create QR Code
(Recommended)', you will be asked if you have
already heard the voice prompt 'Ready to
connect'. The voice prompt should be heard at
the beginning when you have plugged in the
surveillance camera.
Note: If the voice prompt did not sound when the surveillance
camera was plugged in, please reset it to the factory setting (see
page: 20).
1) If you have heard the voice prompt when
you turned on the surveillance camera, click:
Android: 'Have heard the voice prompt'
Apple: 'A voice announcement has been heard'
(Recommended)' to continue the WiFi
(Recommended)' to continue the WiFi
The surveillance camera can also be connected using
The surveillance camera can also be connected using
'Manual Conguration'. However, we recommend the connection
'Manual Conguration'. However, we recommend the connection
method explained above and will therefore not go into more
method explained above and will therefore not go into more
detail about manual conguration in this user manual.
detail about manual conguration in this user manual.
(Recommended)', you will be asked if you have
(Recommended)', you will be asked if you have
The voice prompt should be heard at
The voice prompt should be heard at
the beginning when you have plugged in the
the beginning when you have plugged in the
If the voice prompt did not sound when the surveillance
If the voice prompt did not sound when the surveillance
camera was plugged in, please reset it to the factory setting (see
If you have heard the voice prompt when
you turned on the surveillance camera, click:
: 'Have heard the voice prompt'
'A voice announcement has been heard'
Apple
16
 Loading...