REPLACE SPRING FOR FRYHEAD SUPPORT ROD
SV301 Service Manual Standard Fryers
5
GENERAL
REPLACE CONTROL OR HI-LIMIT THERMOSTAT (all exc. F-14)
Thermostat
Installation
Unplug fryer and allow to cool before servicing.
A. REMOVE ELEMENT HEAD FROM FRYER
Note: Some operations can be performed without removing the
fryhead. However, doing so will ease access to components and
fasteners.
1. Remove two screws holding either element head pivot.
Remove pivot.
2. Lift element head assembly from fryer.
3. Remove bottom cover from control box.
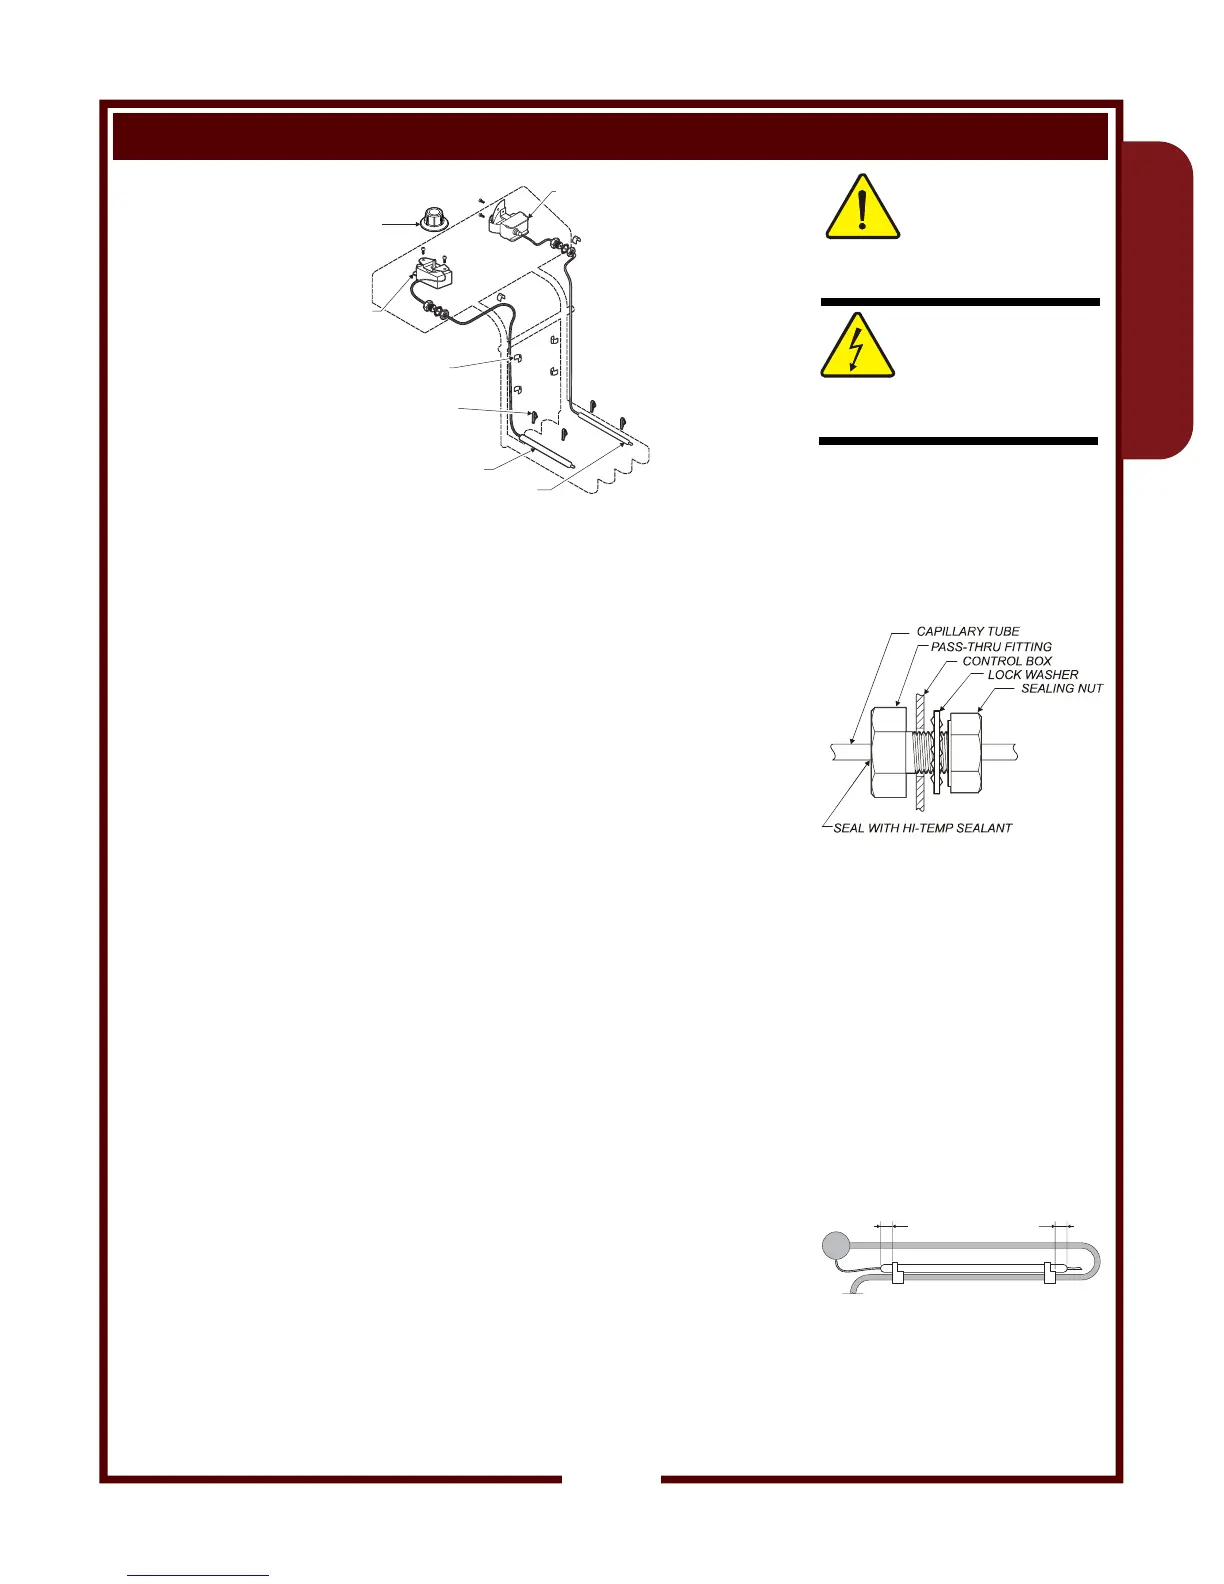
B. DISCONNECT THERMOSTAT
1. Remove the control knob if replacing the temperature control
thermostat.
2. Remove the two screws holding the thermostat to the control box.
3. Note the position of the wiring. Disconnect the wiring from the
thermostat terminals.
4. Note position of the thermobulb and the routing of the capillary
tube. Remove the bulb from the element by removing two bulb
clips and three capillary clips.
5. Undo the pass-thru fitting and withdraw the thermostat from the
control box.
C. INSTALL NEW THERMOSTAT
1. Wipe area around pass-thru openings in control box to remove any
grease or other cooking debris.
2. Undo nut and lock washer from pass-thru fitting of the new
element. Insert the bulb from the inside of the control box.
3. Reconnect wiring to the thermostat terminals. Connect wiring then
attach the thermostat to the control box
4. Reinstall the thermobulbs. Slide two bulb clips over the bulb,
spacing the clips 3/8" from each end of the bulb. Snap the bulb
clips over the element, centering the bulb between element bends.
Carefully route the capillary tube and secure with three
capillary clips.
5. Carefully route capillary tube away from electrical terminals
inside of the control box. Tighten the pass-thru fitting then seal the
inside of the pass-thru fitting with hi-temp sealant.
D. REINSTALL ELEMENT HEAD ON FRYER (see page 4)
Test fryer for proper operation and return to service.
CAUTION:
BURN HAZARD
Allow fryer to cool before
performing this service.
CAUTION:
SHOCK HAZARD
Unplug fryer from electric
power before servicing.
IMPORTANT:
DO NOT damage the
capillary tubes. If the tubes
are pinched or kinked, they
are not repairable.
Capillary Tube Pass-Thru
Fitting
IMPORTANT:
Be sure bulb clips are
properly positioned on bulb,
and are clipped to element to
maintain the gap between
bulb and element. Failure to
properly position the rings will
result in the immediate failure
of the thermostat due to
thermobulb damage.
Bulb Clip Spacing
CAPILLARY CLIP
6 places
HI-LIMIT
THERMOSTAT
TEMP CONTROL
THERMOSTAT BULB
TEMP
CONTROL
THERMOSTAT
CONTROL
KNOB
BULB CLIP
4 places
HI-LIMIT THERMOBULB
3/8"
3/8"
 Loading...