9
EN
- WARNING: Water that has flown through backflow preventers is
considered to be nonpotable.
- WARNING: The machine shall be disconnected from its power
source by removing the plug from the socket-outlet during
cleaning or maintenance and when replacing parts or converting
the machine to another function.
- WARNING: Do not use machine if a supply cord or important
parts of the machine are damaged, e.g. safety devices, high
pressure hoses, trigger gun.
- WARNING: Inadequate extension cords can be dangerous. If an
extension cord is used, it shall be suitable for outdoor use, and
the connection has to be kept dry and off the ground. It is
recommended that this is accomplished by means of a cord reel
which keeps the socket at least 60 mm above the ground.
- WARNING: Always switch off the mains disconnecting switch
when leaving the machine unattended.
- WARNING: This hose contains electrical connections: do not use
it to collect water and do not immerse in water for cleaning.
- The electric supply connection shall be made by a qualified
electrician and comply with IEC 60364-1. It is recommended
that the electric supply to this machine should include either a
residual current device that will interrupt the supply if the
leakage current to earth exceeds 30 mA for 30 ms or a device
that will prove the earth circuit.
SYMBOLS
Read operator’s manual
Warning
Warning: Do not direct the jet at persons,
animals and electrical equipment.
Machine not suitable for connection to the potable
water mains
Double insulation
Waste electrical products must not be disposed
of with household waste. Please recycle where
facilities exist. Check with your local authorities or
retailer for recycling advice.
OPERATING INSTRUCTIONS
NOTE: Before using the tool, read the instruction book
carefully.
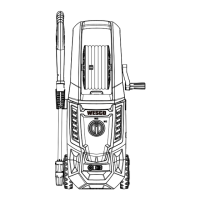
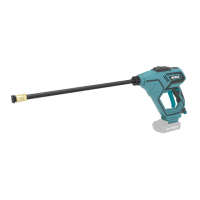
INTENDED USE
The product is designed exclusively for cleaning, e.g., cleaning
of facades, pavements, machines, vehicles, etc. and for
watering the garden.
ASSEMBLY
1. ASSEMBLING THE SPRAY GUN HOLDER (SEE FIG. A)
Press the spray gun holder on to the machine.
2. MOUNTING THE HANDLE (SEE FIG. B1, B2)
Press the handle onto the machine, and fix the screws.
3. MOUNTING THE HANDLE OF HOSE DISK (SEE FIG. B3)
Insert the handle of the disk on to the hose disk standily.
4. MOUNTING THE WATER INLET SCREW (SEE FIG. C1-C4)
Remove the inlet’s cover. Then attach water inlet screw to the
machine’s inlet, tighten the water inlet screw clockwise. Insert
the garden hose to the water inlet screw. Attach garden hose to
water supply and turn water on.
5. PUTTING THE DETERGENT INTO THE SOAP POT (SEE FIG. D)
Remove the cover of the soap pot. Add the detergent into the
soap pot and cover the soap pot again.
6. ASSEMBLING THE HIGH PRESSURE HOSE
1) Make sure that ON/OFF switch is in OFF position. (See Fig.
E1)
2) Insert the high-pressure hose to spray gun. You can remove
the pressure hose after pressing the hose controlling button.
(See Fig. E2)
3) Insert the lance into spray gun, and twist 1/4 turn. (See Fig.
E3, E4)
4) Connect the high-pressure hose to the high-pressure outlet.
You can remove the pressure hose after sliding the outlet
lock knob to left side. (See Fig. E5)
OPERATION
CAUTION!
1. Never use the pressure washer to draw in water
contaminated with solvents (e.g. paint thinners, gasoline, oil,
etc.).
2. Dirt in the feed water will damage the unit. To avoid this risk,
we recommended checking the water filter (located inside
the water inlet; to clean it out see maintenance section).
3. Always prevent debris from being drawn into the unit by
using a clean water source and an accessory water source
and an accessory water filter if required.
Water supply (cold water only)
1. Do not draw non-water liquids through the unit. For use with
cold water supply only.
2. Water hose must be at least a 1.27 cm in diameter.
3. Flow rate of water supply must not fall below 5.5 l/min.
4. Flow rate can be determined by running the water for one
minute into an empty container.
5. The water supply temperature must not exceed 40
o
C.
1. ON/OFF SAFETY SWITCH
1) Connect the plug to a properly grounded outlet.
2) Before turning the unit on, press the gun trigger switch to
bleed any trapped air out of the pump and hose.
3) Depress lock-on/off switch to “
” position. Your trigger
switch is in a locked off position to prevent in accidental
starting. (See Fig. F1)
4) Depress lock-on/off switch to “
” position then trigger
switch. Your switch is now on. (See Fig. F2)
5) To switch off, you can just release the trigger switch.
6) Start the high pressure washer by turning ON/OFF switch to
ON. Press the trigger.
Reminder: motor does not run continuously, once trigger switch
will be pressed. (See Fig. F3, F4)
Surface preparation
Before any cleaning task, it is important to keep the work area