EasyManua.ls Logo

Westin 57-3540 User Manual

Westin 57-3540
4 pages
To Next Page IconTo Next Page
Page #1 background imageLoading...
Page #1 background image
1
Westin Automotive Products, Inc.
320 W. Covina Blvd
San Dimas, Ca. 91773
Thank you for choosing Westin products
for additional installation assistance please call
Customer Service (800) 793-7846
www.westinautomotive.com
P.N.: 75-0014-RevC
ECO #: W13-0999
DATE: 9/2/16
INSTALLATION INSTRUCTIONS
AUTOMOTIVE PRODUCTS,
HDX GRILLE GUARD
APPLICATION:
2009-2016 Dodge Ram 1500
PART NUMBER:
57-3540, 57-3545
ITEM QUANTITY DESCRIPTION TOOLS NEEDED
1 1 GRILLE GUARD 10MM SOCKET
2,3 2 LOWER MOUNTING BRACKET, DRIVER (2) AND PASSENGER (3) 16MM SOCKET
4,5 2 FRAME MOUNTING BRACKET, DRIVER (4) AND PASSENGER (5) 16MM WRENCH
6 2 SUPPORT STRAP 18MM SOCKET
7 6 M12 BUTTON HEAD BOLTS (STAINLESS) 18MM WRENCH
8 14 M12 FLAT WASHERS (STAINLESS)
FLAT HEAD
SCREWDRIVER
9 6 M12 LOCK WASHERS (STAINLESS)
10 6 M12 HEX NUT (STAINLESS) HAMMER
11 2 M12 X 140 HEX BOLT UTILITY KNIFE
12 2 M12 LARGE FLAT WASHER RATCHET
13 2 M12 X 30 HEX BOLT TORQUE WRENCH
14 4 M12 HEX NUT
15 6 M12 FLAT WASHER
16 4 M12 LOCK WASHER
17 4 M12 X 60 HEX BOLT
ANTI-SEIZE LUBRICANT MUST BE USED ON ALL STAINLESS STEEL FASTENERS TO PREVENT THREAD DAMAGE AND GALLING
PROCEDURE
1. Remove contents from box, verify if all parts listed are present and free from damage.
Carefully read and understand all instructions before attempting installation.
Failure to identify damage before installation could lead to a rejection of any claim.
2. Remove the lower bumper front valance by removing the two M6 bolts at the ends and prying out the center pins of the
plastic retaining clips with a flat head screwdriver. See Figure 2.
3. On vehicles without factory tow hooks: For 2009 - 2012 vehicles, remove the plastic fill panel on the front bumper by
removing the 2-piece plastic clips at the top of the panel. See Figure 1. NOTE: Use a flat-blade screwdriver to first pop
the center pin out to release the clip. For 2013+ vehicles remove the two plastic bumper inserts that are attached with (4)
M6 fasteners from the inside of the bumper. Next, from behind the driver side of the front bumper, remove the (2) hex nuts
on the bottom of the bumper bracket securing the bumper to the frame. See Figure 3.
ITEM 1
ITEM 5 ITEM 4
ITEM 3 ITEM 2 ITEM 6
Question and Answer IconNeed help?

Do you have a question about the Westin 57-3540 and is the answer not in the manual?

Westin 57-3540 Specifications

General IconGeneral
BrandWestin
Model57-3540
CategoryAutomobile Accessories
LanguageEnglish

Summary

Installation Instructions Overview

Part Identification and Preparation

Verify all parts against the list and read instructions thoroughly before starting installation.

Initial Removal Steps

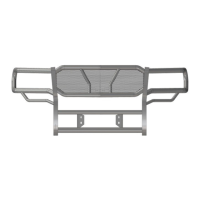
Remove the lower bumper front valance and plastic fill panel (if applicable) according to instructions.

Bracket Mounting Procedures

Tow Hook Vehicle Bracket Installation

For vehicles with tow hooks, remove them and attach the mounting bracket using supplied hardware.

Non-Tow Hook Vehicle Bracket Attachment

For vehicles without tow hooks, reuse factory bolts to secure brackets. Align mounting holes.

Lower Mounting Bracket Attachment

Remove the factory M10 flange bolt and use it to loosely attach the lower mounting bracket.

Grille Guard and Support Strap Installation

Support Strap Installation

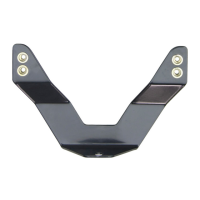
Attach the support strap to the frame tower and lower mounting bracket using M12 hardware.

Grille Guard Attachment

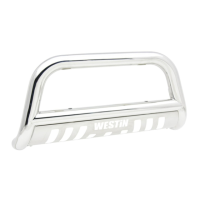
Position and loosely attach the Grille Guard to the frame and lower mounting brackets.

Final Adjustments and Care

Align, tighten all hardware, trim valance if needed, and follow care instructions.

Safety and Warning Information

General Installation Warnings

Failure to follow instructions can lead to injury or damage. Always wear eye protection.

Fastener and Drilling Precautions

Use all supplied fasteners correctly and exercise caution during any required drilling.

Towing and Carrying Capacity Guidelines

Do not exceed vehicle or hitch weight ratings; failure voids warranty and risks injury.

Related product manuals