Do you have a question about the Whirlpool GC2000 and is the answer not in the manual?
Details electrical shock hazard and requirements for grounding the disposer for safe operation.
Lists food wastes suitable for disposal and advises against fibrous materials and large bones.
Step-by-step guide to free a jammed disposer using the Jam Breaker Wrench.
Instructions for operating the disposer in conjunction with a dishwasher.
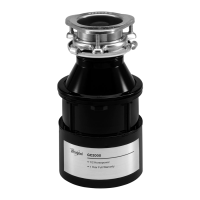
The Whirlpool Food Waste Disposer is an appliance designed to make kitchen cleanup easier by grinding food waste into small particles that can be flushed down the drain. This Use and Care Guide provides essential information for the safe and efficient operation of models GC1000, GC2000, GC3000, and GC4000.
The primary function of the Whirlpool Food Waste Disposer is to process food scraps, converting them into a slurry that can be safely discharged through your plumbing system. This eliminates the need to dispose of most food waste in the trash, reducing household odors and the volume of garbage. The disposer is equipped with grinding elements that create a powerful whirling water action to break down food items. It is designed to handle a variety of food wastes, including bones, fruit and vegetable wastes, pits, eggshells, and coffee grounds. For optimal performance and to prevent drain blockages, large pieces of food waste, such as melon rinds, should be cut into smaller pieces before being fed into the disposer. The appliance is intended for use with cold water, which helps to harden greasy substances, making them easier to grind into tiny particles and preventing grease from sticking to the drain lines.
Operating the Whirlpool Food Waste Disposer involves a few simple steps to ensure safety and efficiency. First, always remove the cover from the sink opening and turn on a good flow of cold water before activating the disposer. Cold water is crucial during operation as it aids in the grinding process and helps flush the drain lines. If you have a double sink, ensure the faucet is positioned over the disposer side. Next, turn the wall switch to the ON position. You can then scrape food waste into the disposer opening, mixing soft and hard food waste items for the most efficient grinding. For maximum safety and to minimize the possible ejection of materials during grinding, the cover should be placed in the DRAIN/GRIND position after all food waste has been fed into the disposer. Once grinding is complete, allow both the disposer and cold water to run for a short period to ensure all ground waste is flushed out of the drain pipes. Finally, turn off the wall switch and then the water.
The disposer's cover serves a dual purpose: it acts as a seal for holding water in the sink and as a drain cover. To seal the sink, press the cover firmly into the disposer opening. It is important not to operate the disposer with the cover in the SEAL position.
The disposer is designed to handle common food wastes but has limitations. Users should avoid putting extremely fibrous materials like corn husks and artichokes into the disposer, as these can cause drain blockages. Additionally, items such as glass, china, metal, tin cans, bottle caps, oyster, and clam shells should never be put into the disposer; these items belong in the trash. If the disposer drains into a septic tank, grinding large amounts of eggshells, lobster, crab, and shrimp shells should be minimized, as this type of waste may necessitate more frequent cleaning of the septic tank system.
In the event of a jam, the disposer includes a safety mechanism and a Jam Breaker Wrench. If foreign material causes a jam, first turn the wall switch to the OFF position. Insert an end of the Jam Breaker Wrench into the center hole at the bottom of the disposer and work it back and forth until the grinding mechanism moves freely. Any foreign objects should then be removed with long-handled tongs or pliers. If the disposer is magnetically actuated, nonmagnetic tools should be used. After clearing the jam, wait 3 to 5 minutes for the motor to cool, then push the red Reset Button located on the bottom of the disposer. Ensure the wall switch is still in the OFF position before pressing the reset button. The Jam Breaker Wrench is effective for most jams, but for extremely tight jams caused by metal objects, a pry bar or tool may be needed, without hammering on it.
For households with a dishwasher connected to the disposer, it is recommended to run the disposer for a short time before starting the dishwasher. This ensures that any unground food waste is cleared, preventing potential backup of discharge water from the dishwasher. It is crucial not to operate the disposer while the dishwasher is in operation. After the dishwasher cycle, run the disposer again briefly to clean and flush any particles discharged by the dishwasher into the main drain line. When the dishwasher is running, placing the disposer cover in the DRAIN/GRIND position can prevent water splash-out.
The Whirlpool Food Waste Disposer is designed for minimal maintenance. Its unique grinding elements create a whirling water action that keeps the grinding chamber clean and free of odors. Over time, a brown discoloration may appear on the face of the grinding disc; this is normal surface discoloration and does not affect the disposer's life or performance.
To prevent odors, clogged drains, or jams, it is important not to "store" food waste in the disposer between grindings. Always use cold water during operation, as it helps solidify greasy substances, making them easier to grind and preventing them from sticking to drain lines.
If odors do occur, they are typically caused by food waste left inside the disposer due to insufficient flushing. To clean and freshen the disposer, follow these steps: Turn the wall switch to the OFF position. Place the cover in the SEAL position and fill the sink halfway with lukewarm water. Add one cup of baking soda and mix it to form a solution. Then, turn on the disposer and remove the cover from the sink. This action will flood the inside of the disposer, washing away loosened particles and freshening the interior.
A critical maintenance instruction is NEVER to use chemical or solvent drain compounds in the disposer. These can damage the appliance and plumbing.
The Whirlpool disposer is permanently lubricated and does not require any additional lubrication throughout its lifespan. This simplifies maintenance, as users do not need to worry about regularly oiling or greasing any components. The focus of maintenance is primarily on proper usage and occasional cleaning to prevent odors and blockages.
| Motor Speed | 1725 RPM |
|---|---|
| Feed Type | Continuous |
| Grind Chamber Material | Stainless Steel |
| Sound Insulation | Yes |
| Dishwasher Drain Connection | Yes |
| Grind Stages | 1 |
| Anti-Jamming | Yes |
| Horsepower | 0.5 HP |
| Warranty | 1-year Limited |