Do you have a question about the Whirlpool WCG55US0HB and is the answer not in the manual?
Explains the meaning of DANGER and WARNING safety alert symbols and messages.
Instructions on what to do if gas is smelled and general gas safety.
Warnings regarding chemicals known to cause cancer or reproductive harm.
Proper installation requires grounding according to local codes or National Electrical Code.
Keep area clear, avoid storing flammable materials on or near the cooktop.
Convert cooktop from Natural gas to Liquid Propane by a licensed professional.
Ensure burner heads and caps are correctly installed and matched to the burner.
Push knob in, turn counterclockwise to ignite. Manual lighting for power failure.
Keep burners clean, clean spills immediately. Use hot soapy water, avoid toothpicks.
Details on assembling standard, SpeedHeat, FlexHeat, and Accusimmer burners for specific models.
Match burner head size to cap size, align head hole to electrode.
Align grate feet with indents, install outer grates using tabs and slots.
Describes dual-burner flexibility, Power (fast boiling) and Simmer (slow cooking) functions.
Hinged grates pivot for easier cleaning, requiring 20" clearance.
Even-Heat Simmer burner for sauces, Melt cap for delicate simmering.
Used for rapid boiling, searing, and frying. Located on left rear or center burner.
Clean knobs with soap/water or dishwasher. Remove in OFF position.
Clean with nonabrasive pad and cleanser, or in dishwasher. Avoid banging.
Clean with nonabrasive pad and cleanser. Do not place wet caps on burners.
Keep holes clean for proper ignition. Refer to "Cleaning the Burners: Tips."
Clean porcelain enamel and stainless steel surfaces using appropriate cleaners and cloths.
Optional griddle for cooking meats, pancakes, sandwiches.
Coordinating knobs and grates for kitchen appliance sets.
Match flame size to cookware. Watch flame, not knob, for proper heat.
Ideal cookware has flat bottom, straight sides, well-fitting lid, medium to heavy thickness.
Advice for long-period canning, centering canners, alternating burner use.
Solutions for when the appliance has no power or function.
Solutions for when burners fail to ignite or function properly.
Addresses issues with flame appearance (uneven, yellow, noisy).
Explains normal sparking behavior of all burners when a knob is pushed.
Solutions for burners making popping sounds, often related to moisture.
Details what is covered under the one-year limited warranty.
Lists items and conditions not covered by the warranty.
Limitations on implied warranties like merchantability or fitness.
Whirlpool makes no other representations about product quality or durability.
Limits remedies and excludes incidental/consequential damages.
This document is a user manual for a Whirlpool gas cooktop, providing comprehensive instructions for its operation, maintenance, and troubleshooting. It emphasizes safety, proper assembly, and efficient cooking practices to ensure a long lifespan for the appliance.
The cooktop is designed for household use and offers a range of features aimed at enhancing the cooking experience. Key usage tips cover essential aspects such as propane gas conversion, proper placement of burner heads and caps, lighting the burners, and cleaning them effectively. For those using liquid propane, the manual advises calling a licensed professional to install the included conversion kit, highlighting the importance of correct setup for safety and performance.
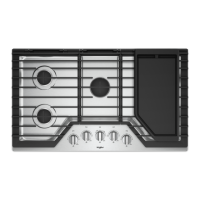
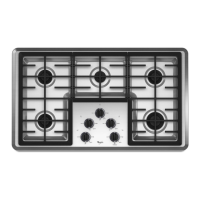
Proper assembly of the burners is crucial, and the manual provides detailed diagrams and instructions based on specific model numbers (WCG51US0D, WCG75US0D, WCG51US6D, WCG9). It explains how to correctly install burner caps and bases, ensuring that each burner has the right size head and cap. The FlexHeat™ burner, for instance, has a unique design where the electrode aligns with a semicircle notch in the head, rather than inserting into a hole, a detail that is important for correct assembly. The manual also clarifies that burner caps and heads are included with the cooktop and stresses the importance of matching burner head size to cap size and aligning the burner head hole with the electrode. For WCG9 series models, an extra "Melt" cap is provided for the smallest burner, designed for delicate simmering tasks.
Lighting the burners is a straightforward process: push in the knob, turn it counterclockwise to IGNITE, wait for a flame, and then adjust to the desired setting between Hi and Lo. In case of a power failure, the burners can be lit manually using a lit match.
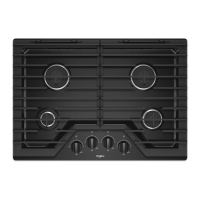
The cooktop incorporates several innovative features to improve cooking versatility and convenience. The FlexHeat™ burner is a dual-burner system offering both fast boiling (Power range) and precise simmering (Simmer range). The Power range is ideal for large quantities of food or quick boiling, while the Simmer range, with its small flame, is perfect for slow cooking and holding a simmer. The Accusimmer® and Accusimmer® Plus burners are specifically designed for simmering sauces, with the knob position closer to "Melt" providing a more delicate simmer level. The Accusimmer® Plus, available on WCG9 series models, includes a dedicated "Melt" cap for melting chocolate, butter, or achieving an even more delicate simmer. The SpeedHeat™ burner, located on the left rear for 30" models and the center for 36" models, is optimized for rapid boiling, searing, and frying.
A significant convenience feature is the EZ-2-Lift™ Hinged Cast Iron Grates. These grates pivot upward and toward the back of the cooktop, providing easy access for cleaning underneath. They stop in a vertical, fully open position, requiring a minimum clearance of 20" (50.8 cm) from the countertop to the bottom of upper cabinets or appliances. The grates are also removable for thorough cleaning. The manual emphasizes returning the grates to their normal (down) position after cleaning and provides instructions for attaching them to their hinges, ensuring proper alignment to avoid scratching the cooktop.
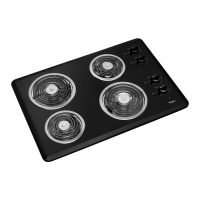
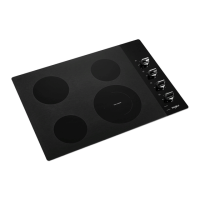
Maintenance and cleaning are thoroughly addressed, with specific recommendations for different surface types. Control knobs (plastic) should be cleaned with soap and water or in the dishwasher, ensuring they are in the OFF position before removal. Burner grates can be cleaned with a nonabrasive plastic scrubbing pad and mild abrasive cleanser, soap, and water, or in the dishwasher after removing burnt-on food. The manual advises against banging grates together or against hard surfaces to prevent chipping. Burner caps should be cleaned with a nonabrasive plastic scrubbing pad and mild abrasive cleanser, soap, and water, and should not be placed in the dishwasher or reassembled when wet. Burner bases require clean holes for proper ignition and flame, with instructions to clean clogged burner ports using a straight pin, needle, or small-gauge wire, and to gently clean the igniter with a damp cloth. Porcelain enamel and stainless steel cooktop surfaces should be cleaned with nonabrasive scrubbing pads, glass cleansers, or specific affresh® cleaners, rubbing in the direction of the grain for stainless steel. The manual explicitly warns against using scouring pads, abrasive cleaners, steel wool pads, gritty washcloths, or abrasive paper towels on stainless steel.
The manual also provides guidance on cooking with the cooktop, including selecting the proper flame size to match cookware and avoid energy waste. It warns against letting the flame extend beyond the edge of the pan and turning off all controls when not cooking. A chart guides users on ideal cookware materials, noting that aluminum and copper cookware may leave permanent marks on grates or the cooktop. For canning, it advises alternating burner use, centering the canner on the grate, and not placing it on two burners simultaneously.
Troubleshooting tips cover common issues such as burners not operating, uneven or noisy flames, and excessive heat around cookware. It provides solutions ranging from checking power supply and gas connections to cleaning burner ports and ensuring correct burner head and cap placement. Illustrations help users identify normal versus abnormal flame appearances, distinguishing between natural gas and propane gas flames.
Finally, the manual includes information on optional accessories, such as a Gourmet Griddle for cooking meats, pancakes, and sandwiches, and coordinating knobs and gray grates for the White Ice and Black Ice Collection, allowing users to enhance their cooktop's functionality and aesthetic. The warranty information details what is covered and not covered, emphasizing the importance of professional installation and maintenance, and providing contact information for customer service in both the U.S. and Canada.
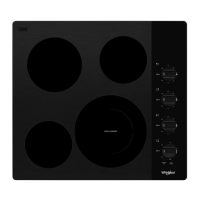
| Style | grate |
|---|---|
| Color | black |
| Griddle | no |
| Continuous Grates | continuous |
| Ignition | electric |
| Number of Cooking Zones | 4 |
| Number of Burners | 4 |
| Downdraft Vent | no |
| Control Type | analog |
| Child Lock | no |
| Wi-Fi | none |
| Fuel | natural gas |
| Depth | 21 inches |
|---|---|
| Height | 4 1/8 inches |
| Width | 30 inches |
| Cutout Depth | 20 inches |
| Cutout Width | 29 3/8 inches |
| Net Weight | 42.8 pounds |