EasyManua.ls Logo

WICKEDedge Pro-Pack II - User Manual

Default Icon
2 pages
Print Icon
To Next Page IconTo Next Page
Loading...
Assembling Your Pro-Pack II or Upgrade Kit
Step
1
Remove the Base Rod and Fixed Vise Jaw from the sharpener Base by unscrewing the two Socket
Head Cap Screws from underneath the Base Rod using the larger of the hex keys on the Vise Key.
Holding the Base with the logo facing you,
place the Extended Base Rod underneath
the Base, so that the engraved lines on the
Extended Base Rod are facing up and the
detents are facing you. Pass the 1/2” Socket
Head Cap Screw through the Extended
Base Rod and screw it into the Base. Only
the hole on the right side of the Base (when
logo is facing you) is threaded to accept the
screw.
Step
2
Place the Riser on the Base with the hole
in the Riser aligned with the through-
hole on the le side of the Base. Pass the
2” Socket Head Cap Screw through the
Extended Base Rod, Base and Riser and
screw it into the bottom of the Fixed Vise
Jaw.
Step
3
Step
4
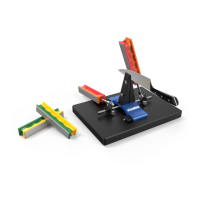
Slide the Ball Joint Assemblies onto the Extended Base Rod so that the Ball Joints face in toward
the center of the sharpener, as shown in the gure above.
Step
5
To mount your sharpener to the Mounting Plate, slide the the included washers onto the #10-32
Flat Socket Head Cap screws with the metal side facing the heads of the screws and slide those
through the underside of the Mounting Plate. read them into the holes on the bottom of the
blue sharpener Base and tighten them down with the smaller of the hex keys on the Vise Key. Ax
the four adhesive backed rubber bumpers to the underside of the Mounting Plate at each corner.
Question and Answer IconNeed help?

Do you have a question about the WICKEDedge Pro-Pack II and is the answer not in the manual?

Summary

Assembling Your Pro-Pack II or Upgrade Kit

Step 1: Remove Base Rod and Fixed Vise Jaw

Unscrew Socket Head Cap Screws from Base Rod and Base using the larger hex key.

Step 2: Attach Extended Base Rod

Place Extended Base Rod under Base, align engraved lines, and secure with 1/2" Socket Head Cap Screw.

Step 3: Mount Riser and Fixed Vise Jaw

Align Riser with Base, pass 2" Socket Head Cap Screw through Base Rod, Base, and Riser into Fixed Vise Jaw.

Step 4: Install Ball Joint Assemblies

Slide Ball Joint Assemblies onto Extended Base Rod with Ball Joints facing the sharpener's center.

Step 5: Mount Sharpener to Plate

Mount sharpener to Plate using Flat Socket Head Cap screws and washers, affix rubber bumpers.

Packing List

WICKEDedge Pro-Pack II Specifications

General IconGeneral
Sharpening System TypeManual
MaterialAluminum and Stainless Steel
TypeSharpening System
ClampVise
Compatible Blade ThicknessUp to 0.25 inches

Related product manuals