32 WILO SE 08/2013 Ed.04 DIN A4
English INSTALLATION
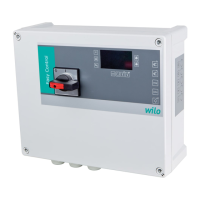
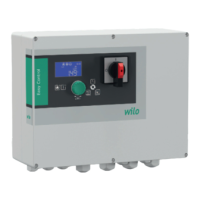
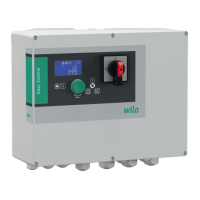
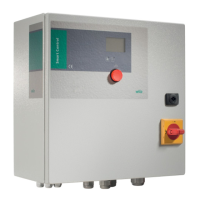
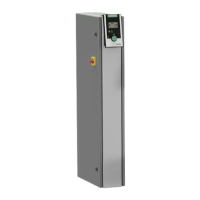
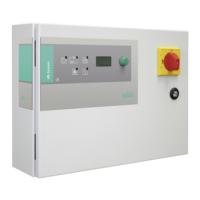
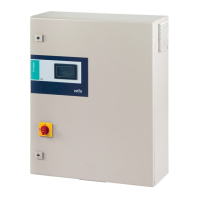
Fig. 2.: Overview of individual components
A Switchgear with main switch
B Switchgear with plug
C Switchgear without main switch and plug
1 Main switch 5 DIP switch
2 Motor contactor 6
Potentiometer for fol-
low-up time
3 Terminal strip 7
Rechargeable battery
installation location
4 Ground terminals 8 Network terminal strip
5.4.1. Switchgear mains connection: with main switch
Insert the cable ends of the power supply cables
laid onsite through the threaded cable connec-
tions and secure them accordingly.
Connect the wires to the main switch as follows:
• Mainsconnection1~230V:
• Cable: 3-core
• Terminals: 2/T1 (L), N (N)
• The protective ground conductor (PE) is con-
nected to the ground terminal (;).
• Position of DIP switch 8: OFF (down position)
NOTE
For correct operation, 2 converter bridges
(enclosed) must be installed on the network
terminal strip:
• Terminal 1 and 2
• Terminal 3 and 4
• Mainsconnection3~400V:
• Cable: 5-core
• Terminals: 2/T1 (L1), 4/T2 (L2), 6/T3 (L3), N (N)
• The protective ground conductor (PE) is con-
nected to the ground terminal (;).
• Position of DIP switch 8: ON (top position)
• A clockwiserotatingeldmustbepresent!
5.4.2. Switchgear mains connection: with plug (S
version)
Insert the plug into the socket:
• Mainsconnection1~230V:Safetysocket
• Mainsconnection3~400V:CEEsocket(Aclock-
wiserotatingeldmustbepresent)!
5.4.3. Switchgear mains connection: without main
switch and plug (O version)
Insert the cable ends of the power supply cables
laid onsite through the threaded cable connec-
tions and secure them accordingly.
Connect the wires to the network terminal strip
as follows:
• Mainsconnection1~230V:
• Cable: 3-core
• Terminals: L1 (L), N (N)
• The protective ground conductor (PE) is con-
nected to the ground terminal (;).
• Position of DIP switch 8: OFF (down position)
NOTE
For correct operation, 2 converter bridges
(enclosed) must be installed on the network
terminal strip:
• Terminal 1 and 2
• Terminal 3 and 4
• Mainsconnection3~400V:
• Cable: 5-core
• Terminals: L1 (L1), L2 (L2), L3 (L3), N (N)
• The protective ground conductor (PE) is con-
nected to the ground terminal (;).
• Position of DIP switch 8: ON (top position)
• A clockwiserotatingeldmustbepresent!
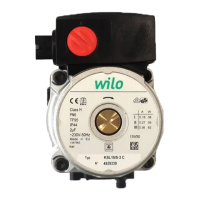
5.4.4. Pump mains connection
Insert the cable ends of the pump power supply
cables laid onsite through the threaded cable
connections and secure accordingly.
Connect the wires to the motor contactor as
follows:
• Pumpconnection1~230V,3-corecable:
• Terminals: 4/T2 (L), 6/T3 (N)
• The protective ground conductor (PE) is con-
nected to the ground terminal (;).
NOTE
With the S version, the pump is connected at
terminals 2/T1 (L), 4/T2 (N)!
• Pumpconnection3~400V:
• Terminals: 2/T1 (U), 4/T2 (V), 6/T3 (W)
• The protective ground conductor (PE) is con-
nected to the ground terminal (;).
• A clockwiserotatingeldmustbepresent!
After the pump has been connected correctly, the
motor protection needs to be adjusted.
Adjusting the motor protection
The electronic motor protection monitors the
rated current of the connected pump during
operation. Deactivation occurs immediately if the
setratedcurrentisexceeded.
NOTE
With connection of 3-phase current motors,
deactivation also occurs after 10 secs if the
ratedcurrentdropsbelow300mAduring
operation!
After each deactivation, the fault needs to be
acknowledged via the "Reset" button.
The motor protection needs to be set to the rated
current shown on the rating plate.
The desired rated current is set via DIP switches
1-5.Thelowestcurrentvalueis1.5Awhereall
DIP switches are set to "OFF" position. On acti-
vating the individual DIP switches (ON position),
the current value is increased by the value of the
relevant DIP switch.
 Loading...