EasyManua.ls Logo

Wise Controls WiseBox - User Manual

Wise Controls WiseBox
3 pages
Print Icon
To Next Page IconTo Next Page
Loading...
PROGRAMMING
INSTALLATION
Simple Instructions for the
WiseBox 4 x 10Amp
General Description of use.
Radio Receiver with 4 x 10A relay contacts. Switches contacts via radio signal from a wireless switch / remote. It has
been designed for switching on / off all types of light sources, as well as electric gates, water features, garage doors, as
well as many other applications.
How to install the WiseBox.
Connect a mains 240V supply into the WiseBox using terminals 1 (Neutral), 2 (Live) and 3 (Earth)
Connect up to four circuits using terminals 4-7 (Earth) and 8 – 15 (Live and Neutral).
How to program a WiseBox circuit to a single switch button.
Make sure that the mains 240V supply into the WiseBox is ON.
Press and hold ‘M1’ (Circuit 1)
(the buzzer will sound continuously.)
With ‘M1’ held down, press one of the buttons on the wall or remote switch.
(The buzzer will sound intermittently to conrm the programming is successful.)
You will now be able to control channel 1 using the selected switch button.
To program circuits 2, 3 or 4, repeat steps A - D.
1.
a)
b)
2.
a)
b)
c)
d)
e)
wise controlswisebox
Question and Answer IconNeed help?

Do you have a question about the Wise Controls WiseBox and is the answer not in the manual?

Summary

Installation

General Description

Radio Receiver with 4 x 10A relay contacts for various switching applications.

Wiring and Connection

Connect mains supply and up to four circuits using designated terminals.

Programming

Single Button Programming

Program a single circuit to a switch button by pressing the M1 button and the switch button.

2 Button Switch Programming

Program circuits for On/Off control using two buttons on a switch/remote.

7 Button Switch (All On;Off)

Program a 7-button switch for group 'All On' and 'All Off' functions.

Master On;Off Function

Assign master On and Off functions to buttons on a 2-button switch/remote.

Switching Mode Adjustment

Change channel mode between On/Off and Push to Make via dip switch.

Deleting Programs

Procedures for deleting single memorised switches or all programmed switches.

Delete Single Switch

Delete a specific switch's control over a channel by pressing MT and the switch button.

Delete All Switches

Clear all programmed switches by pressing MT button multiple times and holding.

Overview

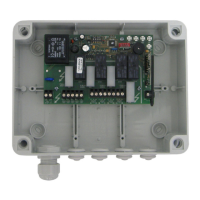
The WiseBox 4 x 10Amp is a radio receiver equipped with four 10A relay contacts, designed to switch contacts via radio signals from a wireless switch or remote. It is suitable for controlling various applications, including all types of light sources, electric gates, water features, and garage doors.

Technical Specifications:

  • Reception Frequency: 868.3 MHz
  • Intermediate Frequency (IF): 10.7 MHz
  • Sensibility (finely tuned signal): 1 µV
  • Power Supply: 230 V ± 10%
  • Operating Temperature Range: -20°C to +60°C
  • Maximum Commutable Power at the Relay (with resistive load): 10A / 250V~
  • Fuses (F1-F2-F3-F4): F10AH250V type

Installation:

To install the WiseBox, connect a 240V mains supply to terminals 1 (Neutral), 2 (Live), and 3 (Earth). Up to four circuits can be connected using terminals 4-7 (Earth) and 8-15 (Live and Neutral).

Programming Features:

Programming a Single Switch Button:

  • Ensure the 240V mains supply to the WiseBox is ON.
  • Press and hold the 'M1' button (for Circuit 1); the buzzer will sound continuously.
  • While holding 'M1', press one of the buttons on the wall or remote switch. The buzzer will sound intermittently to confirm successful programming.
  • Channel 1 can now be controlled using the selected switch button.
  • To program circuits 2, 3, or 4, repeat these steps for the corresponding 'M' button.

Programming a 2-Button Switch:

This method programs a circuit such that one button turns it ON and another turns it OFF.

  • Ensure the 240V mains supply to the WiseBox is ON.
  • Press the programming button (M1, M2, M3, or M4) twice within 1 second, holding it down on the second press. The buzzer will sound continuously.
  • While holding the programming button, press the button on the switch/remote you wish to control the circuit with. The buzzer will sound intermittently to confirm successful programming.
  • The two buttons will now control that circuit (one for ON, one for OFF).
  • Note: Programming this way allows a maximum of two circuits to be controlled from a 4-button switch. If programming to button 1 or 2, button 1 will be ON and button 2 OFF. If programming to button 3 or 4, button 3 will be ON and button 4 OFF.

Programming a 7-Button Switch (ALL ON / ALL OFF):

The 'MT' button automatically programs the WiseBox's 'all on' and 'all off' functions. This feature requires a 7-button switch or remote, utilizing two of the three buttons at the bottom of the switch.

  • First, program circuits 1-4 as instructed above.
  • Press and hold 'MT' (group control); the buzzer will sound continuously.
  • While holding 'MT', press button 5 on the switch/remote. The buzzer will sound intermittently to confirm successful programming.
  • Button 5 will now activate 'All On', and Button 7 will activate 'All Off'.

Programming a Master On/Off Function:

This function requires a minimum of a 2-button switch/remote.

  • Press and hold the 'MT' button; the buzzer will sound continuously.
  • Press either buttons 1 or 2 / 3 or 4 on the switch/remote. The buzzer will sound intermittently to confirm successful programming.
  • Button 1 will be assigned a master 'on' function, and button 2 a master 'off' function.

Programming with WisePIR (Motion Sensor):

For further technical information, refer to the WisePIR instruction sheet.

  • Insert 3 of the 4 batteries into the PIR, ensuring correct polarities.
  • Press the corresponding programming button (M1, M2, M3, or M4) in the WiseBox TWICE, holding down on the second press.
  • While still holding the programming button, push the fourth and final battery into the PIR. The buzzer will sound intermittently to confirm successful programming.
  • Repeat this process for as many PIRs as needed. If multiple PIRs are added to the same circuit, the lights will turn off once the first PIR's timer runs out.
  • Important: If the WiseBox switches On and Off every time the sensor is triggered, delete the PIR by repeating the deletion process (see below), replacing step 'b' with: "Press the MT button inside the WiseBox TWICE, holding down on the second press."
  • If the PIR is being programmed to all circuits in the WiseBox, step 'b' should be changed to pressing 'MT' once instead of twice. Steps 'a', 'c', and 'd' remain the same.

Maintenance Features:

Changing the Switching Mode:

The switching mode allows you to toggle between a "push to make" circuit and an "on/off" circuit.

  • The dip switch panel at the top center of the WiseBox circuit board controls this.
  • Caution: Ensure the circuit is OFF before changing the dip switch.
  • The dip switch in the UP position changes the channel to an on/off circuit (default).
  • The dip switch in the DOWN position changes the channel to a push to make circuit.

Deleting a Single Memorized Switch:

  • Press the 'MT' button twice, then hold it.
  • While holding, press the switch button you wish to delete.
  • The switch button will no longer control that channel.

Deleting Everything Programmed from a WiseBox:

  • Press the 'MT' button three times within 3 seconds.
  • On the third press, continue to hold for 10 seconds.
  • Every switch programmed to the WiseBox will now be deleted.

Wise Controls WiseBox Specifications

General IconGeneral
BrandWise Controls
ModelWiseBox
CategoryController
LanguageEnglish