EasyManua.ls Logo

Wixey WR365 User Manual

Wixey WR365
4 pages
To Next Page IconTo Next Page
Page #1 background imageLoading...
Page #1 background image
1
Wixey
TM
Model WR365 Digital Angle Gauge
with Level Patent Pending
Instructions
SAFTEY FIRST
Always turn off the power and unplug power tools before using any gauge.
Never use power tools without properly installed blade guards. Guards
may not be shown for clarity.
Basic Use
*
Dead Level
TM
refers to absolute level with respect to the center of the earth. This
is what is shown with a tradition bubble level when the bubble is in the exact
center of the vial. Our Dead Level
TM
technology consists of a permanently
c
alibrated level setting which is always being displayed by both the bubble level
icon and the small digital angle reading in the upper right corner of the display.
Exclusive
flip-up
display
Install two AAA Batteries
Note the super strong
magnetic base with “V”
groove for use on pipe
FIG 1
READING THE DISPLAY
A. Bubble icon permanently set Dead Level
TM
*
B. Tilt of gauge compared to Dead Level
TM
C. Low battery indicator
D
. Indicates the display is in HOLD mode
E. Relative angle reading
F. Indicates direction of tilt from relative 0.0°
A
B
C
D
E
F
FIG 2
ON/ZERO
:
A.
Press once to turn
disp
lay. B.
Press again to set relative angle to 0.0
°
.
C. Press and hold to turn off.
HOLD Press once to HOLD displayed reading -Press again to return to measuring mode
FIG 3
Question and Answer IconNeed help?

Do you have a question about the Wixey WR365 and is the answer not in the manual?

Wixey WR365 Specifications

General IconGeneral
ModelWR365
TypeDigital Angle Gauge
DisplayLCD
Auto Power OffYes
Magnetic BaseYes
Measurement Range0 to 360 degrees
Accuracy±0.1 degrees
Resolution0.05 degrees
Operating Temperature32 to 122 degrees Fahrenheit

Summary

Safety Precautions

General Safety Warnings

Always turn off power and unplug tools before using the gauge; never use power tools without blade guards.

Basic Operation and Display

Installing Batteries

Install two AAA batteries into the device for power.

Reading the Display

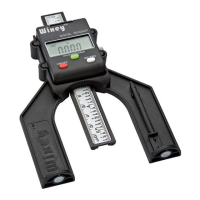
Explanation of display elements including bubble icon, tilt comparison, battery indicator, hold mode, and angle readings.

Button Functions

Describes the ON/ZERO button for turning on/off and setting relative angle, and the HOLD button for freezing readings.

Proper Measuring Techniques

Setting the Reference Surface

Set the gauge on a flat reference surface like a table saw, then use ON/ZERO to calibrate to 0.0 degrees.

Attaching and Measuring

Attach gauge to surfaces using magnets, keeping it perpendicular to the reference surface for accurate measurements.

Troubleshooting and Calibration

Trouble Shooting Issues

Addresses issues like unstable numbers, flashing/dim display, and frozen display with corresponding solutions.

Dead Level Calibration

Procedure to override and recalibrate the permanent Dead Level setting using the ON/ZERO and ON/HOLD buttons.

Specifications and Contact

Device Specifications

Details range, resolution, repeatability, physical size, and power requirements for the digital angle gauge.

Manufacturer Information

Provides contact information and website for Barry Wixey Development for questions and other products.

Related product manuals