EasyManua.ls Logo

Woodford R34 - User Manual

Woodford R34
2 pages
Print Icon
To Next Page IconTo Next Page
Loading...
R34 YARD HYDRANTS
TROUBLESHOOTING AND MAINTENANCE
Water leaks from the nozzle when the hydrant is off.
Check the closing force of the handle. The handle, at the end of the closing
stroke, should "snap" closed. Follow instructions below on how to adjust the
linkage. The plunger (10108) may be worn or damaged and needs to be
replaced. Follow instructions below on how to remove the operating rod. If the
hydrant leaks just after installation, the valve seat may be fouled with debris,
such as small rocks. The operating rod will have to be removed and the
hydrant casing flushed.
Packing leak. Water leaks from around brass stem below the linkage
when the hydrant is on.
The packing nut will occasionally need to be tightened to stop a packing leak.
Tighten the packing nut until snug and the leak stops. Persistent leaks will
require a new packing (10101).
Hydrant leaks from below the ground level when the hydrant is on.
A small leak may be the result of a leak at the drain hole. Replace the plunger
if it is old and worn. Follow instructions below on how remove the operating
pipe. A large leak may be the result of a hole in the pipe casing caused by
electrolysis corrosion. Some soil conditions can cause premature failure of the
pipe casing near the valve body. Brass pipe is recommended for these
conditions.
Hydrant will not drain when shut off.
Make sure there are no attachments on the nozzle, such as a hose or vacuum
breaker. Improper linkage adjustment (not enough tension) may prevent the
hydrant from draining properly. A poor drain field around the valve body or a
blocked drain hole will prevent drainage.
Linkage adjustment.
The adjustment can be made with the water supply on by tightening the
packing nut enough to hold the hydrant closed. To increase the tension: With
the hydrant in a closed position, remove the two linkage screws. Lift the
handle out of the way. Turn the pivot block counterclockwise 1-2 full turns. Re-
attached the linkage and screws, test the tension of the handle. The handle, at
the end of the closing stroke, should "snap" closed. To decrease the tension:
Lift the handle part way open and remove the linkage screws. Turn the pivot
block clockwise 1-2 full turns. Re-attached the linkage and screws, test the
Question and Answer IconNeed help?

Do you have a question about the Woodford R34 and is the answer not in the manual?

Summary

R34 Yard Hydrant Troubleshooting

Nozzle Leaks When Off

Troubleshoot water leaks from the nozzle when the hydrant is in the closed position.

Brass Stem Packing Leaks

Address water leaks from the brass stem below the linkage when the hydrant is on.

Ground Level Leaks When On

Diagnose hydrant leaks from below ground level when the hydrant is operating.

Hydrant Fails to Drain

Resolve issues where the hydrant does not drain properly when shut off.

Linkage Adjustment Procedure

Guide for adjusting the hydrant linkage for proper operation and tension.

Operating Rod Assembly Removal

Instructions for safely removing the operating rod assembly from the hydrant.

Overview

The provided text describes the R34 Yard Hydrant, focusing on troubleshooting and maintenance procedures.

Function Description:

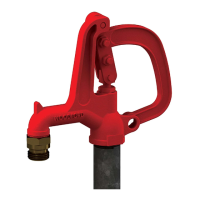
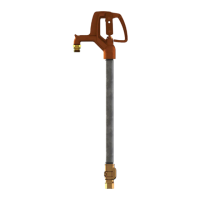
The R34 Yard Hydrant is a device designed to provide water access, likely in an outdoor setting, given the "yard hydrant" designation. It features a handle mechanism for controlling water flow and a drainage system to prevent freezing when shut off. The core function is to deliver water on demand and then drain itself to protect against cold weather.

Important Technical Specifications:

While specific technical specifications like flow rates or pressure ratings are not explicitly stated, the text mentions several components that imply its construction and operation:

  • Plunger (10108): A critical component for controlling water flow and drainage. Its wear or damage can lead to leaks or drainage issues.
  • Packing (10101): A seal around the brass stem that prevents water leaks when the hydrant is on.
  • Operating Rod Assembly: Consists of a steel rod and a brass stem, responsible for actuating the plunger.
  • Pivot Block: A threaded component that connects the linkage to the operating rod, crucial for linkage adjustment.
  • Head Casting: The upper part of the hydrant where the handle and linkage are located.
  • Pipe Casing: The main body of the hydrant that extends below ground, housing the operating rod and valve body. The text notes that brass pipe is recommended for certain soil conditions to prevent corrosion.
  • Valve Seat: The surface against which the plunger seals to stop water flow.
  • Drain Hole: A feature designed to allow water to drain from the hydrant when it's shut off, preventing freezing.

Usage Features:

The primary usage feature is the handle, which, when operated, controls the water flow. The text emphasizes that the handle should "snap" closed at the end of its closing stroke, indicating a positive shut-off mechanism. The hydrant is designed for outdoor use, requiring a proper drain field around the valve body for effective drainage.

Maintenance Features:

The document is primarily a maintenance guide, detailing various troubleshooting steps and repair procedures.

  • Troubleshooting Leaks from the Nozzle (Hydrant Off):

    • Check the closing force of the handle; it should "snap" closed.
    • Adjust the linkage if necessary (detailed procedure provided).
    • Replace the plunger (10108) if worn or damaged.
    • If newly installed, flush the hydrant casing to remove debris fouling the valve seat.
  • Troubleshooting Packing Leaks (Hydrant On):

    • Tighten the packing nut until snug.
    • If leaks persist, replace the packing (10101).
  • Troubleshooting Leaks Below Ground (Hydrant On):

    • A small leak might be from the drain hole; replace the plunger if old and worn.
    • A large leak could indicate a hole in the pipe casing due to electrolysis corrosion; brass pipe is recommended for such conditions.
  • Troubleshooting Drainage Issues (Hydrant Shut Off):

    • Ensure no attachments (hose, vacuum breaker) are on the nozzle.
    • Adjust linkage if improper tension prevents proper drainage.
    • Check for a poor drain field or a blocked drain hole.
  • Linkage Adjustment:

    • This procedure can be done with the water supply on by tightening the packing nut to hold the hydrant closed.
    • To increase tension: With the hydrant closed, remove linkage screws, lift the handle, turn the pivot block counterclockwise 1-2 full turns, reattach linkage, and test. The handle should "snap" closed.
    • To decrease tension: Lift the handle partially open, remove linkage screws, turn the pivot block clockwise 1-2 full turns, reattach linkage, and test. The handle should "snap" closed.
  • Operating Rod Assembly Removal:

    • Preparation: Shut off water supply, lift handle to open position, remove linkage screws, rotate handle away.
    • Disassembly: Unscrew pivot block from brass operating rod, loosen packing nut. Remove head casting using two pipe wrenches (one on pipe, one on head casting). Remove operating rod assembly by gripping the steel rod with vise grips and prying up. Remove the plunger using pipe wrenches or vise grips.
    • Reinstallation: Partially screw pivot block onto brass stem (to protect threads). Use a soft mallet or wood block to drive the plunger into the valve seat. Apply a rubber-safe lubricant (e.g., silicone) to the plunger rubber to aid seating. Remove pivot block from brass stem, reinstall head casting, and adjust linkage to proper tension.

The document provides a comprehensive guide for maintaining the R34 Yard Hydrant, emphasizing common issues and their solutions, particularly focusing on leaks and drainage problems, and offering detailed steps for component replacement and adjustment.

Woodford R34 Specifications

General IconGeneral
BrandWoodford
ModelR34
CategoryLawn and Garden Equipment
LanguageEnglish

Related product manuals