EasyManua.ls Logo

Woodford W34 - User Manual

Woodford W34
4 pages
Print Icon
To Next Page IconTo Next Page
Loading...
For more information contact…
WOODFORD MANUFACTURING COMPANY
2121 Waynoka Road, Colorado Springs, Colorado 80915 • Phone: (800) 621-6032 • Fax: (800) 765-4115
To view our complete product line visit: www.woodfordmfg.com
or email: sales@woodfordmfg.com
A Division of WCM Industries, Inc.
W34 Yard Hydrant
1. Water leaks from the nozzle when the hydrant is off.
Check the closing force of the handle. If the handle does not
snap” closed at the end of the closing stroke, see
Linkage
Adjustment instructions.
If the hydrant leaks just after installation, the valve seat may be
fouled with debris, such as small rocks. The operating pipe
assembly will have to be removed and the hydrant casing
flushed. See
Operating Pipe Assembly Removal instructions.
To inspect and/or replace the plunger if it is worn or damaged,
see
Operating Pipe Assembly Removal instructions.
2. Water leaks around the brass stem below the handle linkage when
the hydrant is on.
The packing nut will occasionally need to be tightened to stop a
packing leak. Tighten the packing nut until snug and the leak
stops. Persistent leaks will require a new packing #10101. See
W34 Packing Replacement instructions.
3. Water leaks from below ground level when the hydrant is on.
A small leak may be the result of a leak at the drain hole.
Replace the plunger if it is old and worn. See
Operating Pipe
Assembly Removal instructions.
A large leak may be the result of a hole in the pipe casing
caused by electrolysis corrosion. Some soil conditions can cause
premature failure of the pipe casing near the valve body. Brass
pipe is recommended for these conditions. Contact the factory
for details.
4. Hydrant will not drain when shut off.
Make sure there are no attachments on the nozzle, such as a
hose or vacuum breaker.
Improper linkage adjustment (not enough tension) may prevent
the hydrant from draining properly. See
Linkage Adjustment
instructions
A poor drain field around the valve body or a blocked drain hole
will prevent drainage. See
Yard Hydrant Installation Instructions.
Red Head
Assembly
Handle “Snap”
Packing Nut
Pipe
Valve Body
Drain Hole
Rev 08/10 Form No.TMYH-2.103

Other manuals for Woodford W34

Question and Answer IconNeed help?

Do you have a question about the Woodford W34 and is the answer not in the manual?

Summary

W34 Yard Hydrant Troubleshooting

Water Leaks From Nozzle When Hydrant Is Off

Addresses nozzle leaks when the hydrant is off, checking handle closing force and linkage.

Water Leaks Around Brass Stem

Details leaks around the stem below the handle linkage when the hydrant is on, focusing on packing nut.

Water Leaks Below Ground Level

Covers leaks from below ground when the hydrant is on, discussing drain holes and pipe casing corrosion.

Hydrant Will Not Drain When Shut Off

Explains issues preventing proper drainage, including nozzle attachments and linkage tension.

W34 Yard Hydrant Linkage Adjustment

Increase Handle Tension

Instructions to increase handle tension by adjusting the linkage and set screw for proper closing.

Decrease Handle Tension

Instructions to decrease handle tension by adjusting the linkage and set screw for proper closing.

W34 Yard Hydrant Plunger Replacement

Plunger Inspection and Replacement

Procedure for inspecting or replacing the plunger due to debris or wear in the valve body.

W34 Yard Hydrant Packing Replacement

Packing Replacement Procedure

Steps to replace the graphite packing and washer to resolve persistent leaks after tightening the packing nut.

Overview

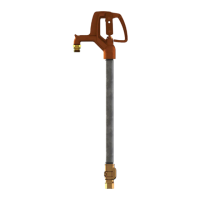
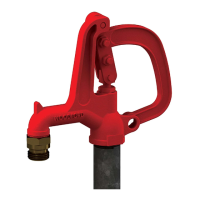
The Woodford W34 Yard Hydrant is a robust and reliable outdoor water fixture designed for convenient water access in various settings, including residential, agricultural, and commercial properties. Its primary function is to provide a dependable water source that is protected from freezing, making it suitable for year-round use even in cold climates. The hydrant achieves this by draining water from the standpipe below the frost line when shut off, preventing ice formation within the pipe.

Function Description:

The W34 Yard Hydrant operates via a simple lever-action handle that controls the flow of water. When the handle is lifted, a plunger at the bottom of the standpipe opens, allowing water to flow up through the pipe and out the nozzle. When the handle is pushed down to the closed position, the plunger seats, shutting off the water supply. Crucially, as the plunger seats, a drain hole located below the frost line opens, allowing any water remaining in the standpipe above the plunger to drain out into the surrounding soil. This self-draining mechanism is essential for freeze protection. The "snap" action of the handle when closing indicates proper linkage adjustment and ensures the plunger is fully seated and the drain hole is open.

Important Technical Specifications:

While specific dimensions and materials are not exhaustively detailed in the provided manual, key components and their functions are highlighted:

  • Pipe Casing: The main vertical pipe that houses the operating pipe and plunger. The manual notes that brass pipe is recommended for certain soil conditions to prevent premature failure due to electrolysis corrosion, implying the standard casing might be a different material (e.g., galvanized steel).
  • Valve Body: Located at the bottom of the pipe casing, below the frost line, where the plunger seats and the drain hole is situated.
  • Operating Pipe Assembly: This internal assembly includes the brass stem, operating pipe, and plunger. It moves vertically to open and close the valve.
  • Plunger (#10105): A critical component that seals against the valve seat to stop water flow and, when seated, opens the drain hole. It is subject to wear and can be replaced.
  • Packing (#10101) and Packing Nut: These components seal around the brass stem where it exits the head casting, preventing leaks when the hydrant is in use. The packing is a consumable item that may need replacement.
  • Head Casting: The upper part of the hydrant that houses the handle, linkage assembly, and packing nut.
  • Linkage Assembly: Connects the handle to the operating pipe, translating the handle's movement into vertical motion of the operating pipe and plunger. It includes a pivot, set screw, link bolt, and link spacer.

Usage Features:

  • Year-Round Water Access: Designed for use in all seasons, including freezing temperatures, due to its self-draining feature.
  • Simple Operation: A straightforward handle mechanism makes it easy to turn water on and off.
  • Durable Construction: Built to withstand outdoor conditions, though material choice for the pipe casing can be critical in corrosive soil.
  • Nozzle Attachments: The hydrant is designed to drain properly only when no attachments (like hoses or vacuum breakers) are left on the nozzle, as these can prevent the standpipe from emptying.

Maintenance Features:

The manual provides detailed troubleshooting and maintenance instructions, focusing on common issues:

  • Water Leaks from the Nozzle (Hydrant Off):
    • Linkage Adjustment: If the handle doesn't "snap" closed, the linkage may need adjustment to ensure the plunger fully seats. This involves loosening and resetting the set screw in the pivot to increase or decrease handle tension.
    • Debris in Valve Seat: New installations might experience leaks due to debris. The operating pipe assembly can be removed, and the casing flushed to clear obstructions.
    • Worn/Damaged Plunger: The plunger can be inspected and replaced if worn, as it directly impacts the seal.
  • Water Leaks Around the Brass Stem (Hydrant On):
    • Packing Nut Tightening: The packing nut can be tightened to stop minor leaks.
    • Packing Replacement (#10101): For persistent leaks, the graphite packing will need to be replaced. This involves removing the head casting, linkage, packing nut, and carefully digging out the old packing. A new packing is then installed, and the components reassembled.
  • Water Leaks Below Ground Level (Hydrant On):
    • Drain Hole Leak/Worn Plunger: A small leak might indicate an issue with the drain hole or a worn plunger, necessitating plunger replacement.
    • Pipe Casing Corrosion: A large leak could point to a hole in the pipe casing due to electrolysis corrosion, especially in certain soil conditions. In such cases, brass pipe is recommended for replacement.
  • Hydrant Will Not Drain When Shut Off:
    • Nozzle Attachments: Ensure no hoses or vacuum breakers are left on the nozzle, as they prevent proper drainage.
    • Improper Linkage Adjustment: Insufficient tension in the linkage can prevent the drain hole from opening fully. Adjustment is required.
    • Poor Drain Field/Blocked Drain Hole: A clogged drain hole or inadequate drainage around the valve body can impede water evacuation. This may require clearing the drain hole or improving the surrounding drain field.

Plunger Replacement:

This is a key maintenance procedure that involves:

  1. Shutting off the water supply.
  2. Loosening the linkage set screw and packing nut.
  3. Removing the head casting using pipe wrenches.
  4. Prying the operating pipe assembly upward to remove it.
  5. Flushing the casing.
  6. Examining and replacing the plunger (#10105) from the operating pipe.
  7. Applying silicone grease to the new plunger.
  8. Reinserting the operating rod assembly and tapping it until the plunger seats.
  9. Reinstalling the head assembly and adjusting the linkage.

Packing Replacement:

This procedure is more involved than plunger replacement and includes:

  1. Shutting off water.
  2. Loosening the pivot set screw and packing nut.
  3. Removing the head casting.
  4. Removing the link bolt and link spacer to detach the handle and linkage assembly.
  5. Removing the packing nut.
  6. Digging out the old graphite packing (#10101) with a screwdriver (noting this destroys the packing).
  7. Reusing the packing washer (#10102) if intact.
  8. Installing new packing (#10101).
  9. Reinstalling the packing nut (without tightening initially), handle, and linkage assembly.
  10. Aligning and carefully reinstalling the head assembly, ensuring the set screw engages the brass stem.
  11. Tightening the packing nut until leaks stop.
  12. Adjusting the linkage for proper "snap" closure.

The Woodford W34 Yard Hydrant is designed for longevity and ease of repair, with clear instructions provided for common issues, ensuring its continued functionality as a reliable outdoor water source.

Woodford W34 Specifications

General IconGeneral
BrandWoodford
ModelW34
CategoryLawn and Garden Equipment
LanguageEnglish

Related product manuals