EasyManua.ls Logo

Woodland CALGARY - User Manual

Woodland CALGARY
4 pages
Print Icon
To Next Page IconTo Next Page
Loading...
W3
W21
S5
110mm flathead bolt
Assembly Instructions for CALGARY pos. 502
Safety rail
Z26
Safety rail
Z26
S fety
a
il
a
r
Z25
Safety rail Z23
screwed from inside
B17-B32
W16
W15
W17
W3
Z30
Z32
Z31
W9
W8
W7
W5
S1
S8
S11
S7
W18
S6
S5
W23
W11
W12
W10
W21
W22
Beam side of horizontal
beams with the most round
indentations face the inside of
the bed!
Diagram 1.1Diagram 1.1
Predrilled holes
for wall attachment
Safety rail Z25
screwed from outside
P1
Z1
Z7
Z2
F1
F2
F3
W6
2. Wooden parts (if necessary) should be treated with the natural wax or oil before the assembly.
Our Tip: The untreated bed is better for the environment of children’s room (regulating humidity in the air!). Also you could save treatment cost and makes it easier
to wipe off crayon and color pencil marks with tissues and cloth. Other advantage is that untreated wood is easier for children’s hands to grip on and the natural
colour of the wood would last longer.
3. The following working tools are necessary for assembly: a ratchet with size 10 socket and cross-end screwdriver (better yet a
cordless screwdriver with exchangable size 10 socket and cross-end attachment) and hammer. An assistance is necessary
only when putting together the corner posts.
1. Before you begin please take a look at the diagrams above. Every important assembly parts are labeled with a sticker so that
you will recognize them immediately. Additional beam list will also help you to identify the beam parts. Each beams are shown
vertically or horizontally depending on how they are assembled. Also you will find labels on the boxes with a description of what is
To begin:
W13
W14
W20
W19
S1
S8
S7
W13
W9
W2
W1
W8
W14
1.1.
S8
S7
W2
W1
S6
W9
W7
W8
S5
S1
W13
W14
W12
W23
2.2.
S7
W2
W1
S6
W7
W5
W6
S5
W12
W11
W10
W23
W16
W15
W17
W3
S8
S1
W8
W9
W13
W14
W22
W21
3.3.
W1
W2
B1-B16
Beam sides of S1,S5,
S6 and S8 with the
round indentations face
the middle of the bed!
Z32
Z32
Z32
S11
S11
W18
W18
W20
W19
W20
W19
W20
W19
The upper surface of the
mattress may not go over the
marking on beam S1
Not all specifications are guaranteed.
© Copyrights by WOODLAND 1998
R
flange
nut M6
Question and Answer IconNeed help?

Do you have a question about the Woodland CALGARY and is the answer not in the manual?

Summary

Getting Started

Identify Parts and Beams

Familiarize yourself with labeled parts and the beam list for immediate recognition during assembly.

Wood Treatment and Care

Instructions on treating wooden parts with natural wax or oil before assembly, with tips on untreated wood benefits.

Required Tools and Assistance

Lists necessary tools like a ratchet, screwdriver, and hammer, and recommends assistance for corner post assembly.

Beam Identification Guide

Understanding Beam Labels

Learn to identify beams by their labels (W for horizontal, S for vertical) and circular indentations.

Horizontal Beam Assembly Notes

Guidance on orienting horizontal beams, noting round indentations facing the inside of the bed.

Vertical Beam Assembly Notes

Information on vertical beams and specific notes for ladder beams, corner beams, and middle beams.

Assembly Steps and Details

Starting Bed Frame Assembly

Begin assembly with horizontal beams, ensuring correct orientation of round indentations.

Ladder Assembly Instructions

Details on gluing ladder rungs on one side for potential future height adjustments.

Drawer Assembly

Steps for assembling drawers, attaching castors, and sliding them into the bed frame.

Component Assembly and Safety

Slatted Frame Installation

Instructions for placing and fixing the slatted frame with wooden pegs and screws for mattress support.

Safety Rail Attachment

Guidance on assembling safety rails using screws, specifying front, back, and side rail placement.

Sail and Steering Wheel Installation

Instructions for attaching a sail with rope and a steering wheel using specific bolts and nuts.

Wall Attachment Recommendation

Advises securing the bed to a wall for safety, detailing anchor and bolt usage and baseboard considerations.

Overview

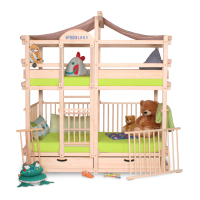
This document provides assembly instructions for the WOODLAND CALGARY bed, model pos. 502. It serves as a comprehensive guide for setting up the bed, detailing the function of various components, important technical specifications, usage features, and maintenance considerations.

Function Description:

The CALGARY bed is a modular children's bed system designed for versatility and safety. It can be assembled in various configurations, including a basic bed, a bunk bed, and can be enhanced with accessories like a climbing rope, ship's wheel, and drawers. The core function is to provide a sturdy and adaptable sleeping solution for children, with an emphasis on safety features that exceed European standards. The modular design allows for future modifications and additions, extending the bed's usability as a child grows.

Important Technical Specifications:

  • Beam Identification: Beams are labeled with stickers (e.g., W1, W2, S1, S5) for easy identification during assembly. "W" denotes horizontal beams, and "S" denotes vertical beams.
  • Indentations: Beams feature 20 mm circular indentations. The side with the most indentations typically faces the inside of the bed. Horizontal beams (W1, W2, W3, W5, W7, W8, W9, W10, W11, W12) have two round indentations facing down. Head and foot side horizontal beams (W13, W15, W16, W17, W23) have round indentations facing inside the bed.
  • Fasteners:
    • Screws: 16mm and 35mm screws are used for various connections, including slats, safety rails, and arch assembly.
    • Flathead Bolts: 110mm flathead bolts are used for major structural connections. These are hammered from outside to inside and secured with size 6 flange nuts using a screwdriver with a size 10 socket. Initial tightening should be loose, with final tightening performed later.
    • Flange Nuts: M6 flange nuts are used with flathead bolts.
    • Wall Attachment Hardware: Supplied anchors and 80mm or 100mm hexagonhead bolts are used for wall attachment.
  • Ladder Assembly: Ladder end beams (Z1, Z2, Z7) are designed with holes for rungs. Wood glue is used on one side of the rungs to allow for future height adjustments (up to 150 cm).
  • Slatted Frame: Consists of 15 wooden pegs placed between slats. The pegs are attached to one side of every slat except the 16th. Slats are placed on notches of beams W2, W9, W3, W10 and fixed with screws. The slatted frame is designed for use with a mattress.
  • Safety Rails: Z23-Z26 are assembled with 35mm screws. Front rails (Z23) and back rails (Z26) attach from the inside, while side rails (Z24, Z25) attach from the outside. WOODLAND bunk beds feature guard rails that are more than double the European Standard EN 747 requirement for children under six years old.
  • Drawers: Sideboards (F1, F2, F3) are fixed to beams S12 and S13 with 40x40mm brackets. Castors are attached to wooden blocks underneath the drawers using 16mm screws.
  • Accessories:
    • Climbing Rope: A 50 cm long Hanf rope (10mm thick) attaches to the climbing rope beam (W18) and side beams (W17 or W23) using a figure-eight knot.
    • Ship's Wheel: Attaches to the front beam (W17 or other 6mm holes) with a flathead bolt, large washer, M6-bolt, and a special nut (green ring inside).
    • Arch: Assembles over ladder beams Z1 and Z2 using 35mm screws.

Usage Features:

  • Modular Design: The bed's components allow for various configurations, from a basic bed to a bunk bed, and integration with accessories like drawers, a climbing rope, and a ship's wheel.
  • Ladder Options: The ladder can be positioned at the head or foot of the bed, and its height can be adjusted by adding or removing steps.
  • Mattress Support: The slatted frame is designed to support a mattress, ensuring safety and comfort.
  • Safety Rails: Exceed European safety standards, providing enhanced protection for young children.
  • Wall Attachment: Recommended for security, especially when children play actively. Upper holes on S7 beams are designated for wall attachment, or W23 can be used. A wooden block may be needed to fill the gap if the bed does not directly contact the wall due to a baseboard.
  • Drawer Functionality: Drawers slide smoothly between vertical beams, providing convenient storage.
  • Accessory Integration: Designed to easily incorporate various WOODLAND accessories, enhancing play and functionality.

Maintenance Features:

  • Initial Wood Treatment: Wooden parts should be treated with natural wax or oil before assembly. This protects the wood, regulates humidity in the room, and makes cleaning easier. Untreated wood is also highlighted as an environmentally friendly option that retains its natural color and is easier for children to grip.
  • Bolt Tightening: After approximately three weeks, all bolts should be re-tightened to ensure they remain secure and prevent the bolt heads from becoming buried in the wood.
  • Sticker Removal: Stickers should be removed from beam ends and other building parts after assembly.
  • Safety Check: Regularly inspect the bed for any loose parts or damage, especially if used by active children.
  • Cleaning: The treated wood can be easily wiped clean with tissues and cloth.

Assembly Tools:

  • Ratchet with size 10 socket
  • Cross-end screwdriver (cordless screwdriver with exchangeable size 10 socket and cross-end attachment is recommended)
  • Hammer

Important Tips:

  • Assemble the bed in an open space to allow for easy movement around it.
  • When assembling vertical beams, orient yourself to the upper round indentations, as lower ones are for conversion options.
  • For drawer assembly, screw brackets onto the sideboard first, then fix the other end to the beam.
  • If combining with a frame set or back and armrest set, read their assembly instructions first.
  • Do not allow small children to put covering for round indentations in their mouth.
  • Contact WOODLAND at (02133) 2482-19 for technical questions.

Woodland CALGARY Specifications

General IconGeneral
BrandWoodland
ModelCALGARY
CategoryIndoor Furnishing
LanguageEnglish

Related product manuals