Owner Service 17
MAN0476 (Rev. 2/10/2006)
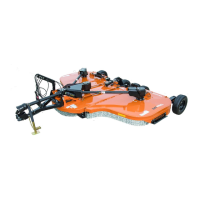
Sharpen Blades
IMPORTANT
■ When sharpening blades, grind the same
amount on each blade to maintain balance.
Replace blades in pairs. Unbalanced blades will
cause excessive vibration, which can damage
gearbox bearings. Vibration may also cause struc-
tural cracks to cutter.
Figure 6. Sharpen Blade
1. Sharpen both blades at the same time to maintain
balance. Follow original sharpening pattern.
2. Do not sharpen blade to a razor edge, leave at
least a 1/16" blunt edge.
3. Do not sharpen back side of blade.
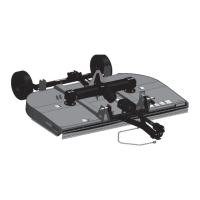
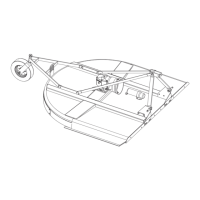
DRIVELINE SLIP CLUTCH ADJUSTMENT
The slip clutch is designed to slip so that the gearbox
and driveline are protected if the cutter strikes an
obstruction.
A new slip clutch or one that has been in storage over
the winter may seize. Before operating the cutter, make
sure it will slip by performing the following operation:
1. Turn off tractor engine and remove key.
2. Remove driveline from tractor PTO.
3. Loosen eight 10 mm cap screws (2) to remove all
tension from clutch pressure plate (3) and clutch
flange yoke (7). See Figure 7.
4. Hold clutch hub (5) solid and turn shaft to make
sure clutch slips.
5.
If clutch does not slip freely, disassemble and clean the
clutch flange yoke (7) and clutch pressure plate (3).
6. Reassemble clutch.
7. Tighten clutch springs (8) until springs are
compressed to 1.10". See Figure 7.
8. If a clutch continues to slip when the springs are
compressed to 1.10", check clutch discs (4) for
excessive wear. Discs are 1/8" when new. Replace
discs after 1/16" wear. Minimum disc thickness is
1/16".
Figure 7. Slip Clutch Assembly
1/16"
Follow Original Pattern
Maintain Corner
CD1257-2
1.10" REF
7
2
3
4
5
4
CD6824
8
2. M10 x 1.5 x 80 Hex head bolt
3. Clutch pressure plate
4. Clutch disk
5. Support hub
7. Clutch flange yoke
8. Clutch spring
 Loading...