Xenex Disinfection Services LLC- Confidential and Proprietary Information.
12082017 Original Instructions. 730-00009-02
xenex.com | 866-867-9799 | page 5
PODSETUP:
Integrating the LightStrike® Robot
Set Up: Integrating the LightStrike®
Robot (continued)
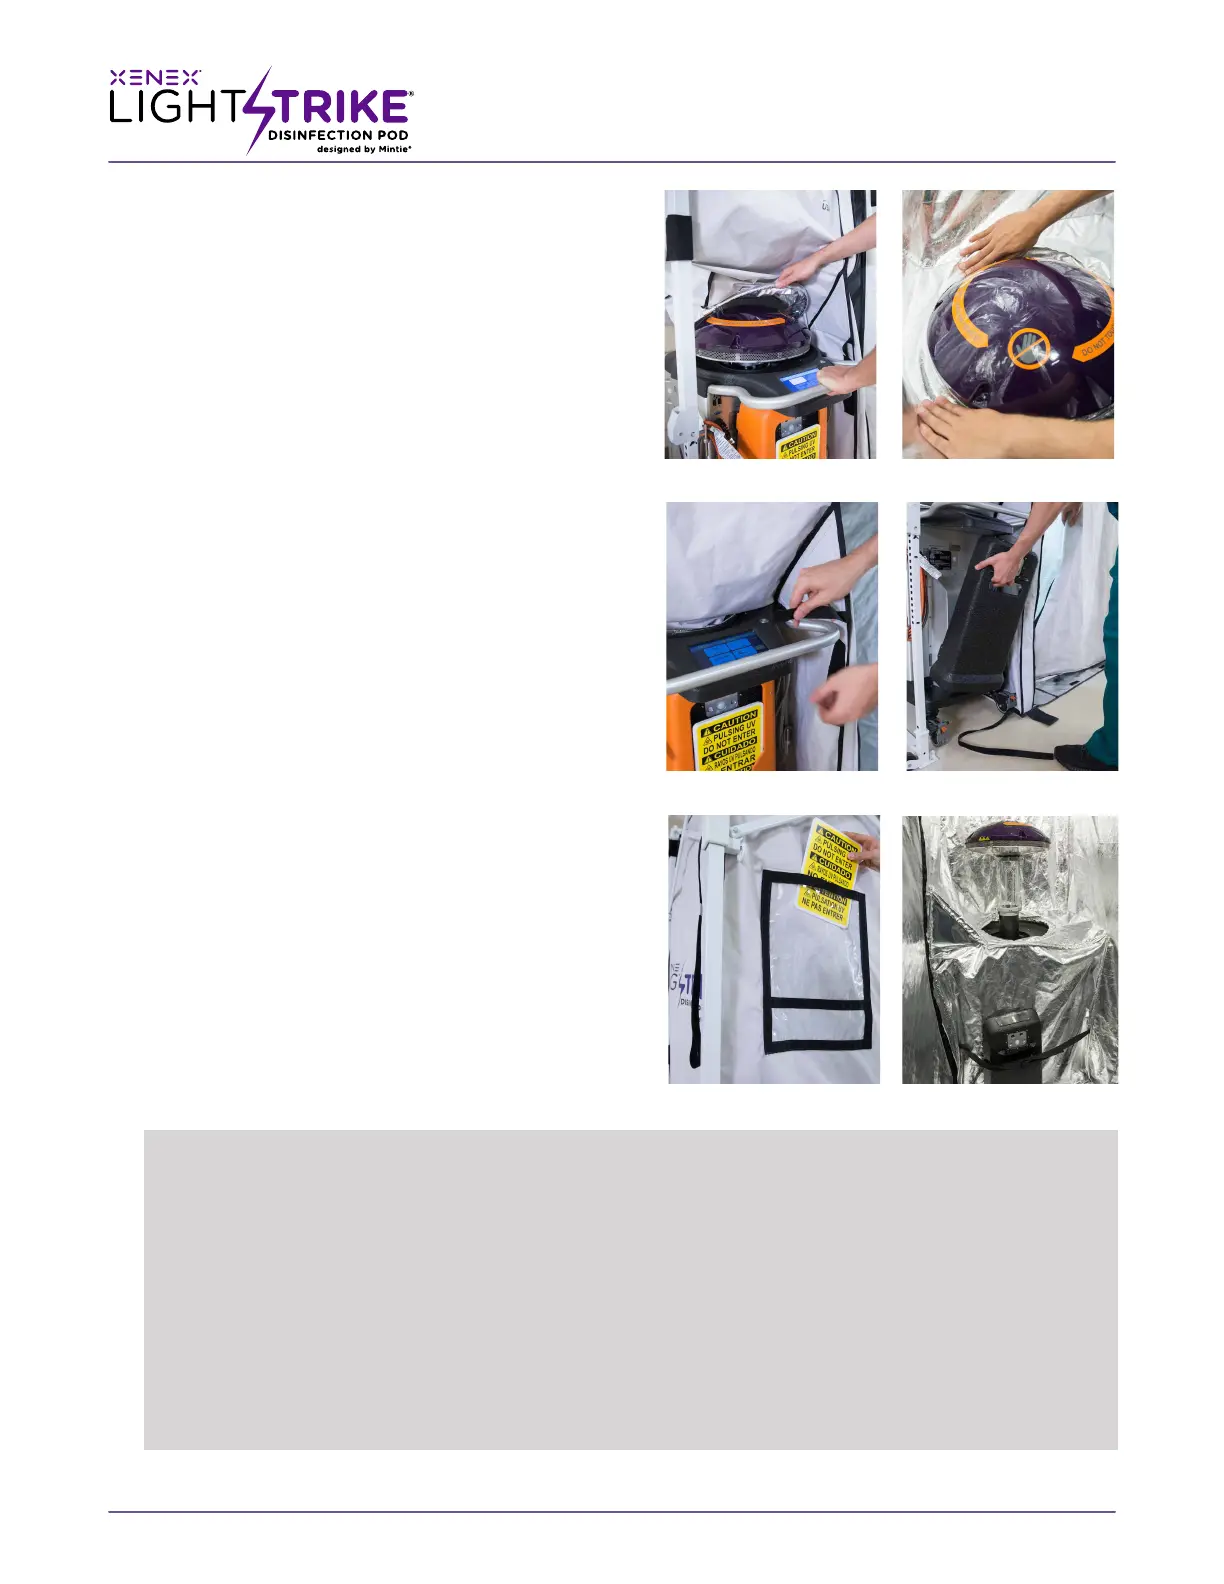
3. Roll the LightStrike® Robot through the front le side
of the Pod envelope and align with the round Robot
port collar
(Fig: 3-F).
4. Remove the orange cone from the LightStrike Robot
and set it aside in front of the Pod for use before
starting the disinfection cycles.
5. Step inside the Pod and place the round robot collar
over the dome of the LightStrike Robot. The collar
should rest on the plastic upper housing of the
LightStrike Robot and the collar centered over the
Robot head.
(Fig: 3 -G).
NOTEYou can loop the front suspension strap through the
robot handle for added support
(Fig: 3 -H).
6. Lock the wheels of the LightStrike Robot and then
remove the black motion sensor from the Robot.
Unwind the cord of the motion sensor from the
LightStrike Robot and place it inside the Pod through
the cargo door against the le side wall of the
envelope, facing away from the wall and secure it with
the Velcro straps
(Fig: 3 -I). Feed the cord through the
lower le corner of the cargo door.
7. Plug in the LightStrike Robot and power it on.
8. Load the items to be disinfected. Close both zippers by
pulling each downward to the floor.
9. Place the orange safety cone in front of the Pod and
remove a safety sign from the orange cone and place it in
the clear pouch on the pod
(Fig: 3-J).
NOTEThere is a name placard space also.
10. Run the Robot for a 5 minute cycle
(Fig:3 -K).
(Fig: 3F)
(Fig: 3G)
(Fig: 3H)
(Fig: 3i)
(Fig: 3J)
(Fig: 3K)
HELPFULHINTS
• Never place an item outside of the
disinfection range. This is between 12
inches from the front wall of the pod and
6 inches from the back wall.
• Ensure all high-touch surfaces are
extended (e.g., keyboard pulled out from
under Computer on Wheel tabletop,
or blood pressure cuff removed from
Dynamap basket).
• When possible, position all high-touch
surfaces so that they face the robot. To
prevent shadowing, place multiple pieces
of equipment of similar height back to
back, and evenly separate them within the
disinfection range.
• Place taller equipment (e.g., IV pole)
behind shorter equipment (e.g.,
wheelchair) to minimize shadowing and
maximize direct line of sight exposure.
• Stagger the placement of multiple
equipment on poles and adjust the
vertical height of control panels if
necessary in order to maximize direct
line of sight exposure.
Examples of combinations portable
medical equipment can be placed
inside of the pod.
– 1 computer on wheels
– 1 wheelchair
– 3 IV poles/dynamaps
– 2 commodes
– 1 wheelchair + 1 IV pole
– 1 NICU isolette
 Loading...