Do you have a question about the XPG GAMMIX S70 BLADE and is the answer not in the manual?
Lay the SSD on a flat surface with the warranty sticker facing downwards and the gold interface connector on the right-hand side.
Remove the backing film from the backside of the heat sink to expose the adhesive.
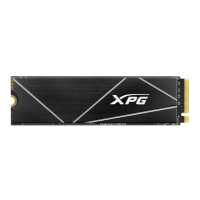
Align the heat sink with the SSD, ensuring the XPG logo is right-side up, and then attach it.
Verify alignment of the heat sink with PCB pins and ensure it is centered on the SSD.
Install the fully assembled SSD onto your computer's motherboard.
Display of the completed SSD heat sink assembly installed on a motherboard.
This document outlines the assembly process for the XPG GAMMIX S70 BLADE heat sink, designed to enhance the thermal performance of an SSD. The guide provides clear, step-by-step instructions for attaching the heat sink to an SSD and subsequently installing the assembled unit onto a computer's motherboard.
The primary function of the XPG GAMMIX S70 BLADE heat sink is to dissipate heat generated by an SSD during operation. By effectively managing the temperature, the heat sink helps maintain optimal performance and extends the lifespan of the SSD, especially under heavy workloads or in systems with limited airflow. This is crucial for high-performance SSDs like the GAMMIX S70 BLADE, which can generate significant heat.
The assembly process is straightforward, beginning with the proper orientation of the SSD. Users are instructed to lay the SSD on a flat surface with the warranty sticker facing downwards, ensuring the gold interface connector is positioned on the right-hand side. This initial step is vital for correct alignment in subsequent stages.
The next step involves preparing the heat sink by removing the backing film from its backside. This action exposes the adhesive layer, which will secure the heat sink to the SSD. The adhesive is designed to provide a firm and reliable attachment, ensuring efficient heat transfer from the SSD to the heat sink.
Following the preparation, the user proceeds to align and attach the heat sink to the SSD. The instructions emphasize facing the front of the heat sink towards the user, with the XPG logo oriented right-side up. Careful alignment with the SSD is crucial at this stage to ensure proper contact and coverage, maximizing the heat sink's effectiveness.
Once the heat sink is attached, the guide provides detailed instructions for confirming the alignment. This confirmation process involves several visual checks:
These detailed alignment checks are critical for ensuring that the heat sink is correctly positioned to provide optimal cooling and does not interfere with the SSD's functionality or installation.
The final step in the assembly process is to install the fully assembled SSD, with the heat sink attached, onto the computer's motherboard. This involves inserting the SSD into the appropriate M.2 slot on the motherboard and securing it, typically with a small screw. The heat sink's design ensures that it fits within the standard clearances of most motherboards, allowing for seamless integration.
While the document primarily focuses on assembly, the inherent function of the heat sink implies certain usage and maintenance features. In terms of usage, the heat sink is a passive cooling solution, meaning it operates without external power or moving parts. Once installed, it continuously works to draw heat away from the SSD, requiring no active management from the user. This makes it a set-and-forget component, contributing to a stable and reliable system.
Regarding maintenance, the XPG GAMMIX S70 BLADE heat sink itself requires minimal upkeep. As a passive component, it does not have wear-and-tear parts like fans. However, like any cooling component, it may accumulate dust over time, which can slightly impede its cooling efficiency. Periodically, users might consider gently cleaning the heat sink fins with compressed air or a soft brush to remove dust buildup, ensuring optimal thermal performance. The adhesive used for attachment is generally designed for long-term stability, so re-application or replacement is typically not necessary unless the heat sink is removed for other reasons.
The design of the heat sink, with its XPG branding and sleek appearance, also contributes to the aesthetic appeal of the internal components of a PC, which is a consideration for many modern system builders. The guide's emphasis on aligning the XPG logo right-side up during installation highlights this aspect.
In summary, the XPG GAMMIX S70 BLADE heat sink is a crucial accessory for high-performance SSDs, designed to improve thermal management and ensure consistent performance. Its assembly process is user-friendly, with clear instructions and visual cues for proper alignment. Once installed, it functions as a reliable, passive cooling solution requiring minimal maintenance, contributing to the overall stability and longevity of the SSD and the computer system. The detailed steps provided in the guide ensure that even users with limited experience can successfully attach the heat sink and integrate it into their systems.
| NVMe | Yes |
|---|---|
| Interface | PCI Express 4.0 |
| Read speed | 7400 MB/s |
| TBW rating | 370 |
| Memory type | 3D NAND |
| Write speed | 2600 MB/s |
| NVMe version | 1.4 |
| SSD capacity | 512 GB |
| Component for | PC/Laptop |
| SSD form factor | M.2 |
| Random read (4KB) | 425000 IOPS |
| Random write (4KB) | 510000 IOPS |
| Security algorithms | 256-bit AES |
| Sequential read speed (CDM) | 7200 MB/s |
| Sequential read speed (AS SSD) | 5700 MB/s |
| Sequential write speed (AS SSD) | 2400 MB/s |
| PCI Express interface data lanes | x4 |
| Operating shock | 1500 G |
| Storage temperature (T-T) | -40 - 85 °C |
| Operating temperature (T-T) | 0 - 70 °C |
| Minimum operating temperature | 0 °C |
| Sustainability certificates | CE, RoHS |
| Package type | Box |
| Harmonized System (HS) code | 84717070 |
| Depth | 80 mm |
|---|---|
| Width | 22 mm |
| Height | 4.3 mm |
| Weight | 10 g |