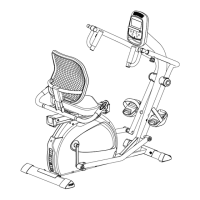
RSX1500 Seated Stepper
7
1. Use the Allen Wrench (#131) to tighten both front and rear Stabilizers
(#12,13) with 4 Socket Head Cap Bolts (#100), 4 Split Washers (#98)
and 4 Flat Washers (#99).
2. Connect the Computer Cable (#21) and Handpulse Wire (#26) in the
Console Mast (#2) with the wires from the Main Frame before you slide
the Console Mast onto the Main Frame. Be careful not to pinch any of
the wires during this step.
3. Insert the Console Mast (#2) onto the Main Frame (#1) and use the
Allen Wrench (#131) to tighten with 4 Socket Head Cap Bolts (#100), 4
Flat Washers (#99), 5 Split Washers (#98) and 1 Curved Washer (#101).
4. Connect the Console (#19) with the Computer Cable (#21) and
Handpulse Wire (#26) to the Console Mast (#2) and use Combination
M5 Allen Wrench & Phillips Head Screw Driver (#130) to secure with 4
Phillips Head Screws (#81).
RSX1500 Assembly Instructions
Console Mast & Stabilizers
1
Hardware Step 1
#131. 6x27x120L_L Allen
Wrench
#100. 5/16”x 3/4” Socket
Head Cap Bolts - 9pcs
#98. 5/16”x1.5T Split
Washers - 9pcs
#99. 4 5/16”x18x1.5T Flat
Washers - 8pcs
#101. 5/16”x19x1.5T
Curved Washer - 1pc
#130. Combination M5 Al-
len Wrench & Phillips Head
Screw Driver
#81. M5x12L Phillips Head
Screws - 4pcs
 Loading...