RSX1500 Seated Stepper
11
5
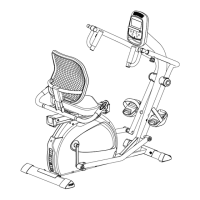
1. Install Seat (#65) on Sliding Seat Assembly and use Allen Wrench & Phillips Head Screw Driver
(#130) to secure with 4 Phillips Head Screws (#106).
2. Install Handle Bar (#7) on the Sliding Seat Assembly by using Allen Wrench (#131) to tight 4 of
Button Head Socket Bolts (#92), going through Handle Bar (#7) and 4 Flat Washers (#93), then use
Wrench (#129) to tighten 4 Nyloc Nuts (#94).
3. Install Seat Back Fixing Plate (#16) on the Handle Bar (#7) by using Allen Wrench (#131) to tight 2
Button Head Socket Bolts (#95), going through Handle Bar (#7) and 2 Flat Washers (#93), then use
Wrench (#129) to tighten 2 Nyloc Nuts (#94).
4. Install Seatback (#64) on Seat Back Fixing Plate (#16) and use Allen Wrench & Phillips Head Screw
Driver (#130) to tighten with 4 Phillips Head Screws (#97) and 4 Flat Washers (#89) to secure Seat
Back Fixing Plate (#16) then with Seatback Cover (#56).
5. Connect Lower and Upper handpulse wires (#27,26).
Lower Crank Arms & Pedals
#130. Combination M5
Allen Wrench & Phillips
Head Screw Driver
#106. M6 × 35L_Phillips
Head Screws - 4pcs
#131. 6 × 27L × 120L_L
Allen Wrench
#92. 3/8” × 1-3/4” Button
Head Socket Bolts - 4pcs
#93. 3/8” × 19 × 1.5T Flat
Washers - 6pcs
#129. 14.15m/m Wrench
#94. 3/8” × 7T Nyloc Nuts
- 6pcs
#95. 3/8” × 3/4” Button
Head Socket Bolts - 2pcs
#97. 1/4” × 1” Phillips
Head Screws - 4pcs
#89. Ø1/4” × 13 × 1.0T_
Flat Washers - 4pcs
Hardware Step 5
 Loading...