Do you have a question about the Xylem JABSCO 17850-1012 and is the answer not in the manual?
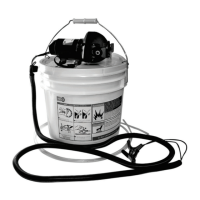
Details the polypropylene pump body and Geolast diaphragm, highlighting oil resistance.
Specifies the 12V DC motor with integral switch and associated amp draw and fuse size.
Provides lengths for the suction tube and dimensions for the receiver bucket.
Instructs to run the engine for 5 minutes to heat oil before starting the removal process.
Details inserting the probe, activating the pump, and monitoring oil flow for effective draining.
Highlights explosion hazards from sparks, need for ventilation, and burn hazards from hot oil.
Advises flushing the pump with water-based degreaser for extended storage.
Start engine and run for 5 minutes to heat the oil for quicker oil changes.
Remove the dipstick and insert the suction probe into the dipstick tube.
Attach the power cord clips to the engine's battery, red to positive, black to negative.
Activate the pump with the switch on the motor to drain the crankcase.
Lists part numbers for Dipstick Hose (17867-0000) and Pail (17089-0000).
States products are subject to a one-year limited warranty, available upon request.
| Model | 17850-1012 |
|---|---|
| Category | Industrial Equipment |
| Manufacturer | Xylem JABSCO |
| Self-Priming | Yes |
| Pressure | 50 PSI |