Maintenance
64
fastened to the transom or a stable
stand. You could be severely injured if
the outboard motor falls on you.
●
Never get under the lower unit while it
is tilted, even when the tilt support lever
or knob is locked. Severe injury could
occur if the outboard motor accidental-
ly falls.
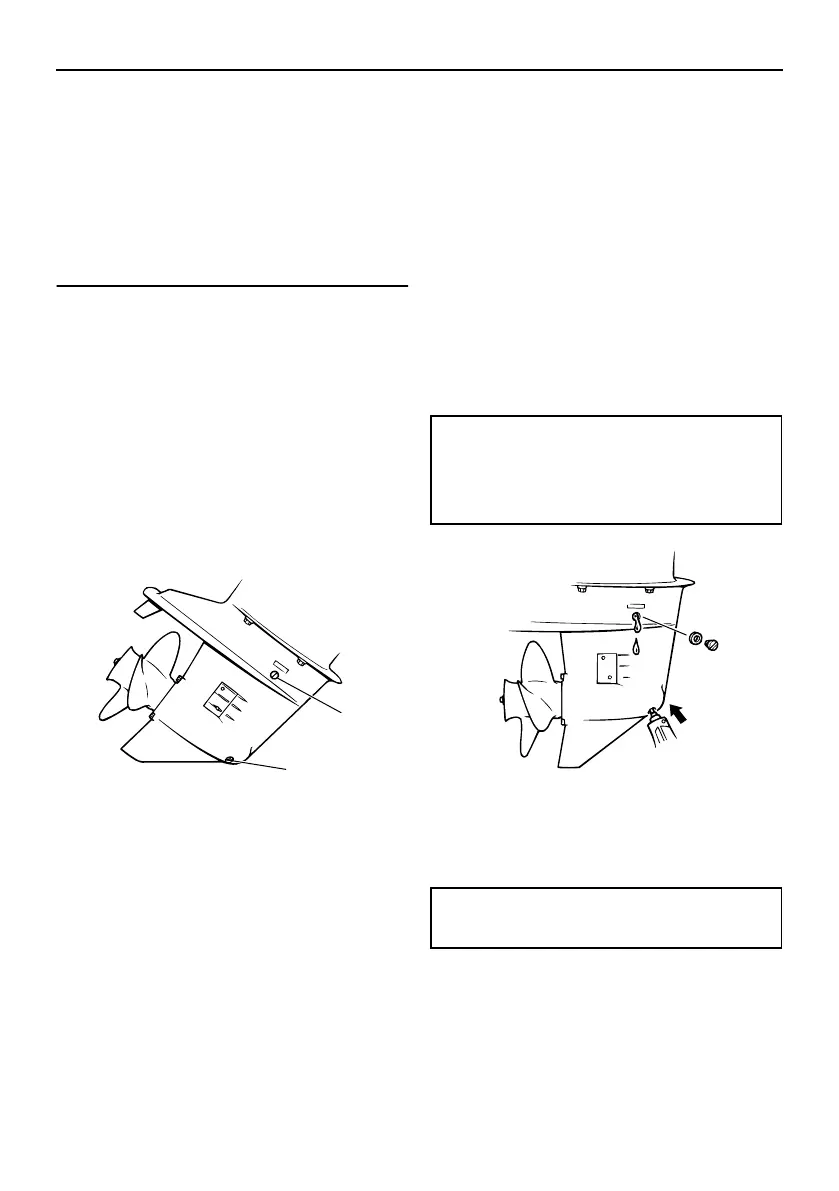
1. Tilt the outboard motor so that the gear
oil drain screw is at the lowest point pos-
sible.
2. Place a suitable container under the
gear case.
3. Remove the gear oil drain screw and
gasket.
NOTICE:
If there is an exces-
sive quantity of metal particles on the
magnetic gear oil drain screw, this
can indicate lower unit problem. Con-
sult your Yamaha dealer.
[ECM01900]
IP:
●
If a magnetic gear oil drain screw is
equipped, remove all metal particles from
the screw before installing it.
●
Always use new gaskets. Do not reuse the
removed gaskets.
4. Remove the oil level plug and gasket to
allow the oil to drain completely.
NOTICE:
Inspect the used oil after it
has been drained. If the oil is milky,
water is getting into the gear case
which can cause gear damage. Con-
sult a Yamaha dealer for repair of the
lower unit seals.
[ECM00711]
IP:
For disposal of used oil, consult your
Yamaha dealer.
5. Put the outboard motor in a vertical po-
sition. Using a flexible or pressurized fill-
ing device, inject the gear oil into the
gear oil drain screw hole.
6. Put a new gasket on the oil level plug.
When the oil begins to flow out of the oil
level plug hole, insert and tighten the oil
level plug.
7. Put a new gasket on the gear oil drain
screw. Insert and tighten the gear oil
1. Gear oil drain screw
2. Oil level plug
ZMU03738
2
1
Recommended gear oil:
Hypoid gear oil SAE#90
Gear oil quantity:
0.370 L (0.391 US qt, 0.326 Imp.qt)
Tightening torque:
9 Nm (0.9 kgf-m, 6.6 ft-lb)
ZMU03739