CONNECTING SPEAKERS & SUBWOOFER
EASY SETUP GUIDE
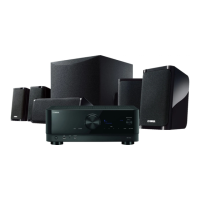
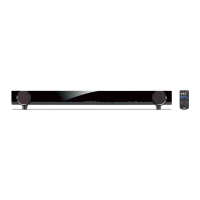
YHT-5960U
Get ready to immerse yourself in exceptional sound.
Use this Easy Setup Guide to help you get started or download the Yamaha AV Setup guide app for your mobile device (available for iOS
®
or Android™). Refer to your owner’s
manual for advanced use and instructions. You may need the following items, which are not included in the package: wire cutter/stripper, HDMI
®
cables or optional wall-mount-
ing hardware such as brackets, molly anchor screws or sheet metal screws.
The following items are included in the box:
• Four surround speakers, one center speaker and one subwoofer
• AV Receiver
• Remote control and two AAA batteries
• Speaker wire, subwoofer cable, YPAO™ microphone
(see receiver manual for more details)
• Non-skid pads (for front, center and surround speakers)
• AM and FM antennas
Speaker cables have two wires: one for connecting to the negative (-) terminal of the receiver
and speaker, and the other for connecting to the positive (+) terminal.
1 Remove 3/8" of insulation from the end of the speaker cable and twist the bare wires
firmly together.
2 Loosen speaker terminals and attach as shown in diagram.
3 Connect subwoofer with supplied subwoofer cable to connect to the receiver’s preout jack.
Make sure AV receiver is not plued in while connecting speakers.
ANTENNA
FMAM
AUDIO 5AUDIO 4
OPTICAL COAXIAL
HDMI
CENTER FRONT
SURROUND
/ZONE B/BI-AMP
SPEAKERS
PRE OUT
SUBWOOFER
AUDIO 2
(3 MUSIC)
AUDIO 1
AUDIO 3
NETWORK
HDMI OUT
eARC/ARC
( 2 RADIO )
(4 NET RADIO)
1 2 3 4
(1 MOVIE)
1
2
75
FRC FL SR SL
FM antenna (supplied)AM antenna (supplied)
Hold down Insert Release
Assembling the AM antenna
Place the AM
antenna on a
flat surface.
Fix the end of the
FM antenna to a wall.
(Pin/Tack not included)
FR FL
C
SR SWSL
AUDIO 5AUDIO 4
OPTICAL COAXIAL
CENTER FRONT
SURROUND
/ZONE B/BI-AMP
SPEAKERS
PRE OUT
SUBWOOFER
AUDIO 2
(3 MUSIC)
AUDIO 1
AUDIO 3
1
2
FRC FL SR SL
ANTENNA
FMAM
AUDIO 5AUDIO 4
OPTICAL COAXIAL
HDMI
CENTER FRONT
SURROUND
/ZONE B/BI-AMP
SPEAKERS
PRE OUT
SUBWOOFER
AUDIO 2
(3 MUSIC)
AUDIO 1
AUDIO 3
NETWORK
HDMI OUT
eARC/ARC
( 2 RADIO )
(4 NET RADIO)
1 2 3 4
(1 MOVIE)
1
2
75
FRC FL SR SL
21 3 4
10 mm
(3/8")
10° to 30° 10° to 30°
SW SW
FL FLSLFR
SR
C
FR SR
C
SL
10° to 30° 10° to 30°
SW SW
FL FLSLFR
SR
C
FR SR
C
SL
Set up the speakers in the room
using the diagram as a reference.
The subwoofer may be placed on
either side of the front speakers
depending on the room layout
and personal preference.
Front speaker (L)
Front speaker (R)
Center speaker
Surround speaker (L)
Surround speaker (R)
Subwoofer
*Speaker stands not included
Optional Speaker Placement
Place all speakers at the front to enjoy virtual
5-channel surround sound when rear speaker installation
is not possible. Select this feature in “Settings.”
5.1-Channel System 5.1-Virtual CINEMA FRONT