EasyManua.ls Logo

YARDLOCK SHED LOCK User Manual

Default Icon
4 pages
To Next Page IconTo Next Page
Page #1 background imageLoading...
Page #1 background image
1
Close SHEDLOCK and rotate
dials to desired combination.
Fermez le boîtier SHEDLOCK
et faites tourner les cadrans pour
obtenir la combinaison souhaitée.
Cierre el SHEDLOCK y gire
los números a la combinación
deseada.
Open SHEDLOCK move lever
to original position, and install
rubber cover.
Ouvrez le boîtier SHEDLOCK,
replacez le levier dans sa position
initiale et posez le capuchon de
caoutchouc.
Abra el SHEDLOCK, mueva la
palanca a su posición original e
instale la tapa.
Remove rubber cover and
move lever to learn position.
learn position
position de réinitialisation
posición de aprendizaje
lever
levier
palanca
Retirez le capuchon de
caoutchouc et placez le levier
dans la position de
réinitialisation.
Retire la cubierta de goma
y mueva la palanca a la
posición de apredizaje.
6.31.2
1.1
Screws
Vis
Tornillos
SHED LOCK
Latch bracket
Couvercle du pêne
Cabezal del pestillo
Back plate x2
Plaque de fixation x 2
Chapa trasera x 2
SHEDLOCK
A
B
C
D
Important The following instructions are for out-swinging shed doors.
Important Les instructions suivantes concernent les portes de cabanon à ouverture vers l'extérieur.
Importante Estas instrucciones son para puertas que abren así afuera.
Wood bit
Mèche à bois
Broca para madera
Parts in the box
Pièces dans la boîte
Piezas
Installation Guide
Guide d’installation
Guía de instalación
Video Instructions
Vidéo d’instructions
Video de instrucciones
Question and Answer IconNeed help?

Do you have a question about the YARDLOCK SHED LOCK and is the answer not in the manual?

YARDLOCK SHED LOCK Specifications

General IconGeneral
BrandYARDLOCK
ModelSHED LOCK
CategoryLocks
LanguageEnglish

Summary

Set a New Combination

Remove Rubber Cover and Move Lever to Learn Position

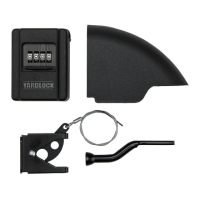
Prepare the SHEDLOCK by removing the rubber cover and moving the lever to the learn position.

Close SHEDLOCK and Rotate Dials to Desired Combination

Set the new combination by closing the SHEDLOCK and rotating the dials.

Mount Back Plate

Mount Back Plate to Swinging Door

Attach the back plate (C) to the inside edge of the swinging door.

Drill Hole for Cable

Drill a 3/8" hole through the back plate and the door.

Mount Latch

Mount Latch Assembly

Install the latch assembly (A) using the provided screws (F).

Feed Latch Pull Wire

Route the latch pull wire through the 3/8" hole.

Latch and Latch Bracket Alignment

Align Latch and Latch Bracket

Align the latch and latch bracket with a small space between them.

Install SHEDLOCK Unit

Unlock SHEDLOCK with Default Combination

Open the SHEDLOCK using the default combination 0-0-0-0.

Push Cable Through Hole

Feed the cable through the large hole in the SHEDLOCK unit.

Mount SHEDLOCK on Door

Mount SHEDLOCK with Aligned Holes

Secure the SHEDLOCK unit to the swinging door by aligning the holes.

Secure Cable to Unit

Fasten the cable to the SHEDLOCK unit after installation.

Normal Operation

Enter Access Code

Input the correct code to unlock the SHEDLOCK.

Open SHEDLOCK and Door

Unlock the SHEDLOCK and open the associated door.

Close SHEDLOCK

Secure the SHEDLOCK unit after closing the door.

Scramble Dials

Rotate the dials to scramble the combination for security.

Close Shutter

Close the protective shutter on the SHEDLOCK.

Close Door

Ensure the shed door is closed after operation.

Yearly Maintenance

Lubricate Dials

Apply penetrating oil to the SHEDLOCK dials annually.

Related product manuals