Do you have a question about the Yardworks 060-2398-8 and is the answer not in the manual?
Details the type of charger, specifying it as cordless.
Specifies the input voltage and frequency for the charger.
Indicates the voltage output of the charger.
States the current supplied by the charger.
Provides the estimated time required to fully charge the battery.
Identifies the type of battery compatible with the charger.
Lists the weight of the charger unit.
Indicates the electrical protection class of the charger.
Avoid using the charger outdoors or in wet/damp conditions to prevent electric shock.
Avoid using unrecommended attachments to prevent fire, shock, or injury.
Handle the charger cord with care; do not carry by cord or yank from outlet.
Position cords to avoid damage, tripping hazards, and electric shock.
Protect cords and charger from heat, oil, sharp edges, and moving parts.
Keep petroleum-based products away from plastic parts to prevent damage.
Use of extension cords is discouraged; if used, ensure proper type and condition.
Inspect charger cords for damage to prevent short circuits and electric shocks.
Do not operate a damaged charger; seek professional inspection and repair.
Do not disassemble the charger; contact authorized service for repairs.
Disconnect charger from power when not in use to reduce shock/damage risks.
Avoid touching exposed electrical contacts on the charger or battery terminals.
Ensure the charger is used indoors or in dry locations, away from water.
Save and review instructions; share with others to ensure safe product use.
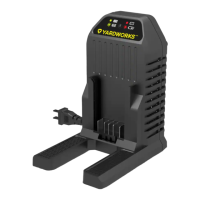
Identifies the LED indicator for charging status.
Identifies the main part of the charger where the battery connects.
Locates the button to release the battery pack from the charger.
Identifies the battery that is charged.
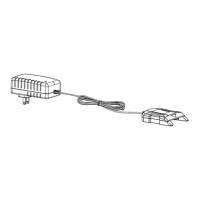
Identifies the power adapter component.
Refers to the upper protective casing of the charger.
Identifies the main electronic circuit board within the charger.
Refers to internal wiring components of the charger.
Identifies the plug component certified by UL standards.
Refers to the lower protective casing of the charger.
Identifies the direct current power cable.
Refers to the main housing or body of the charger, possibly including indicator lights.
Identifies the upper casing specifically for the charger.
Identifies the lower casing specifically for the charger.
Identifies the main electronic circuit board for the charger.
Refers to electrical connection points on the charger.
Identifies the fasteners used in the charger assembly.
Instructions for charging the battery pack, including safety notes.
Guidance on initial battery charging before first use of the tool.
Detailed steps for connecting and charging the battery pack, including indicator light meanings.
Instructions for cleaning and general care of the charger.
Addresses inability to fit the battery into the charger and the expected indicator light.
Explains factors influencing charging time, like discharge level and temperature.
Defines common electrical symbols like Volts, Amperes, Hertz, Watts, and current types.
Explains symbols related to per minute, reading manuals, warnings, and usage locations.
Details the manufacturer's warranty coverage and duration.
Lists conditions and parts not covered by the warranty.
Specifies warranty coverage for normal wear parts like blades and tires.
Provides contact information and procedures for warranty service claims.
Outlines the purchaser's responsibility for shipping costs related to warranty service.
Clarifies limitations on implied warranties and exclusive remedies.
The Yardworks 20 V MAX* Lithium-Ion Battery Charger (model 060-2398-8) is designed to efficiently and safely charge compatible 20 V MAX* lithium-ion battery packs. This instruction manual provides essential information for operating and maintaining the charger, ensuring optimal performance and user safety.
The primary function of this device is to charge 20 V MAX* lithium-ion battery packs. It converts standard household AC power (120 V~60 Hz) into the appropriate DC voltage and current (20 V ---, 1.5 A) required for charging lithium-ion batteries. The charger is equipped with an indicator light that communicates the charging status to the user. When connected to a power supply, the indicator light turns green, signifying that the charger is powered on. Once a battery pack is properly inserted, the light turns red, indicating that charging is in progress. Upon completion of the charging cycle, the light returns to green, signaling that the battery is fully charged. The charger is designed with safety features, including protection against deep discharging of the battery pack, which automatically switches off the tool when the battery is empty to prevent damage.
Before using the battery charger, it is crucial to read and understand all instructions and safety warnings provided in the manual, on the battery charging stand, on the battery pack, and on the battery-powered product. This ensures safe operation and prevents potential injuries or damages.
To charge a battery pack:
It is important to note that new battery packs or those that have not been used for extended periods may not reach full charge until they have been fully discharged through use and recharged several times.
The charger should only be used indoors and in locations where contact with water is unlikely. It is specifically designed to work with the designated battery pack included with the charger; charging other types of battery packs may cause them to burst, leading to personal injuries or damages.
Avoid using the charger outdoors or exposing it to wet or damp conditions, as water entering the charging stand increases the risk of electric shocks. Do not abuse the cord on the battery charger; never carry the charger by its cord or yank the cord to remove the transformer from the power outlet. Ensure the cord is positioned to prevent it from being stepped on, tripped over, or coming into contact with sharp edges, moving parts, heat, or oil. Damaged cords should be replaced immediately.
If the battery charge runs out after continuous use or exposure to direct sunlight or heat, allow the tool to cool down before re-charging to achieve a full charge.
Proper maintenance of the battery charger ensures its longevity and safe operation.
The manual also addresses common troubleshooting scenarios, such as difficulties fitting the battery into the charger (ensure correct orientation) and variations in charging times (influenced by battery discharge level and ambient temperature). If the battery pack is very hot, it must be removed from the charger and allowed to cool to ambient temperature before recharging.
By following these guidelines, users can ensure the safe and effective operation and maintenance of their Yardworks 20 V MAX* Lithium-Ion Battery Charger.
| Voltage | 12V |
|---|---|
| Amperage | 2A |
| Input Voltage | 120V AC |
| Output Voltage | 12V DC |
| Output Current | 2A |
| Compatibility | 12V Lead Acid Batteries |
| Safety Features | Short-circuit protection |
| Battery Type | Lead-Acid |
| Charging Modes | Standard |